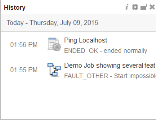
History Widget
The History widget provides information about the tasks you have most recently started, the latest one being at the top of the list. The time that is displayed to the left of the task refers to its end time.
Configuring the History Widget
- Hover your mouse over the widget to enable its toolbar
-
Click the setting icon to open the Settings pane at the bottom half of the widget.
The widget is expanded to occupy the entire dashboard and allow you to make your changes. When you are done, click the maximize/minimize button on the widget toolbar.
-
The Settings tab is displayed by default
- The default Title of the widget is History. You can rename it here
-
In Refresh Frequency specify the interval at which the contents of the widget is automatically refreshed. Tasks already finished are removed from the list at the interval you indicate here
- Open the Description tab to describe the widget
- Click Save and close the pane
Accessing the Task Execution Data
The Executions list provides historical details on a particular activity and allows you to further process it, provided you have the necessary rights.
- Click a task and select Executions.
-
The corresponding Executions list is displayed.
Each row is an execution of the selected task. By default, the last one is displayed at the top
-
If you want to further process a task, right-click on it to open a context menu with all the available functions.
Which functions are displayed depends on your rights and on the status of the selected activity.
For more information, see Execution Data and Available Functions Depending on the Task Status.
