Configuring SQL Server to Connect to AE and CDA DB
This section describes how to unlock port 1433 to connect to the AE & Automic Continuous Delivery Automation databases.
To Configure SQL Server
-
Enable remote connections.
- Open SQL Management Studio.
- Right-click the server name and select Properties.
- Select Connections in the left pane.
- Ensure that the Allow remote connections to this server checkbox is selected.

-
Configure SQL to listen on a static port.
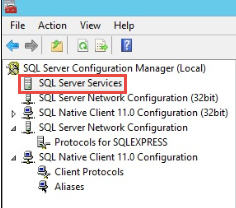
- Open SQL Server Configuration Manager.
- Click SQL Server Services in the left pane.
- In the central pane, look for the process Id of the SQL Server.
- To identify the port this process ID is listening on, type the following command in the command prompt:
netstat -ano | find /i “PID-Number-Of-SQL-Server”
Example:
netstat -ano | find /i “120” - If no results are returned, ensure that the TCP/IP protocol is enabled. To enable it:
- Click SQL Server Network Configuration in the left pane.
- Select Protocols for <instance_name>.
- Right-click the TCP/IP protocol.
- Select Enable.
- Restart SQL Server service.
- Identify the new process ID assigned to the SQL Server.
- Type the following command in the command prompt:
netstat -ano | find /i “PID-Number-Of-SQL-Server”.
Example:
netstat -ano | find /i “9154”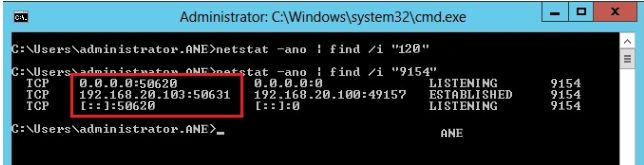
- Select SQL Server Network Configuration in the left pane.
- Right-click the TCP/IP protocol and select Properties.
- Open the IP Addresses tab.
- In the IPAll section, replace the value displayed for TCP Port with 1433.
- Restart SQL Server service.
-
In the command prompt execute the following command to check if SQL has been configured correctly:
netstat -ano | find /i “3948”
-
Enable SQL Server Browser Service.
- Open SQL Server Configuration Manager.
- Click SQL Server Services in the left pane.
- Right-click SQL Server Browser service and select Properties.
- Open the Service tab.
- Display the drop-down list by Start Mode and select Automatic.
- Click Apply.
- Click Start in the SQL Server Browser Properties window to start the SQL Browser service.
-
Configure the firewall to allow SQL-related network traffic.
- Click Advanced Settings in the left pane. The Windows Firewall with Advanced Security window is displayed.
- Click Inbound Rules.
- Click New Rule in the Actions pane.
- Select the Port option.
- Select TCP.
- Select Specific local ports and enter 1433 in the field.
- Select Allow the connection.
- Select all options (Domain, Private & Public).
- Enter a Name for the rule.
- Click Finish.
- Click New Rule in the Actions pane.
- Select the Port option.
- Select UDP.
- Select Specific local ports and enter 1433 in the field.
- Select Allow the connection.
- Select all options (Domain, Private & Public).
- Enter a Name for the rule.
- Click Finish.
- Click New Rule in the Actions pane.
- Select the Program option.
- Select This program path and click Browse.
- Navigate to this location: [C:\Program Files\Microsoft SQL Server\MSSQL11.<INSTANCE_NAME>\MSSQL\Binn\sqlservr.exe] and select sqlservr.exe.
- Select Allow the connection.
- Select all options (Domain, Private & Public).
- Enter a Name for the rule.
- Click Finish.
- Click New Rule in the Actions pane.
- Select the Program option.
- Select This program path and click Browse.
- Navigate to this location: [C:\Program Files (x86)\Microsoft SQL Server\90\Shared\sqlbrowser.exe] and select sqlbrowser.exe.
- Select Allow the connection.
- Select all options (Domain, Private & Public).
- Enter a Name for the rule.
- Click Finish.