Installing Automation.AI in On-Premises Systems
Automation.AI is an AI-platform- agnostic, stand-alone component that can communicate with multiple Large Language Models (LLMs), thus allowing you to incorporate state-of-the-art AI technology to help you design automated processes, write scripts, analyze and explain the automation output, troubleshoot issues and suggest potential solutions to those issues. The LLMs supported are Gemini, OpenAI, Azure OpenAI, and Ollama.
You can install it in Automic Automation Kubernetes Edition and on-premises systems, regardless if they have been installed manually or, for testing environments, using the ONE Installer.
Important!
-
This page outlines the installation and configuration required to install the Automation.AI component in on-premises systems. For instructions on how to install Automation.AI in AAKE, see Installing Automation.AI in AAKE.
-
Before installing Automation.AI, make sure that you have covered all preparation steps required. For more information, see On-Premises: Preparing for the Automation.AI Installation.
This page includes the following:
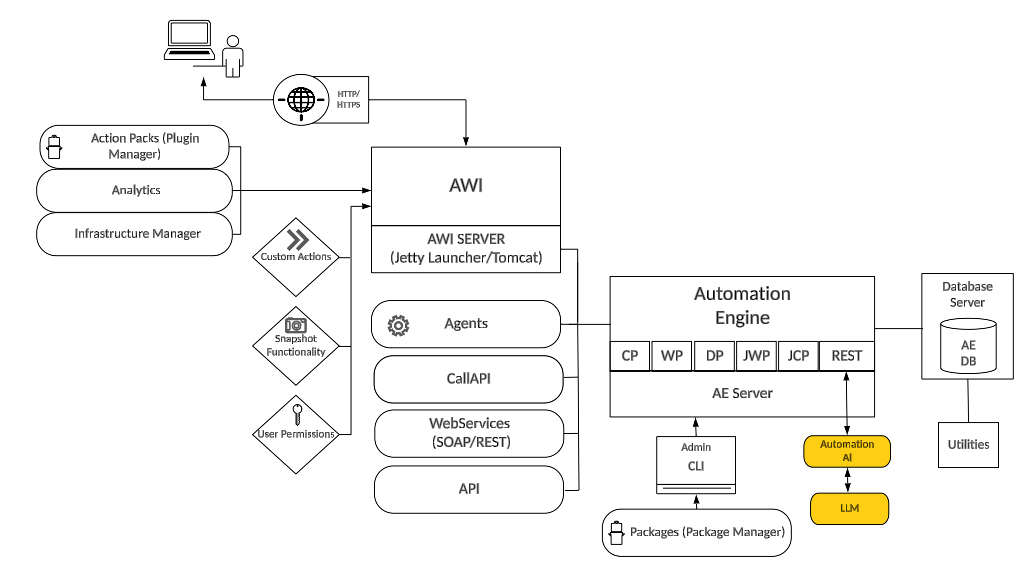
System Overview
The graphic below is a high-level overview of the installation process, highlighting the installation of the Automation.AI component.
Click the image to expand it.
Install Automation.AI with the ONE Installer
You can use the ONE Installer to install systems for proof of concepts, testing purposes, and non-production environments only.
When using it, the Automation.AI component is installed automatically. The database required for Automation.AI is also created automatically and shares the same database instance that is set up for Analytics. Since the ONE Installer takes care of the port assignment for the environment being installed, you only need to make sure that your system can connect to the relevant LLM, which you can define before the installation using the application.properties file. You can also use environment variables to define those settings. For more information, see On-Premises: Preparing for the Automation.AI Installation.
Optionally, if you do not want to use the default TLS configuration the ONE Installer provides, you can also configure custom TLS settings by providing your own certificate, private key, and private key password. For more information, see ONE Installer - Single-Box Installation.
Install Automation.AI Manually
Automation.AI operates as a standalone application within the broader Automic Automation package. It relies on its own dedicated REST API to facilitate communication between the Automation Engine and Automation.AI.
Important! The Automation.AI REST API currently does not require authentication. To prevent unauthorized access, it is strongly recommended to deploy Automation.AI strictly behind a firewall or within an isolated, secure internal network.
Before installing the Automation.AI component, make sure that a dedicated database for Automation.AI is available. When installed manually, this database must be created and configured in advance.
Next, ensure that you have defined the server port and the LLM you want to use in the application.properties file. You can also use environment variables to define those settings. For more information, see On-Premises: Preparing for the Automation.AI Installation.
To trigger the manual installation, use the automation-ai-launcher.jar file delivered with the offering and run it using the following command:
java -jar automation-ai-launcher.jar
You can also add the Automation.AI component to the ServiceManager. For more information, see ServiceManager - Dialog Program.
Once the system has been installed, make sure you define the endpoint used for the communication to the Automation.AI component by the JWP using the AUTOMATION_AI_ENDPOINT key of the UC_SYSTEM_SETTINGS variable. For more information, see AUTOMATION_AI_ENDPOINT.
See also: