You will probably work mainly with the Process Assembly Perspective and, to check the results of your object definition, with the Process Monitoring Perspective. On this topic you can find examples that illustrate how to use some of the objects you will probably have to work with once and again.
This topic provides information on the following:
- Creating a Folder and a Job
- Creating File Transfers
- Creating and Responding to Notifications
- Creating Workflows
- Using Calendars in Schedules
- Creating Queues
Using a consistent naming policy for your objects is important! Before you start creating them we recommend you to have a look at Using Consistent Naming Conventions for your Objects, where we provide detailed information on naming rules, best practices and examples.
Take a look at our Use Cases and Examples section, where you will find descriptions to design objects and to combine them.
Activities and processes managed with the Automation Engine are shown in the form of objects. This brings about significant advantages:
- Distributed operations: Complex processes can be handled in simple individual steps.
- Re-usability: Partial tasks can be integrated in various processes.
- Simple maintenance: Modifications can easily be assumed.
- Clarity: Processes have a clear structure.
- Expandability: New requirements can easily be integrated.
What types of objects are available? Refer to the topic Object Classes and Object Types which lists all object types and briefly describes the tasks for which the particular objects can be used. In this section and the following ones, various object types are used to familiarize you with the functioning of the Automation Engine and present some suggestions of how you might structure your own processes.
Start by creating a folder. You will use this folder to store the examples jobs described in this guide.
- Select the Processing Assembly perspective.
- Click the
 button in the Explorer tab's toolbar.
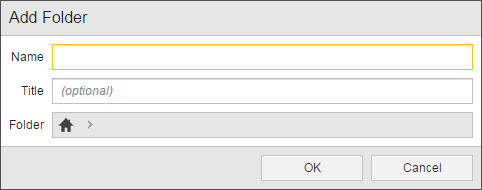
 - Enter a name and optional title for the folder. Optionally change the folder location in the Folder field.
The AWI opens the Explorer tab. By default the Process Assembly perspective shows the folders under the AE system's name and the client number.
The AWI opens the Add Folder dialog shown below.
Next, create a simple OS Job object. This job will be used in later examples. Job objects can be used to execute commands on computers or in Enterprise Business Solutions (SAP, PeopleSoft, Oracle Applications, Siebel). Commands, therefore, are widely used in this object type. Note that there are individual Job objects available for each supported platform.
- Open the folder you created.
- Click the
 button in the Explorer tab's toolbar.
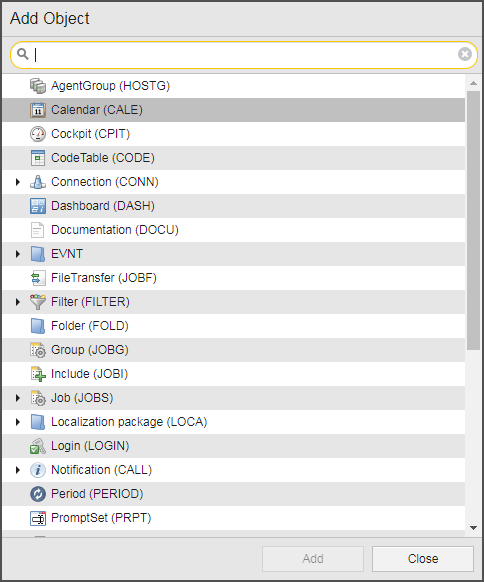
 - Select the object type JOBS and an OS job type, then click Add Object.
- Optionally rename the object by changing the default name shown in the Name field and give it a description in the Title field and click Rename.
-
Select the Attributes page.
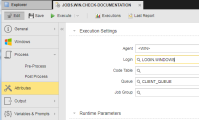
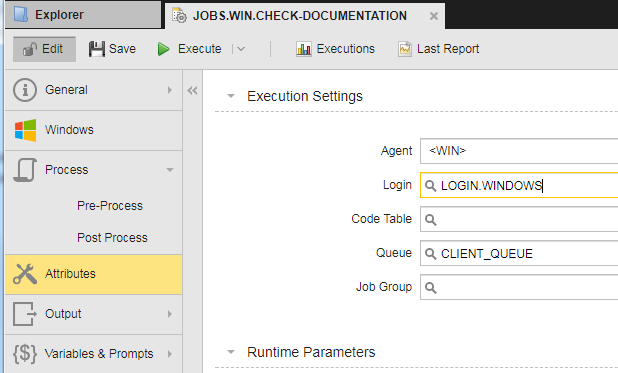
- Select an OS agent and a login for the job.
- Select Process page.
-
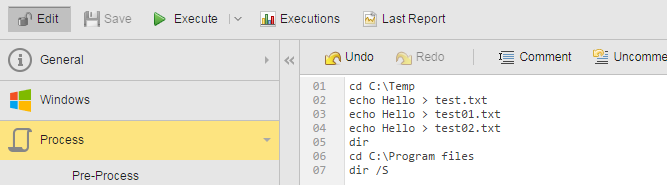
Enter some OS commands as shown below.

- Click
 to save the job.
 - Click
 to run the job.
 - Click
 to view the output of the job.
The AWI opens the Add Object dialog shown below. Click the image to expand it.
The Job object is created with a default name.
Automic strongly recommends that you define and use consistent naming conventions for your objects. But any name is probably fine for your first Job object.
The job object is opened to the OS-specific page. In the image below, it is the Windows page. Look around at the fields on this page and on the other pages. But you don't need to change any of the default values on this page at this time.
Click the image to expand it.

For information on what agent to login to select, see you Automation Engine administrator.
You use this and the other process pages to enter processing instructions in Automic's scripting language. The script is processed when the object is either activated or started, which you can define on the Attributes Page.
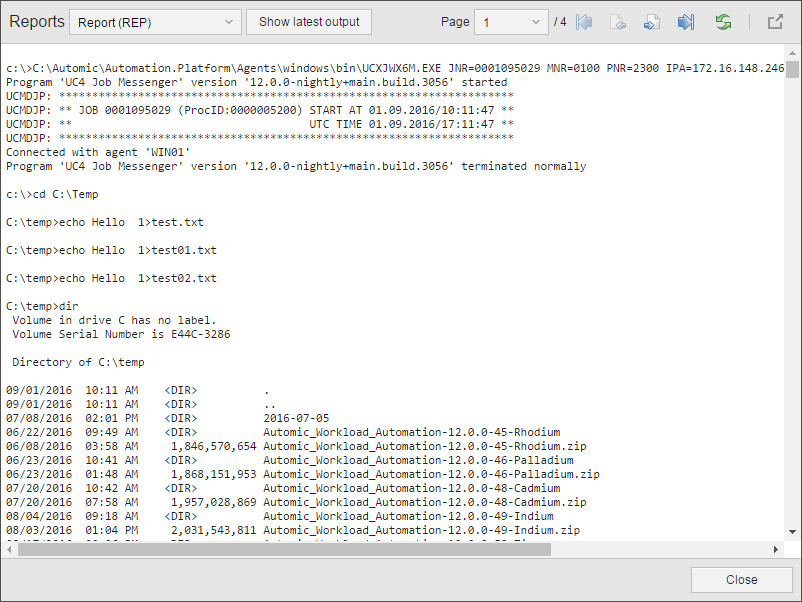
The AWI opens the Reports dialog for the last run of the Job. Click the image to expand it.
Since these were the first objects you created, this topic includes instructions for every step. But now that you've done it once, you can apply the same concepts to the rest of the objects you create, so these steps won't be listed. But remember, you can always find them in the online help.
An integral part of processing is the transfer of files. The Automation Engine therefore provides an extra object type for this activity. A statistics overview is available for file transfers (as for Job objects) so that the individual executions can be traced.
We are now going to create a file transfer. Prepare several files that can be transferred to a different computer.
- From your folder, and add a new File Transfer object the same way you created your job object.
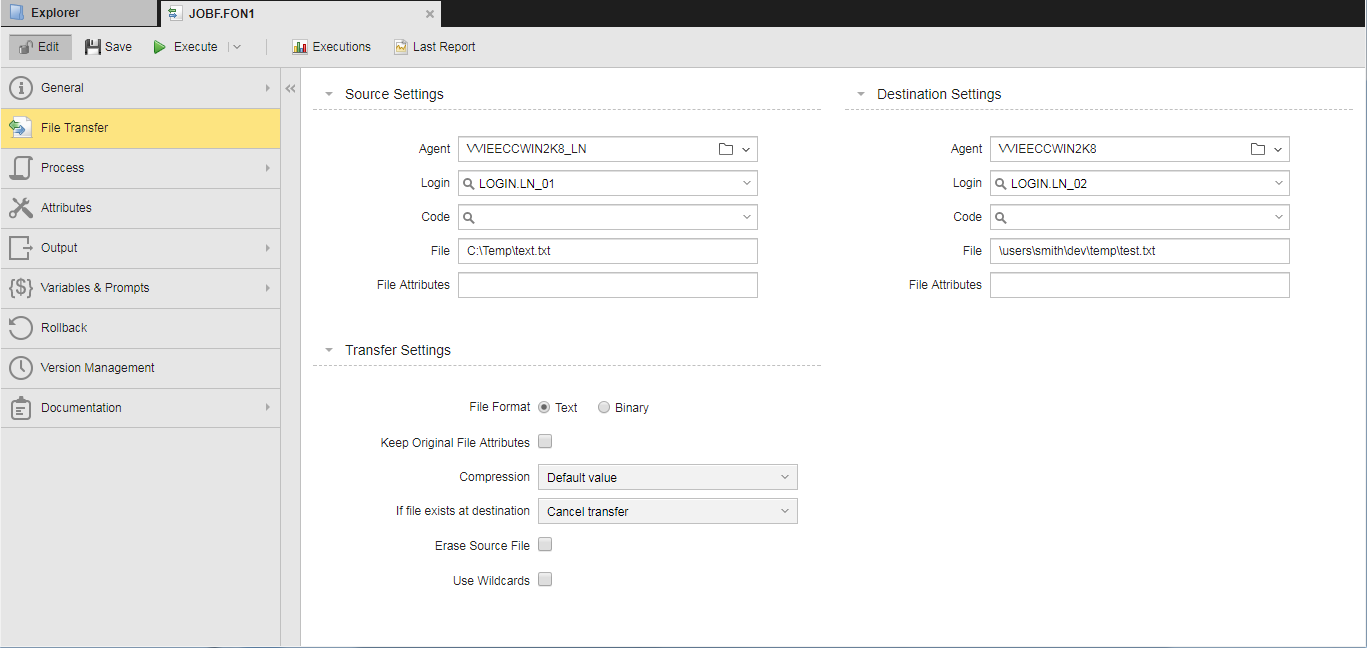
- On the File Transfer page select the following for the source and destination:
- Agents and logins
- Fully pathed file(s) to transfer.
Click the image to expand it.
Now run the file transfer the same way you ran your job. Next, create a File Transfer where you use the * wildcard to copy all files with a particular naming convention.
Creating and Responding to Notifications
Notifications are very important and commonly used objects. They are used to send messages in the Automic Web Interface or through email. There are various ways to indicate when and in which situations you want to notify someone of something. The table below describes them and provides examples.
| Where/When | Setting Descriptions |
|---|---|
| Runtime Page |
When you define the general settings of an executable object you also assign it a maximum and a minimum runtime. If the time needed to execute the object deviates from these values, you can have the system execute a task, which can be a notification object:
In the example above, if the execution of the job takes longer than 5 minutes, CALL.GET.ROOT.CAUSE is executed. The type of notification defined here is either sent or displayed online. In this case, CALL.GET.ROOT.CAUSE is as follows:
This is a request, which means that it will be displayed with high priority in the Requests dialog that open when clicking the notifications area on the menu bar. For example, this is where you set it in a Workflow:
And here in a Schedule:
|
| Output Page in Jobs |
When defining the output of an executable object you can specify a status or a return code and tell the system to deliver a notification as soon as they are reached when executing that object.
In this example if the execution of the job gets the ENDED_NOK status, the type of notification defined in the EMAIL_CAUSE notification object will be delivered to the user. EMAIL_CAUSE is as follows:
This is an email. Its subject is retrieved from the &$ACTIVATOR_RUNID# variable and the content defined in the Message input field is delivered to the ADMIN recipient. |
| Attributes Page |
For workflows (JOBP), schedules (JSCH) and Remote Task Monitor (JOBQ), when specifying their attributes you can also have the system execute a task when the task has a certain status. This task, again, can be a notification object:
In the example above, as soon as the task has the ANY_ABEND status, the type of notification defined in CALL_ALARM.GRM is either sent or displayed online. |
| Process Pages |
In this page you can use the Automation Engine scripting language to create customized popup notifications. Click here for Examples of Notification Object Scripting. |
|
Workflows |
If a task in a workflow cannot be started at the time checkpoint, you can specify that a different task be executed. Again, this can be a notification object:
The same applies if a task in a workflow does not end with the expected status and therefore blocks the execution of the next task:
Likewise, the action defined in the conditions (pre and post conditions) assigned to a workflow can also trigger the execution of a notification. See Time & Dependencies. |
| Remote Task Manager, Workflow and Schedule objects |
One or several individual tasks do not have the specified end status. For example, in a Workflow:
For example, in a Schedule:
|


Workflows comprise multiple executable objects that can run sequentially or in parallel depending on how you define them. When you add executable objects to a Workflow, you can define properties to override their settings. You can add the same executable object to multiple Workflows, or even multiple times to the same Workflow. This is part of the Automic object-oriented design where you define an object once and use it many times.
Click the image to expand it.
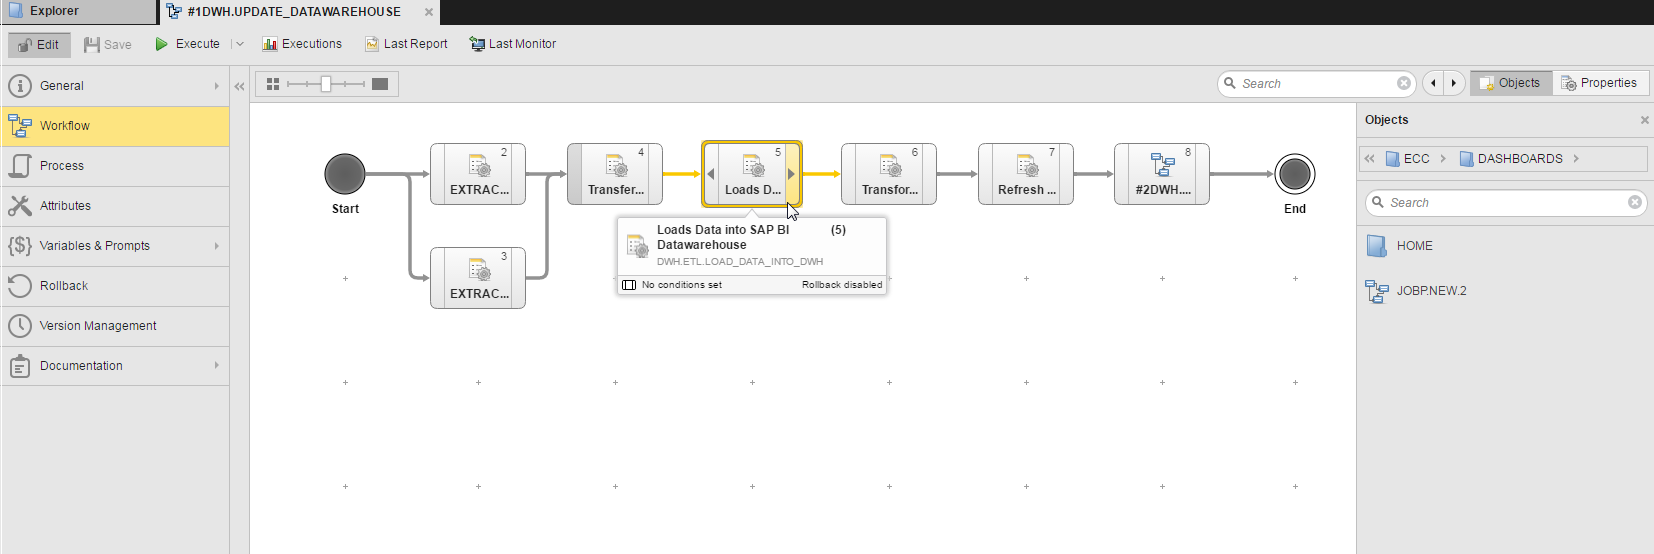
You add objects to a Workflow on the Workflow tab. You can drag from the Objects list on the right side of the page into the Workflow structure. Once you've placed your executable objects from into the Workflow structure, you can use the line connectors to define the order in which tasks are processed within workflows. To use the line connectors:
- Hover the mouse over the start or the end point of a task.
Arrow symbols are displayed, from which you can start drawing the lines.
- Click and hold the arrow symbol and drag it to the task you want to link.
- Release the mouse button.
The two tasks are now linked to each other.
Next you can right-click an executable object in the Workflow and click Properties to edit how that object will run as part of this Workflow.
Create a sample Workflow object and add some objects to it. Then override some of the objects' properties and run the Workflow.
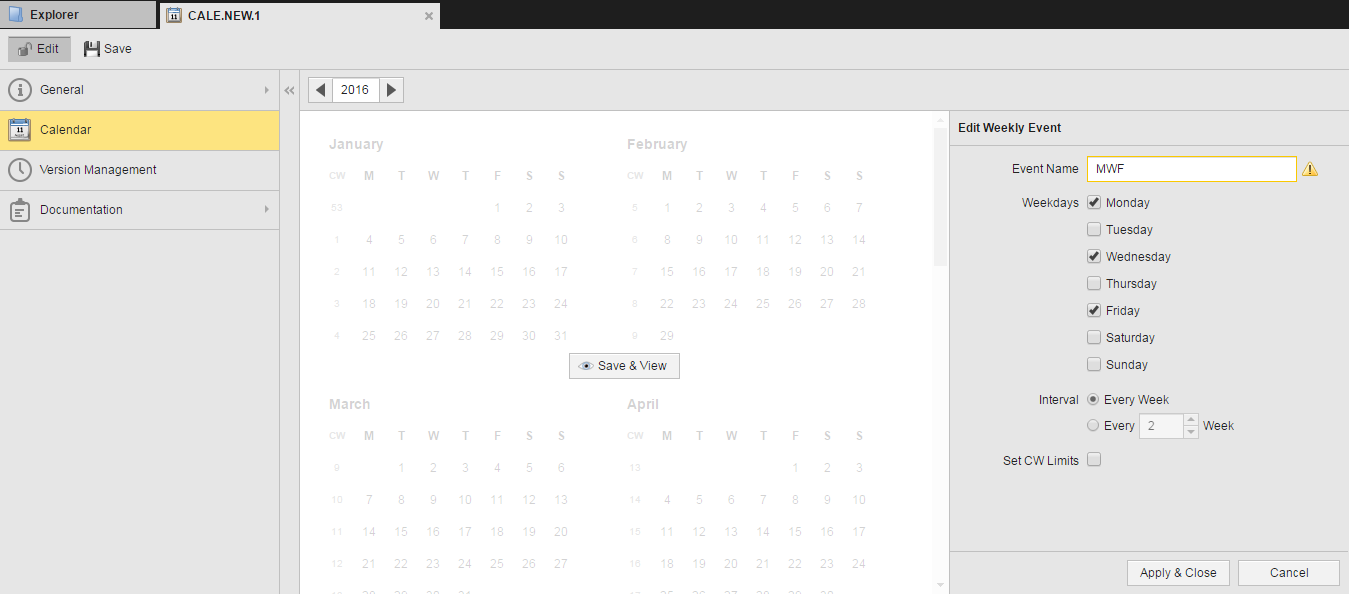
A Calendar object is a container for calendar events. A Calendar Event is a set of rules that result in selecting certain days in the calendar. You can include as many Calendar Events as you need in a Calendar object. You can also reuse the events assigned to a Calendar when defining another one.
Create a Calendar object. Add a weekly event to the calendar and specify Monday, Wednesday, and Friday as the days. Click the image to expand it.
Schedule objects collect tasks that you want to execute at regular intervals. They provide options to define scheduling parameters, such as the periodicity with which the tasks in the schedule should be executed and the times at which they will be started. They also allow you to modify the properties of the tasks you have included in the schedule. These changes apply to the tasks only when processed within the schedule, the objects themselves are not affected by them.
Designing schedule objects takes place at two levels:
- At schedule level you define periods, which are the time frames that determine the regularity with which the tasks will be executed.
You define the period duration and its turnaround time in the Attributes page. Tasks are executed once within a period.
- At task level you define specific time parameters, such as task start time and offset in relation to the period specified for the schedule. If necessary, you can modify certain properties of the tasks.
You do this in the Schedule page.
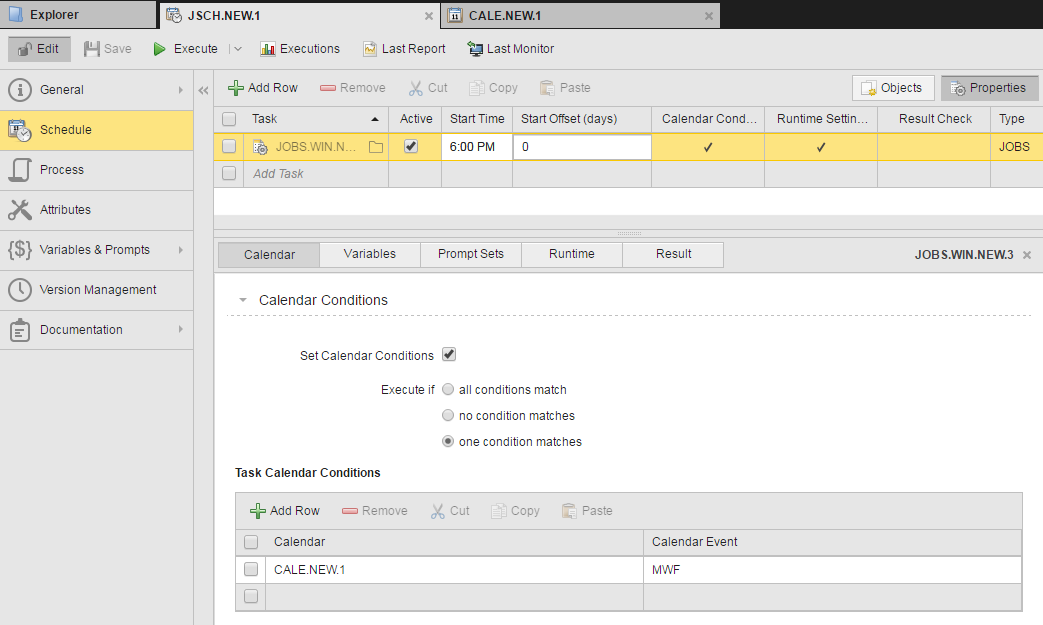
So far, we have manually started our objects. As this is non-productive when a large number of objects are involved or for when you want to run objects after business hours. Schedules start objects in a predetermined interval - every day at 6:00 PM, for example. Go ahead and create a schedule and add one of the objects you created to it. Next, select the job and add the calendar you created as shown below. Click the image to expand it.
Now execute the Schedule manually and switch to the Process Monitoring perspective where you'll see the active Schedule object.

Select the Schedule object and click Open Monitor. The schedule monitor opens in a new tab where you can see the Job object waiting for its start time.

Queues control the flow of tasks. Every executable object runs through a queue. You assign queues on their Attributes Page, but they can be overridden. If an object has no specific Queue assigned to it, the system automatically uses the CLIENT Queue to process it. You can define multiple queues that allow different numbers of executable objects to run at the same time.
When you to define a queue, you specify a default settings and override them in the Exceptions table.
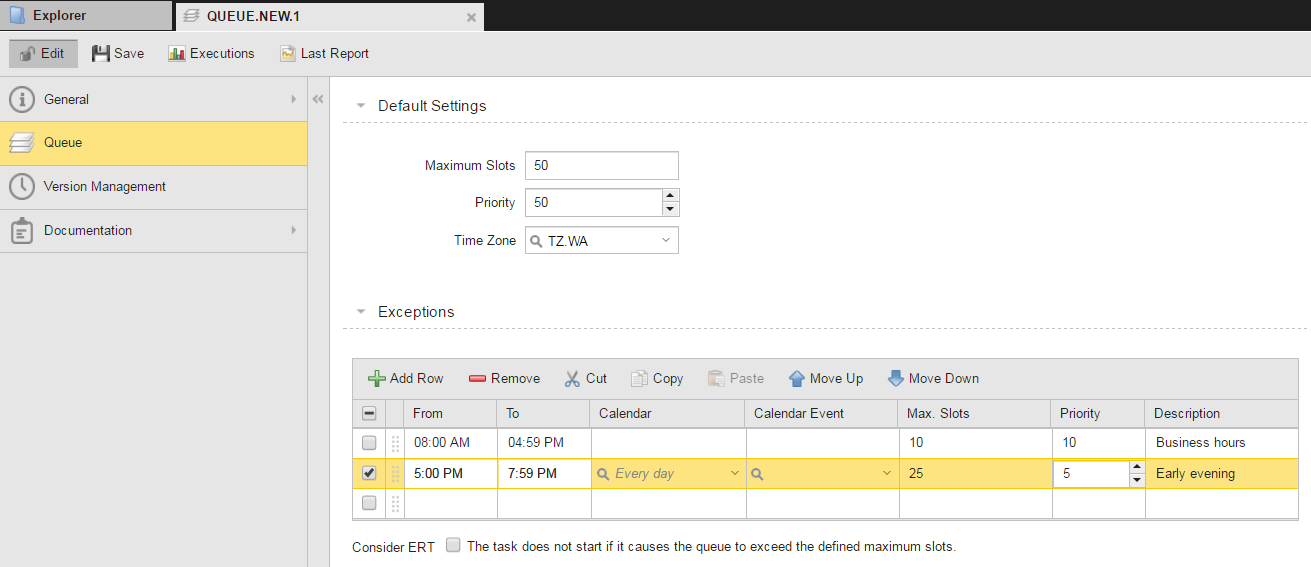
Create a queue that allows different numbers of jobs to run at different time. Try adding the Calendar object you added earlier to an exception.
Viewing the Queues in Your System
All the queues that are available in the client you are logged into are visible both in the Process Monitoring and in the Administration Perspective.
The Process Monitoring in client 0 provides overview of the Queue objects of all clients.
| Symbol | Description |
|---|---|
|
|
"START" - Object execution of the Queue object is active. The max. queue slots must show a value above 0. |
|
|
"STOP" - Object execution is deactivated. No further objects of the queue will start. |
|
|
The Queue object's max. slots are "0" - i.e. it is not possible to start tasks. This status depends on the setting specified in the Attributes tab and on the modified queue slots. The queue's status is "START". |
See also:
Take a look at the following use cases and examples before you start creating your own objects: