Working with Packs (GUI)
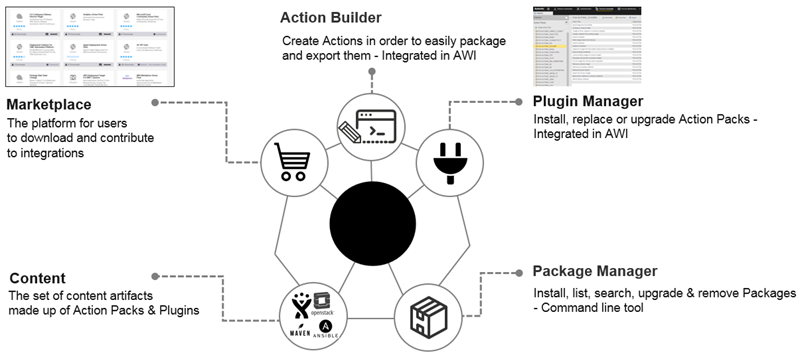
As a system administrator, you install Packs to enhance the AWA functionality. Use the Plugin Manager to manage packs integrated into AWI from the user interface. For more information, see About the Plugin Manager.
The predefined Action Packs that let you incorporate different actions into release workflows are available at https://marketplace.automic.com/.
Note: To see the Packs page in the Administration perspective you must install the Plugin Manager in the respective AWI instance. For more information, see Installing the Plugin Manager.
This page includes the following:
Viewing Packs
Packs can be accessed from the Administration perspective by selecting Packs in the navigation pane. They can also be accessed from the Process Assembly Explorer.
Installing Packs
On the Administration perspective, go to Packs and select Install Pack. Press the Upload button, navigate to the location where you have downloaded the Pack and follow the instructions of the wizard.
After the installation is complete, the new Action Pack can be found in the PACKAGES folder of the Process Assembly perspective.
Notes:
- To upgrade an installed Pack to a newer version, the same procedure can be used. The system will automatically detect the former version and prompt you to upgrade it.
- Post-fixes are also allowed in the package format schema integer.integer.integer+(chars|integer)(.(chars|integer)*) in order to support semantic versioning.
Some Packs may contain AWI plug-ins, which are installed together with the Pack. To check if the Plug-in has been registered correctly do one of the following:
-
Check the logs of the pack installation:

-
Log out and log back into AWI, select the arrow in the user and session information area (top-right corner) and select About:


Creating Packs
Before creating an Action Pack, the following should be defined:
- Purpose of the Action Pack
- What kind of technology will be used.
- What Actions will be needed and what parameters are necessary for running the Actions.
- What variables will be needed.
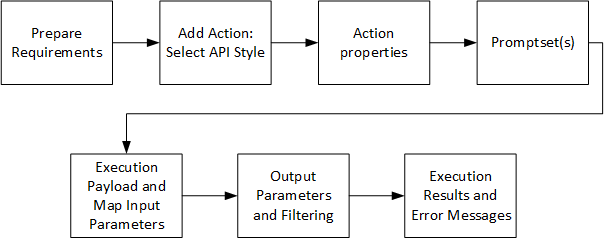
The following graphic depicts the typical workflow when creating an Action Pack:
To Create an Action Pack
- Under the Process Assembly perspective, click the Action Packs accordion tab in the sidebar.
- Select Create Action Pack. The New Action Pack dialog is displayed.
- Enter a title for the Action Pack. The name for the Action Pack is suggested automatically. The name consists of the following parts:
- PCK.CUSTOM (prefix). The prefix can be configured via the
actionbuilder.propertiesfile. For more information, see Installing the Action Builder. - Title of the Action Pack.
- PCK.CUSTOM (prefix). The prefix can be configured via the
-
Select Create Action Pack.
Exporting Packs
Packs can be exported in the Process Assembly perspective to be reused in another client or system.
Important! When exporting a Pack, ensure that the metadata contains the correct values. It is good practice to increase the version number with subsequent releases of your Pack to distinguish between different versions. The version number can be set in the Metadata object of the Pack.
To Export an Action Pack
-
On the Action Packs page of the Process Assembly perspective, right-click the relevant Action Pack and select Export.
-
On the Export Action Pack window, select Export to automatically validate and build the Pack.
-
Select Download to download the Pack and select a destination.
A semantic check is performed before exporting the Action Pack, thus ensuring that the Actions are defined correctly. The following properties are checked:
- Generate Job at = Runtime
- Deactivate on Finish = After error-free execution.
- Error-free status = ANY_OK
- Overwrite Agent's value = “&AGENT#“ or leave it empty
Note: It is not recommended to export Action Packs with a hard-coded Agent/Login set.
Cloning Packs
The cloning functionality of the Action Builder allows you to save time when creating Packs which are similar to existing ones.
Important! Action Packs can only be cloned provided the SEARCH_SCRIPT_FOR_USAGE setting in the UC_CLIENT_SETTINGS Vara is set to Y. For more information, see the Prerequisites table in Installing the Action Builder.
Note: Cloning an Action Pack results in all Actions and objects that directly belong to it (Includes, Prompsets, Workflows) to be copied.
To Clone Packs
-
On the Action Packs page of the Process Assembly perspective, right-click the relevant Action Pack and select Clone.
-
(Optional) Change the title for the cloned Action Pack.
Tip: It is recommended to enter a descriptive name because the title helps you and others to better identify the purpose of the Action Pack.
-
Enter a Name. A prefix is automatically added by the system to adhere to the Action Packs' naming conventions.
Note: Prefixes can be configured via the
action.builderfile.
The cloned Action Pack is displayed on the list.
Deleting Packs
On the Packs page of the Administration perspective, right-click the Pack you want to delete and select Remove.
See also: