AutoForecast
The AutoForecast functions gives you a preview of future activities within a certain time frame in your system. The AutoForecast page on the Process Monitoring perspective allows you to recalculate forecasts (a prerequisite for AutoForecasts) and to filter the outcome for a better overview of the results.
Whereas forecasts focus on objects and tasks, AutoForecasts aim at periods of time. You may want to know which tasks will run on a particular date, time or period of time. This allows you to plan maintenance activities, notify users in time, optimize the start times of critical processes, etc.
An AutoForecast takes a date/time frame as input (e.g. 2016-09-29 03:00:00 to 2016-06-30 06:00:00) and returns all tasks that have their logical start date within that period. Furthermore it informs you about the expected runtime and end time of each task.
Only users who have been assigned the Access to Autoforecast privilege can execute this function.
An AutoForecast simulates the execution by running the scheduled jobs as it would occur in reality. It does not use the real job scheduling engine, though; the simulation considers neither previously simulated runs nor the history of job executions. Instead, it uses estimated runtimes calculated from the latest 25 runs of the selected tasks.
Two Phases to Create the AutoForecast
Performing this simulation on a client with many scheduled objects can take a long time and may impact system performance severely. To mitigate these issues, the AutoForecast generation process is two-fold:
-
Calculate/Recalculate the AutoForecast Cache.
The system calculates an AutoForecast cache for the time frame defined in AUTO_FORECAST_DAYS (see below) by going through all objects scheduled for that time frame and creating dedicated forecast records for them.
The cache generation is an expensive computation and should be run at off-peak times for clients with a lot of scheduled objects.
-
All AutoForecast queries are run against this cache.
This ensures the fast execution of these queries, but it also means that you can query within the time frame of your AutoForecast cache.
Furthermore, the AutoForecast will not reflect schedule changes that happen after the AutoForecast cache has been generated.
AutoForecasts are created either manually in the Process Monitoring perspective or via a script.
Preconditions
Before working with the AutoForecast, the following preconditions must be met:
-
Your system administrator has defined the following keys in the UC_CLIENT_SETTINGS variable.
Key Description AUTO_FORECAST_PREFIX The Prefix that is used in the name of AutoForecast objects to tell them apart from user-created Forecast objects.
The naming pattern for AutoForecast objects is:
Prefix_object name_RunID:date
AUTO_FORECAST_DAYS Specifies the period of time for which forecasts will be calculated, starting from the current date/time. -
The Auto Forecast cache has been calculated for the desired timeframe.
Restrictions
The result of AutoForecast queries depends on the one hand on the interval in which tasks are executed. For schedules, this is the period length; for events, the time interval. On the other hand, it depends on the calculation period.
One forecast per day is created for events even if the events run every 15 minutes.
The following limitations apply:
- With the exception of events, only tasks planned within Schedules are considered.
- Tasks that will be activated through other tasks (e.g. ACTIVATE_UC_OBJECT) are not included.
- It is not possible to identify dependencies of tasks on other tasks.
- Modifications of attributes during runtime are not taken into account.
To Calculate/Recalculate the AutoForecast Cache
- Open the Process Monitoring perspective and select the AutoForecast page on the left navigation pane.
-
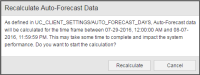
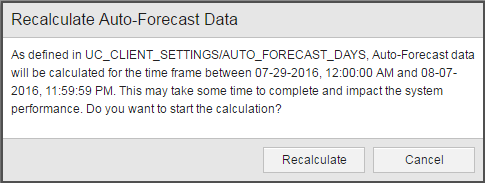
Click the Recalculate button on the toolbar.
This will create forecast records for the number of days that the system administrator has defined in the UC_CLIENT_SETTINGS variable
-
If you have many scheduled objects, this process can consume many resources. This is why a dialog box is displayed prompting you to confirm that you want to continue:
- Click Recalculate.
-
You will be notified when your forecast cache calculation has started and finished.
You can then refresh the AutoForecast page to see the scheduled tasks or check the message console for errors in the forecast calculation. See Working with Messages.
You have to stay logged in during forecast calculation to receive all notifications or error messages.
If you have many scheduled objects, Automic recommends to recalculate the forecast cache during off-peak times using a scheduled script which invokes the AUTOFORECAST() function. Reducing the AUTO_FORECAST_DAYS value can also speed up the creation of your AutoForecast cache.
To Show or Filter the AutoForecast
- Open the Process Monitoring perspective and select AutoForecast on the left navigation page.
- This list can be very long. For a better overview of the results click
 on the toolbar.
 -
The Filter pane opens on the right hand side of the page.
Specify here the criteria you want to apply to restrict the results to the upcoming executions you are interested in:
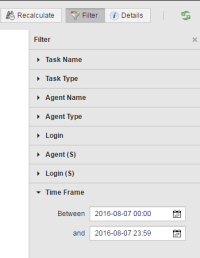
In the case of File Transfer objects, two agents and logins are involved. You can filter the results by the source ones, that is Agent (S) and Login (S), or by the target ones.

See also:
- Working with Forecasts
- Object Forecasts
- Task Forecasts
- AUTOFORECAST script function