 Clients
Clients are the largest organizational units in an Automation Engine system. They define self-contained environments that you can configure to depict your business as best suits you. Only an administrator of the client 0 (system client) can add or edit Client objects. The Clients page of client 0000 lists all clients of your Automation Engine system.
Object Definition
Object class: System object
Object type/Short form: CLNT
This topic provides information on the following:
- Overview
- System Client
- Numbered Non-system Clients
- The Clients List
- Defining Clients
-
Working with Clients
- Enabling/Disabling Automatic Processing
- Editing Clients
- Deleting or Copying Clients
- Opening the report, see Reports for Clients
- Accessing the historical data, see Execution Data
For an example of how to use Clients, read Creating a Basic Client/User Landscape.
One common way to configure your Clients is creating one per operational area, department, etc. For example, Client 1 for DEVELOPMENT (containing all developer Users are and the folders and objects they will have to work with), Client 2 for HR OPERATIONS (with all HR Users as well as their folders and objects), Client 3 for FINANCE OPERATIONS, etc. Another possibility is creating one Client per customer, or per type of customer.
No matter how you decide to set up your Clients, bare in mind that Users within a Client may open and work with all the folders and objects in that Client unless you define and manage their authorizations and privileges.
Multiple clients share the same Automation Engine instance on the same hardware, but do not access the same data.
Each client is uniquely identified by a four-digit number between 1 and 9999. When you log into Automic products, you must log into a specific client.

Client 0 (also called system client) is already available when you install the Automation Engine. You use it to manage system-wide settings (login information, calendars, variables, create and maintain other clients, users and user groups, etc.).
When you first log in to the client 0 you can use the UC/UC user object with password UC. Automic recommends changing this password immediately after your first login.
Only administrators can change or extend system client settings. All other clients and users with admin rights for numbered clients are created in the system client.
Some of the system client's internal objects can be overwritten when you update your system to a newer version and are, therefore, no longer available afterward.
All clients other than the system client (client 0) are considered referred to simply as clients. Non-system clients are numbered between 0001 and 9999. If you have the required authorizations assigned, you can also change some client settings locally (in the client itself). However, you can change a numbered non-system client's number only from the system client 0000.
Some of the objects that are supplied by the system client can be overridden by objects of the same name from a numbered non-system client. Therefore, you can define settings for each numbered non-system client which differ from the system client.
|
Column |
Description |
|---|---|
|
Client |
Number of the client |
|
Title |
Title specified in the Client object |
|
TimeZone |
Time zone valid in this client |
|
Active |
Whether the client is currently active for automatic processing or not:
|
|
Number of objects |
Number of objects created in the client |
|
Number of activities |
Number of tasks currently being executed |
|
Number of active users* |
Number of users who are currently logged on |
|
MIB Monitor |
Displays whether the client is subject to SNMP monitoring |
|
MIB Info |
MIB information of the client |
|
Priority* |
Priority of the client the administrator specified in the variable UC_CLIENT_SETTINGS with the key "CLIENT_PRIORITY". |
|
Task Priority* |
Priority of the client's tasks the administrator specified in the variable UC_CLIENT_SETTINGS with the key "TASK_PRIORITY". |
| ID* | Client's ID in the system. |
* These columns are not displayed by default. To be able to see them, you must expand the list of additional columns by clicking the arrow (  ) to the right of the header row. ) to the right of the header row. |
|
 - the Client is not active for automatic processing
 - the Client is active, automatic processing is enabled
In the toolbar, the buttons Export and Refresh are available by default. These buttons allow you to refresh the content of the table and export it as a CSV file.
A Client definition is made up of the following pages:
- Standard pages that are always available, no matter what type of object you are defining:
- The object-specific page described here.

Clients can be added, edited, activated or deactivated in the Client 0 only, both from the Administration and from the Process Assembly perspectives. Once created, the Client is moved immediately to the corresponding environment. You can edit it either from the Administration Perspective in client 0 or directly from the Process Assembly of the Client you have just created (it is stored in <No Folder>).
To Define a Client Object
- In Client 0 open the Explorer in the Process Assembly perspective.
- Click the Add Object button in the toolbar or right-click anywhere in the list and select Add Object to open the list of available object types.
- Select
 Client (CLNT) and click the Add Object button. The Add Client dialog is displayed:
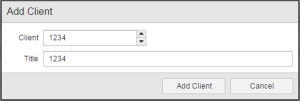
- Enter a number between 1 and 999 in the Client filed. Alternatively you can click the arrow up/down.
- Optionally, enter a Title. It should be short and descriptive to help you easily recognize the client.
-
Click the Add client button. The client is created and moved immediately to the corresponding environment. The Client page is displaye, where you define its specific settings:
Field Description Time Zone It will apply to all tasks processed in the client for which no specific time zone is defined.
If you do not enter a value here, the UTC of the Automation Engine applies.
Monitoring Activate this checkbox if you want to initiate the SNMP monitoring of this client. See About SNMP. Addiitonal info Any text that you deem appropriate regarding MIB monitoring.

Remember, as soon as you create the client it is moved to its environment. You can edit, start, stop it, or open its report or execution data from the Administration Perspective.
Working with Clients
Right-click the client to open the context-menu and access the available functions. On the toolbar you find buttons that provide quick access to some of them.
It is also possible to select more than one client and right-click to perform a bulk operation. See Bulk Operations.
Enabling/Disabling Automatic Processing
After creating a Client you have to activate it. To do so, right-click it and select GO - Enable Automatic Processing; from then on, tasks can be processed in this client.
The Client status changes immediately. You see whether automatic processing is activated or not in the in the Active column of the list of Clients in the Administration Perspective:

Of course, you can also deactivate a Client by right-clicking it and selecting STOP - Disable Automatic Processing.
You can also select various Clients that have the same status and enable/disable automatic processing in all of them at a time.
- In Client 0 switch to the Administration Perspective and open the list of clients.
- Select one or more clients and either right-click and select either Open or Open in New Window. Alternatively click the button on the toolbar.
-
The client definition pages open in edit mode.
If you have selected multiple clients, each is opened in a separate tab.
Clients cannot be deleted or copied via the UI. The utility AE DB Client Copy serves this purpose. See AE DB Client Copy.
Opening the Report
See Reports for Clients.
Accessing the Historical Data
See Execution Data.
See also:
User Management: Defining and Managing the Authorization System