With JMX Job objects you can execute JMX functions directly from within the Automation Engine. For this purpose, Automic delivers Forms, that is, predefined sets of commands that depict those functions. Via the user interface you build scripts for JMX jobs without having to worry about their exact format.
This topic provides information on the following:
- Overview
- Synchronized Views - Script Editor/Form
- Using script variables
- Combining JMX Commands With Non-JMX Commands
- Retrieving Values from the Target JMX System
The Automation Engine Script Guide provides detailed descriptions on the syntax of the individual JMX script elements (commands) here: AE JCL for JMX. It includes and overview of all JCL script elements and the list of supported data types: About the JMX JCL.
Thanks to the integration with JMX systems, you can execute jobs in JMX directly from within the Automation Engine.
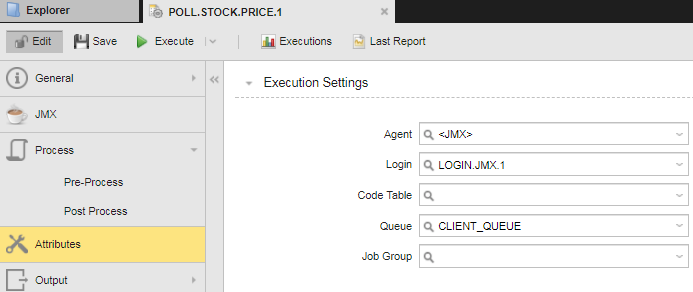
Your Automation Engine system is connected to JMX via the agent, which interprets and transforms the commands sent by the client so that JMX understands them. This means that the only prerequisites your system must meet to be able to create jobs via the Automic Web Interface and execute them in the JMX client is that the JMX agent is active and assigned to the job on the Attributes page and that you have assigned the job a Login Object (LOGIN) that contains the credentials to log in to the JMX system:
Once these prerequisites are met, you just have to build the scripts to be executed. You do so on the Process Page of the JMX Job object definition.
Given the complexity of JMX functions, this can be really cumbersome. This is where the JMX Forms provided by the Automation Engine come into play. They are an additional, intuitive way to build scripts for JMX jobs using a graphical interface that provides ready-to-use commands.
Synchronized Views - Script Editor/Form
Two views are available on the Process page of JMX jobs that you can toggle on/off using the buttons at the top of the page:
-
 - Script editor view
 -
 - Form view
Both views are synchronized. Adding a JMX command via the Form view means that the corresponding code line is simultaneously written in the Script Editor; if you then populate the fields in the Form, these values are also written to the Script Editor.
Likewise, entering or editing script elements in the Script Editor results in the corresponding modifications in the JMX Form.
Instead of entering values in the fields of the JMX Forms you can use variable scripts. This also applies to the Script editor view, of course.
The synchronization of the values you specify for checkboxes and radio buttons is a special case. It is not possible to set their values in a script variable when using the script editor. If you do so, when you save the job, they will be overwritten by the values selected for those checkboxes/radio buttons in the Form view.
Example
You create a script to send a SOAP message that polls stock prices. Using the JMX Form view you add the Register MBean, Add CompositeData Entry and JMX Invoke commands to the script designer and enter the values in the command fields:

If you switch to the Script editor view, the script statement looks like this:

Of course, entering or editing script elements in the script editor results in the corresponding modifications in the JMX Form as well.
Combining JMX Commands With Non-JMX Commands
When building scripts for JMX jobs you may want to use not only JMX-specific commands but also the Automic scripting language. You can enter these statements in the Script Editor, for example:

If you do so and then switch to the Form view, non-JMX commands are grayed out to help you easily recognize them:

Retrieving Values from the Target JMX System
With an active online connection to a JMX system, you can retrieve the values with which to populate the input fields. Click the  button where available, for example:
This opens the MBean Browser dialog, where you search for and retrieve data from the JMX client and insert it in your scripts.
When creating the JMX Job, on the JMX page of the object definition you specify whether the MBean server is installed on the same computer as the JMX agent or not. If it is not, that is, if the Remote JAVA VM option is activated in the JMX Job definition, you will have to enter your credentials to be able to connect to the MBean server. The Automic Web Interface remembers them during the current session, as long as you do not close the object or switch to read only mode. You will also have to enter the credentials again if the Agent or if the connection settings are modified.
By default, the MBean Browser displays a maximum of 300 entries. If there are more than 300, you can use the Search field at the top of the dialog to restrict the number of displayed entries.
The contents and layout of the dialog depend on the nature of the data you need. It may display a list where you select a record and click Choose to insert it in the form field like this one:

Or it may contain additional panes on the right hand side that display the details and the Attributes/Notifications, etc. of the entry you select on the left pane. Select the value on the bottom right pane and click Choose to insert it in the form field, for example:

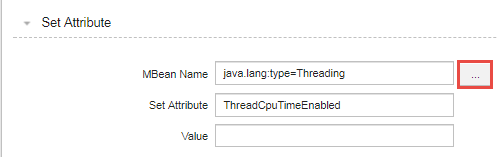
If you are working with the Set Attribute (JMX_SET_ATTRIBUTE) command, the MBean Browser dialog provides an additional Filter pane that allows you to restrict the number of MBeans displayed on the left pane by entering the MBean Name or part of the name and clicking the Filter button. Furthermore, in Max Results you can specify the maximum number of MBeans to be displayed. This helps you avoid performance issues if the list is very long and you do not want to create unnecessary backend calls.

You can sort the contents of the Attributes table to best suit your needs. Click on a column header to sort it in ascendent/descendent order.
Select an item on the left list and the required attribute on the right and click Choose to insert it in the field.
Click the  button on the upper right corner of the dialog to detach it. See Detaching Windows .
To Work with the JMX Form View
- Open the Process page of the JMX Job object.
-
Click
to toggle the Form view on. The Commands pane is displayed on the right hand side. This is where you build the JMX script using predefined commands.
- Click Add Command to open a dialog that displays all the available commands arranged in groups.
-
Select the required one. You have two options:
- Scroll through the list and expand the command group where the required one is located.
-
In the Search field at the top of the dialog start writing any word that is contained in the name of the command you need. The list below displays the commands that have the entered string in their names.
-
Click the Add Command button at the bottom of the dialog.
The command is inserted on the pane and the corresponding input and selection fields are displayed on the main page.
-
Populate the fields as required.
With an active connection you can retrieve values from the JMX system. For this purpose, click
where available. For some fields also a Preview button is available. - Continue adding commands and entering values until you have finished building the script.
- Save your changes.
Switch to the Script Editor view; the commands and the values you have specified are also inserted here.
- On the Commands pane, right-click on the command you want to duplicate.
- A context-menu is displayed. Select Duplicate.
- The new, duplicated command is inserted immediately below the original one. All settings and selections made in the original command are also available in the new one.
- Save your changes.
On the Commands pane do one of the following:
- Click the recycle bin icon on the command label.
- Right-click on the command and select Remove.
To Change the Order of the Commands/Script Elements in the Script
The Form view allows to rearrange the order of the commands, whether JMX-specific or not, by dragging and dropping them. The commands in the Script editor are rearranged accordingly.
- On the Commands pane, click on a command or on a non-JMX statement to select it.
-
Hold the mouse button to drag and drop it to the position where you need it.
- Save your changes.
See also: