Preconditions, Postconditions, Conditions
The Preconditions
This topic provides information on the following:
The Conditions tab is only available in the START node of IF Workflows. You use it to determine if and when the TRUE or FALSE branches should be processed. It can also include any conditions and actions.
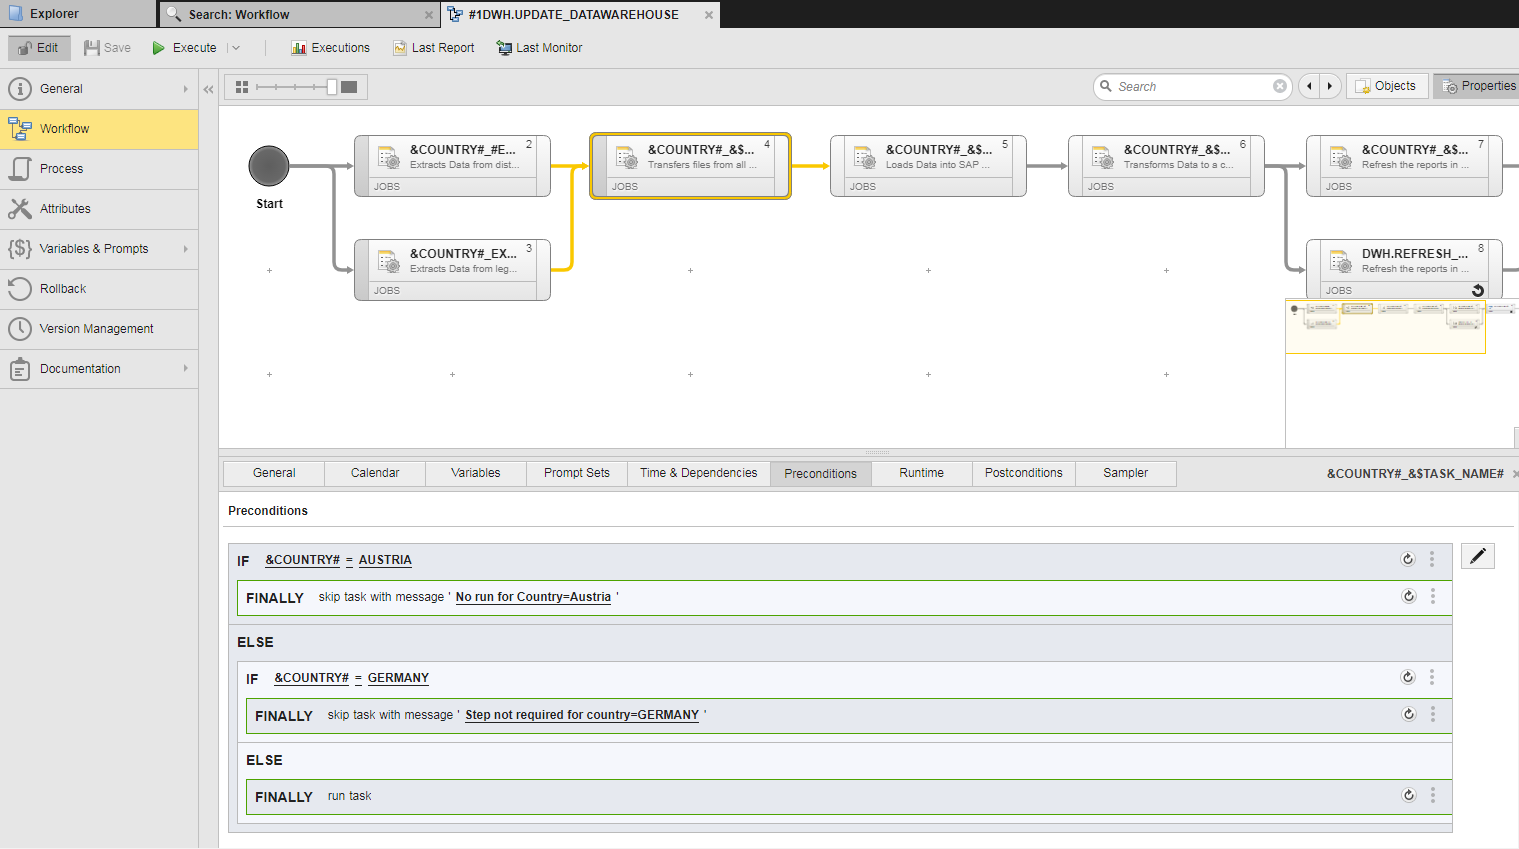
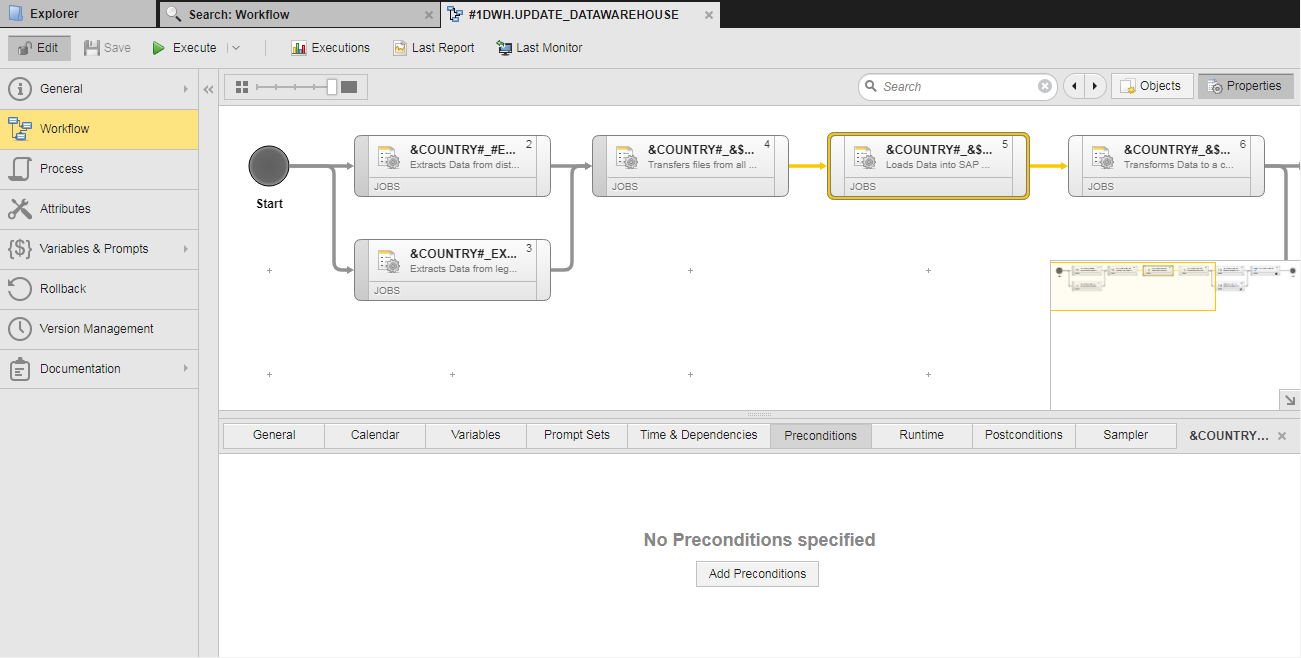
Preconditions and Postconditions are available in the properties of every task in a Workflow. The conditions and actions that are defined in the Preconditions tab will be processed before the task runs. The ones that are defined in the Postconditions tab will be processed afterward.
Important! Preconditions in a Workflow can only use variables that are available to the task, even if the precondition is part of the Workflow. If the task does not inherit the object values from its parent, they cannot be used in conditions.
A condition verifies something and an action either carries out a regular or a final action. The difference of these two types is that after a final action, neither further conditions will be evaluated nor actions taken. This means that after a final action, the task or the TRUE or FALSE branch of the IF Workflow starts in the Preconditions and Conditions tab.
Conditions can include other conditions and actions. The nesting depth is not limited.
Accessing the Conditions Editor
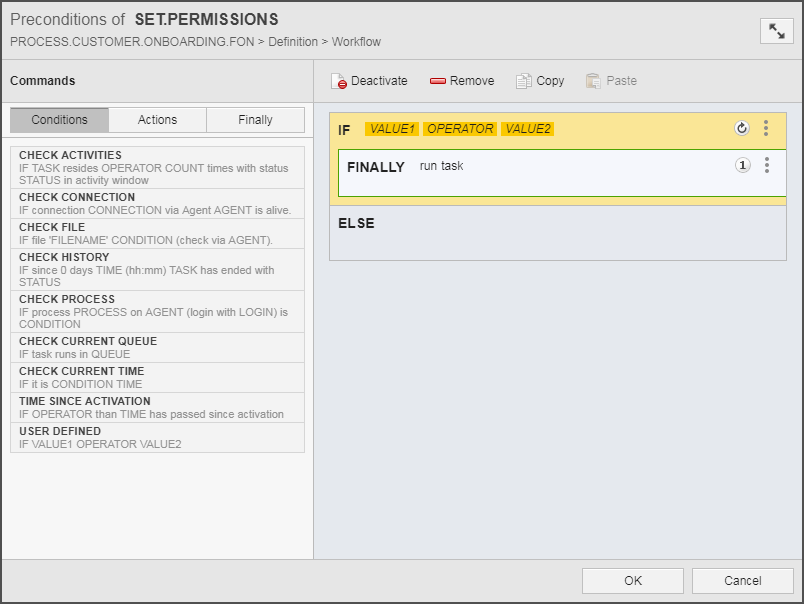
You use the Conditions Editor to create new or change existing conditions and actions. If you have not defined conditions yet, a text indicates it and the button Add Condition/Precondition/Postcondition is displayed. Click it to open the conditions editor.
If conditions are already available, you can edit them and add new ones by clicking the pencil icon:

You build the logic of your conditions on the conditions editor:

 to expand the dialog to the complete window size and
  to reduce it to its original size.
 symbo lindicates that the condition/action is processed recurrently. In case of
  . This means that the condition or action is processed only once regardless of whether it is located in the
 Structure of Conditions and Actions
Conditions and actions appear in blocks that group related statements together to form the entire condition.
A condition block starts with IF. You can add multiple conditions that need to be evaluated together. The additional conditions appear in blocks that start with AND IF.
The first action block of a block starts with THEN, blocks for additional actions for a positive evaluation of a condition begin with AND THEN.
Blocks for the action for a negative evaluation of the condition start with ELSE. Additional "ELSE" actions start with AND. This allows you to build further AND IF conditions for an ELSE action, to describe another decision branch for an action.
List of Statements to Build Conditions
There are three sets of predefined statements that you can use to build your conditions:
- Condition statements, which are the basis of IF statements in your task
- Action statements, which are the basis of THEN statements.
- Finally statements.
Each statement is a sentence with placeholders for parameters. You specify the values for the parameters to describe the conditions or actions that you need.
|
Condition |
Description | Parameters | Precond. | Postcond. | Conditions |
|---|---|---|---|---|---|
|
CHECK ACTIVITIES |
Checks the number of times that an object has run with a particular status. |
TASK=Name or alias of the task OPERATOR=Comparison operator (>, <, =, etc.) COUNT=Number of runs STATUS |

|
|
|
|
CHECK CONNECTION |
Checks whether there is a connection to a machine or a system. |
CONNECTION=Connection object AGENT |
|
|
|
|
CHECK FILE |
Checks whether a particular file exists. |
FILENAME CONDITION=Exists/Does not exist AGENT LOGIN= |
|
|
|
|
CHECK HISTORY |
Checks whether a task has ended with a particular status in a particular time span. |
DAYS TIME TASK=Object name of the task STATUS |
|
|
|
|
CHECK PROCESS |
Checks whether a particular process runs on a machine. |
PROCESS AGENT LOGIN=Login object CONDITION |
|
|
|
|
CHECK CURRENT QUEUE |
Checks whether the task runs in a particular Queue |
QUEUE |
|
|
|
|
CHECK CURRENT TIME |
Checks whether a certain point in time lies before or after the current (physical) point in time. The task time zone is used. |
CONDITION=Before/After TIME (HH:MM) |
|
|
|
|
CHECK RETURN CODE |
Checks the return code of the task. |
OPERATOR=Comparison operator (>, <, =, etc.) RETURN CODE |
|
||
|
CHECK STATUS |
Checks the task's end status. |
STATUS |
|
||
|
TIME SINCE ACTIVATION |
Checks the time that has past since the task has been activated. |
OPERATOR=More/Less TIME SPAN(HH:MM) |
|
|
|
|
USER DEFINED |
Compares two values of your choice. |
VALUE 1 OPERATOR=Comparison operator (>, <, =, etc.) VALUE 2 |
|
|
|
|
Action |
Description | Parameters | Precond. | Postcond. | Conditions |
|---|---|---|---|---|---|
|
CHANGE QUEUE |
Moves the task to another Queue. |
QUEUE in which the task should run |
|
||
|
DELETE ENTRY FROM |
Removes a key (entry) from a static Variable object. |
VARIABLE=Name of the VARA object KEY- Wildcards (* and ?) are allowed. |
|
|
|
|
START OBJECT |
Starts any object and does not check its end status. |
OBJECTNAME=Name of the executable object PARAMETERS=Values as defined in the PromptSet assigned to the object. You have to select an object and accept the condition first and then click on PARAMETERS to load the PromtSet values you must populate. END=Wait/No wait |
|
|
|
|
MODIFY RETURN CODE |
Modifies the task's return code. |
RETURN CODE MESSAGE=Optional text |
|
||
|
PUBLISH VALUE |
Makes a specific value available for the Workflow as a variable. |
VALUE VARIABLE name=Name of the VARA object |
|
|
|
|
REDO EVALUATE AT |
Ends the processing of the conditions and actions at a particular point in time. |
DAYS TIME (HH:MM) |
|
||
|
REDO EVALUATE IN |
Ends the processing of the conditions and actions after a particular time span. |
Time span in MINUTES |
|
||
|
SET OBJECT VARIABLE |
Creates or changes an object variable. |
OBJECT VARIABLE VALUE SCOPE=Task or Workflow |
|
|
|
|
SET VARIABLE |
Creates or changes variable value. |
VARIABLE NAME=Name o the VARA object KEY COLUMN VALUE |
|
|
|
|
Action |
Description | Parameters | Precond. | Postcond. | Conditions |
|---|---|---|---|---|---|
|
ABORT |
Sends an abort signal. And stops further processing |
TEXT=Text to be sent |
|
|
|
|
BLOCK |
Blocks the branch in the Workflow from the current task onwards. |
TEXT (optional) |
|
|
|
|
CANCEL WORKFLOW |
Cancels the Workflow at the specified levels. Processing stops immediately. |
SCOPE=Parent/Top SUBORDINATE TASKS=Include/exclude |
|
|
|
|
RUN TASK |
Starts the task immediately and ends the checks. |
No parameters |
|
||
|
SKIP TASK |
Skips the task. No further conditions or actions will be processed. |
MESSAGE=Additional status text (optional) For limitations, see STATUS_TEXT in :MODIFY_STATE |
|
||
|
RESTART TASK |
Ends processing and starts the task again after a particular time. |
Time span in MINUTES |
|
||
|
ROLLBACK |
Rolls back the task, the Workflow or the top Workflow. |
TASK=Parent workflow or top workflow |
|
||
|
PROCESS IF BRANCH |
Based on the condition results, determines whether processing continues on the TRUE or FALSE branch of the IF-workflow. |
TRUE/FALSE return value ALIAS of true or false branch for the action |
|
Working with the Conditions Editor
- Select a condition/action from the left pane.
-
Drag and drop it to the right pane. The condition/action is displayed in a block and highlighted.

The highlighted elements in the condition/action (in the screenshot above, these are VALUE1, OPERATOR and VALUE2) are the parameters that you have to populate with the data to be evaluated. See To Populate Conditions/Actions .
Important Consideration
If you have defined Preconditions
To Insert Conditions and Actions in other Conditions
- Select a condition/action from the left pane and drag it to the right pane.
-
Move it across the pane until the place where you want to drop it displays a highlighted line (the color depends on your configuration, in our screenshot this is a dark yellow line):
- The embedded condition or action is displayed in a block of its own within the "parent" condition.

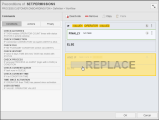
To Replace Conditions and Actions
- Select a condition/action from the left pane and drag it to the right pane.
-
Move it across the pane until the condition/action you want to replace is highlighted and REPLACE is displayed over it:

To Deactivate/Remove Existing Condition/Action Blocks
Select the required block and click the Deactivateor Remove button in the upper right corner of the dialog. Alternatively, click the  button and select Deactivate/Remove.
Deactivating has the effect that the block will not be processed during the Workflow execution. Deactivated blocks are grayed out. You can activate it again at any time.
To Populate Conditions/Actions
Once you have inserted a condition/action, you have to populate it with the values that are going to be evaluated. They are the highlighted terms on the condition/action header. For example, in the screenshot below these are VALUE1, OPERATOR and VALUE2.
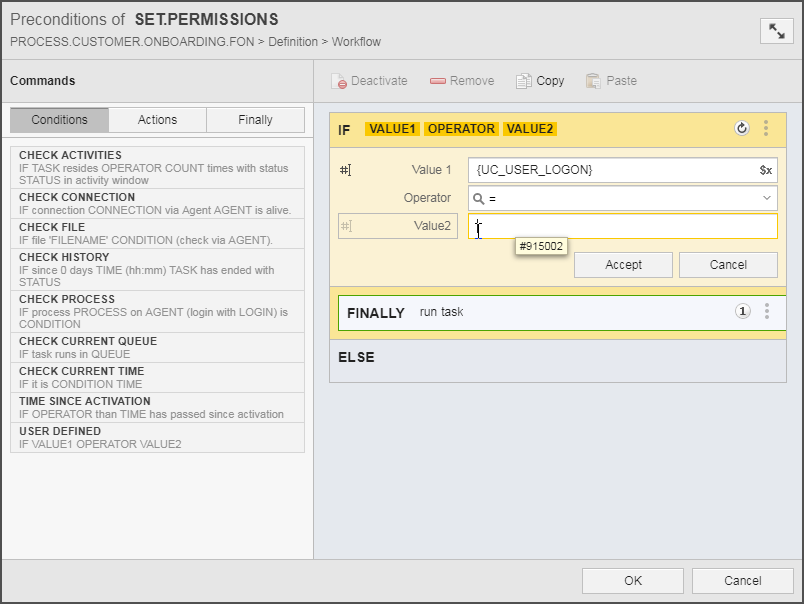
- Click any of the values on the header of the action/condition. This expands the block and displays the input or selection fields.
-
You can populate them using either variables or a static value that you enter or select.
-
To use variables to populate a value, either hover your mouse over its label or insert your cursor in the corresponding input/selection field. This activates a button and displays an icon that indicates the possibility of using variables:
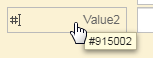
Click it. The corresponding field displays now the variable icon that allows you to open the dialog to select a variable:

For details on how to insert variables see Inserting Variables.
- To enter a static value, put the cursor in the field and type it; in case of a combobox, expand the list and select it or start typing the value.
-
-
Enter the required data and click Accept.
-
If all fields are populated and the values are correct, the conditions/actions block is closed and the values are displayed on its header:

- When you are done, click OK to close the dialog.
- Save your changes.
To Copy/Paste Pre and Post Conditions
Building conditions can be cumbersome. To help you optimize your work, the Automic Web Interface allows you to reuse already defined ones.
For this purpose you can copy a condition available in a task and paste it either into another task within the same Workflow or into a task inserted in an entirely different Workflow. If the copied condition includes nested conditions, they are also copied.
An internal check ensures that you can only paste a condition that is valid in the context of the target task. If it is not, the Paste button is disabled.
-
Select the condition you want to copy and click Copy on the toolbar or expand the dropdown menu and select Copy.
If the condition you want to copy has nested conditions, copying the parent also copies the nested conditions. If you want to copy one of the nested conditions, make sure that you select it (and not the parent).
- Click OK at the bottom of the editor to leave it.
- Switch to the task into which you want to paste the condition and open the conditions editor there.
-
Do one of the following:
- Click Paste on the toolbar or select it in the dropdown menu.
- If you want to insert it in an already existing condition, select it and click Paste.
- Click OK to leave the editor.
- Save your changes.