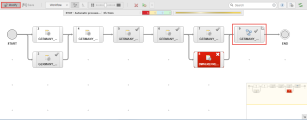
You can modify the design of a workflow from the Workflow Monitor, provided it is either active or stopped; that is, if it has already started or if it is in generation. For this purpose, you open the Workflow Monitor and click the Modify button on the toolbar; this stops the Workflow and makes it editable. Then you can add, move, replace, delete tasks, etc. Active workflows can also be changed via the script function MODIFY_TASK. These changes affect only the current execution of the Workflow!
This topic provides information on the following:
- Overview
- Special Case: IF and FOREACH Workflows
- Modifying Workflows with Embedded (Child) Workflows
- Replacing Tasks
- Adding Tasks
- Moving Tasks
- Connecting/Disconnecting Tasks
- Connecting Distant Tasks in Large Workflows
- Modifying the Properties of Tasks
After designing a workflow you will probably execute it to check its behavior. Sometimes, changes carried out in tasks that are included in a workflow cause it to misbehave. If the execution of a workflow does not meet your expectations, you can modify it from the Workflow Monitor in the Process Monitoring perspective; you can change its settings and design also if it has already started or if it is in generation. The reports provide you later with detailed information on these changes.
These changes apply to that particular execution only, since they are not stored in the workflow definition.
It is not possible to delete tasks from the Workflow Monitor, whether they are active or not. If you want to get rid of a task in the workflow, you have two possibilities:
- Set it to inactive
- Remove the connecting lines that point to the task and redesign the workflow accordingly
When you open the Workflow Monitor, it is in read-only mode. To be able to make changes, do the following:
To Switch to the Modify Mode and Back
- Click the
 button on the Monitor toolbar. This pauses the workflow and activates the edit mode so that you can make changes without new tasks starting.
 - Make your changes; how to do it and what possibilities are available are described in this topic.
- When you are done with your changes, click the
 button again to switch back to the Monitor (read-only) mode.
 -
A dialog is displayed that prompts you to confirm that you want to switch to the Monitor mode; you can either simply switch without activating the Workflow (Switch Only) or you can switch and resume the Workflow processing (Switch and Go):

Although every action is logged in the form of messages, reports and historical records (the various types of Execution lists), this audit information might not be enough later on if you need to understand why certain changes took place. To keep track and provide detailed information on your changes you can add comments to them. See Adding Comments to Tasks.
Special Case: IF and FOREACH Workflows
Whereas the properties of STANDARD Workflows can be modified at runtime, the properties of IF and FOREACH Workflows cannot. This is the reason why the ![]() button on their Workflow Monitor toolbar is always disabled. However, you can perform certain functions on the tasks included in these workflows, such as set a breakpoint, cancel, restart, etc. Which functions are available depends on the status and on the type of the tasks.
button on their Workflow Monitor toolbar is always disabled. However, you can perform certain functions on the tasks included in these workflows, such as set a breakpoint, cancel, restart, etc. Which functions are available depends on the status and on the type of the tasks.
For information on which functions are available see Available Functions Depending on the Task Status.
Modifying Workflows with Embedded (Child) Workflows
Switching the parent workflow to the Modify mode does not automatically switch its child workflows. If you also want to modify its children, you have to explicitly set them to Modify mode.
The example below depicts a workflow with several jobs and a child workflow. The parent workflow is in Modify mode, which means that it is temporarily stopped and you can make your changes. However, the child workflow is not in Modify mode. If you also want to change its parameters (provided it is either active or stopped), you have to expand it and set it to Modify.
To Switch Embedded (Child) Workflows to Modify Mode
- Open the Workflow Monitor of the parent workflow.
- Click the
 button on the Monitor toolbar. This pauses the workflow and activates the edit mode so that you can make changes without new tasks starting.
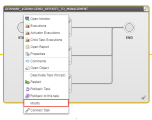
 - Expand the child workflow clicking on the flip icon on its upper right corner. A popup window opens up displaying the structure of the child workflow.
-
Right-click anywhere to open the context-menu and select Modify:
The child workflow is now in Modify mode and you can edit it.
When you are done with your changes, click the ![]() button again to switch back to the Monitor (read-only) mode. A dialog is displayed that prompts you to confirm that you want to switch to the Monitor mode; you can either simply switch without activating the Workflow (Switch Only) or you can switch and resume the Workflow processing (Switch and Go).
button again to switch back to the Monitor (read-only) mode. A dialog is displayed that prompts you to confirm that you want to switch to the Monitor mode; you can either simply switch without activating the Workflow (Switch Only) or you can switch and resume the Workflow processing (Switch and Go).
The parent workflow is still in Modify mode. Click its ![]() button as well if you want it to resume the processing.
button as well if you want it to resume the processing.
You can only replace tasks that are activated but not started yet. For example:
To Replace a Task
- Open the Workflow Monitor if you are not already there. See How to Access the Workflow Monitor.
-
Since the task is running, it is in read only mode. To be able to make your changes, you must switch to the edit mode. You have two possibilities.
- Click the Modify button on the toolbar.
- Click the Workflow button on the toolbar to expand the menu and select Modify.
This stops the execution of the task and allows you to edit its sub tasks.
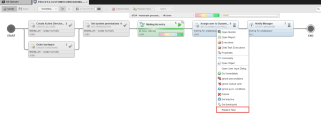
- Right-click the task and select Replace Task.
-
In the Replace Task dialog that opens up, search for the task you want to replace.
- Click the arrow next to the home icon to open a dropdown list that replicates your folder structure in the Process Assembly perspective.
- Select a folder; if it has subfolders, a new dropdown list displays them.
-
The objects contained in the subfolder are displayed in the hit list below. Select the required task.
Click OK.
The new task replaces the old one in the workflow; it inherits all the dependencies and properties that were defined in the old task.
- Save your changes and click the Modify button to leave the edit mode. The workflow is activated again.
- Expand the Workflow button on the toolbar and select the appropriate option to continue processing the workflow.
This is how it looks like:
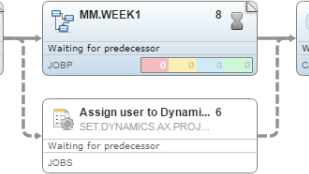
The task you have just replaced is moved one line below the new task and the dashed connecting lines indicate that it is deactivated; it is not removed from the Monitor because it has already been generated. This is essential for auditing purposes, as it allows you to track what has been changed with each replacement.
External Tasks
External tasks are not part of the workflow but affect it. An external dependency is graphically displayed in the form of a dashed task box, for example:
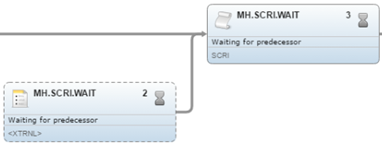
An external task can be replaced only by another external task. The Replace Task dialog contains an additional Insert as External Dependency field at the bottom to indicate that you insert an external task.
You can add tasks to a Workflow as long as the Workflow is editable, that is, if it has already started or if it is in generation.
To Add a Task
- Open the Workflow Monitor if you are not already there. See How to Access the Workflow Monitor.
-
Since the task is running, it is in read only mode. To be able to make your changes, you must switch to the edit mode. You have two possibilities.
- Click the Modify button on the toolbar.
- Click the Workflow button on the toolbar to expand the menu and select Modify.
This stops the execution of the task and allows you to edit it.
- Right-click on the place in the Monitor where you want to insert the new task and select Add Existing Task from the context menu.
-
The Add existing Object dialog is displayed:
- Click the arrow next to the home icon to open a dropdown list that replicates your folder structure in the Process Assembly perspective.
- Select a folder; if it has subfolders, a new dropdown list displays them.
-
The objects contained in the subfolder are displayed in the hit list below. Select the one you need.
- Click the Insert as External Dependency checkbox if you want the task to be included as an external task. For details on the implications of external dependencies in workflows click here.
- Click OK.
The new task is inserted in the position where you right-clicked.
- Connect the new task as needed.
- Click the Modify button to leave the edit mode. The workflow is activated again.
You can move tasks from one position in the Workflow to a different one as long as the Workflow is editable, that is, if it has already started or if it is in generation. This applies both for the tasks within the Workflow and for the start and end nodes, which can also me moved.
To Move a Task
- Open the Workflow Monitor if you are not already there. See How to Access the Workflow Monitor.
-
Since the task is running, it is in read only mode. To be able to make your changes, you must switch to the edit mode. You have two possibilities:
- Click the Modify button on the toolbar.
- Click the Workflow button on the toolbar to expand the menu and select Modify.
This stops the execution of the task and allows you to edit it.
- Select and drag the task to drop it on to its new position.
- Save your changes by clicking the Modify button to leave the edit mode. The workflow is activated again.
- Expand the Workflow button on the toolbar and select the appropriate option to continue processing the workflow.
This does not modify the logic of the Workflow as the task sequence is not changed (the connections between tasks remain the same). It is simply a cosmetic change.
Connecting/Disconnecting Tasks
Connecting
After adding a task to a workflow you will probably want to establish a new connection to it. Connecting tasks in the Workflow Monitor works in exactly the same way as in the Workflow editor in the Process Assembly perspective.
To Connect Tasks
- Hover the mouse over the start or the end point of a task.
Arrow symbols are displayed, from which you can start drawing the lines.
- Click and hold the arrow symbol and drag it to the task you want to link.
- Release the mouse button. The two tasks are now linked to each other.
Disconnecting
It is not possible to delete tasks in the Workflow Monitor. If you want to prevent the execution of a task in an active/stopped workflow, you can disconnect it from its predecessor. To do so, you delete the connecting line that points to it.
You can only remove the connection to a task that has not been executed yet.
To Disconnect a Task
- Open the Workflow Monitor if you are not already there. See How to Access the Workflow Monitor.
- Click the Modify button on the toolbar to stop the workflow. This allows you to make the changes.
-
Select the line that points to the task you do not want to execute and do one of the following:
- Right-click and select Delete.
- Press the Delete button on your keyboard
The connector is now displayed as a dashed line indicating that the connection has been removed. The task (as well as all subsequent tasks) will not be executed.
Connecting Distant Tasks in Large Workflows
In case of large Workflows, if you want to connect tasks that are far away from each other, it can be difficult to find the correct target task. Since the size of the task boxes is automatically reduced to display as much as possible of the Workflow structure, you may not have enough information at a glance to be able to establish the connections. On the other hand, the target task may be outside the visible part of the Workflow.
When a Workflow expands beyond its visible part, the context menu that is displayed when right-clicking a task contains an additional option, namely Connect, that helps you find and connect distant tasks. This function is available both for the Workflow editor and for the Workflow monitor.
To Connect Distant Tasks
-
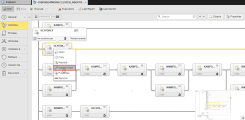
Right-click a task in the Workflow and select Connect Task from the context menu.
- The connect toolbar is displayed at the top of the editor.
-
From Start Task select the task from which you want to start connecting.
This pre populates the field with the selected task; if necessary you can change it by selecting a different task from the dropdown list. Alternatively, start typing the task name, alias or its sequence number within the workflow; the find as you type function automatically restricts the content of the list to those tasks that match your entry.
The focus of the editor/monitor changes to the selected task. This allows you to check that it is actually the task you want to link from. Hover your mouse over the task box to have the tooltip displayed. If you need more information, right-click it and select Properties.
- Select a task or start typing the task name, alias or its sequence number in the End Task dropdown list. Again, the focus of the editor/monitor changes to the selected task.
-
Click the Connect button on the toolbar.
The connecting line is displayed now.
- The Save button is now enabled. Click it to confirm the connection.
- Click Cancel to hide the toolbar.
If you click Cancel before saving, the tasks are not connected and the toolbar is hidden.
Please take the following restrictions into account:
-
External dependencies are not available for selection in either of the dropdown lists.
External dependencies are tasks that are not inserted in the Workflow but that affect its execution, see External Workflow Dependencies)
-
The task you select in the Start Task dropdown list is not available for selection in the End Task one.
This prevents linking a task to itself, which would be an invalid connection.
- The Start node is not available for selection in the End Task list; likewise, the End node is not available for selection in the Start Task list.
- The Connect button is disabled if one of the dropdown lists in empty or if your selection is an invalid combination of tasks.
- In case of sub Workflows (Workflows that are embedded in a parent Workflow), only the tasks that belong to the sub Workflow are available from the dropdown lists.
Modifying the Properties of Tasks
- Open the Workflow Monitor if you are not already there. See How to Access the Workflow Monitor.
-
Since the Workflow is running, it is in read only mode. To be able to make your changes, you must switch to the edit mode. You have two possibilities.
- Click the Modify button on the toolbar.
- Click the Workflow button on the toolbar to expand the menu and select Modify.
This stops the execution of the task and allows you to edit it.
-
Select the task that you want to modify and do the following:
- Right-click the task you want to edit and select Properties from the context menu. Alternatively, select the task and click the Properties button on the toolbar.
-
The properties pane opens at the bottom half of your screen. Select the appropriate tab and change the values as needed.
See Modifying the Properties of Tasks at Runtime for a description of the possibilities to change task properties.
- Click the Modify button to leave the edit mode. The workflow is activated again.
See also:
