Working with Packs (CLI)
As a system administrator, you install Packs to enhance the AWA functionality. Use the Package Manager to manage packs integrated into AWI with CLI. For more information, see About Package Manager .
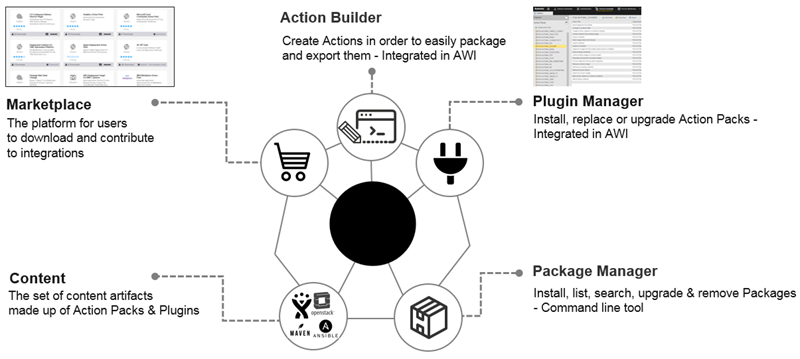
The predefined Action Packs that let you incorporate different actions into release workflows are available at https://marketplace.automic.com/.
Note: You must install the Package Manager to work with packs via CLI. For more information, see Installing the Package Manager.
This page includes the following:
Viewing Packs
-
Update the Package Manager index to fetch new and changed packages from the local repository:
apm update
-
Search for a Pack in the local repository:
apm search [<any part of package name>]
Example
apm search SiebelNotes:
- If
[<any part of package name>]is not specified, all available packages are displayed. - To get a full list of installed Packs, enter the following command:
apm list.
- If
Installing Packs
Use the following command to install a Pack:
apm install <pack name> -pw <password>
Alternatively, you can install a Pack from a file:
apm install --from-file <path to the pack archive or directory> -pw <password> -u user/department
Notes:
- If you want to avoid installing dependent Packs, set the flag to ignore pack dependencies.
- The password is never read from
login_dat.xml. You must use the parameter-pw <password>. - Multiple Packs can be installed by leaving a blank space between the names.
Examples
Single Pack installation:
apm install --from-file C:\Pack.Bond_PCK.AUTOMIC_BOND_1_0_0+build.164.zip -pw aepwd -u ADM/ADMINISTRATORS
Multiple Pack installation:
apm install PCK.AUTOMIC_HTTP PCK.AUTOMIC_FTP -H automicdev -S AUTOMIC -p 1234 -c 123 -u AUTOMIC/AUTOMIC -pw aepwd
Important! The installation of a Pack may be restricted to a limited number of clients. You can use the option -c <number> to change the target client of the installation or enter the following command to bypass the client check: --ignore-client-restriction.
Upgrading Packs
Use the following commands to upgrade Packs:
Command for updating the Pack index (to be run only once):
-
Updating the Pack index (to be run only once)
apm update
-
Upgrading a Pack
apm upgrade <pack name>
-pw <password>Alternatively, you can upgrade a Pack from a file:
apm upgrade --from-file <path to the package archive or directory>
-pw <password>-u user/departmentExample
Upgrading the Tomcat Pack:
apm upgrade PCK.AUTOMIC_TOMCAT -pw aepwd
Important! Upgrading a Pack may be restricted to a reduced number of clients. You can use the option -c <number> to change the target client of the upgrade or enter the following command to bypass the client check: --ignore-client-restriction.
When updating a Pack , be aware of the following:
- All Actions within the Pack will be updated
- All Templates within the Pack will be updated
- Configuration object templates within the Pack will be updated but instances of configuration object templates will not be updated
- Instances of Templates will not be updated – but the referenced Actions within the Pack will be updated
- Custom actions will not be updated
- Artifacts in the Pack folder will be removed
Deleting Packs
Use the following commands to remove Packs:
-
Removing a Pack
apm remove <package name>
Getting Help and Further Commands
For more details on sub-commands, options and syntax, refer to the built-in help.
Command Structure
The APM CLI uses a multipart structure. Each command consists of:
- A base ( APM)
- An action specifying the operation to be executed (for example: install).
-
Arguments and options, which can be generally specified in any order.
Options can be specified in short form (starting with a single dash "-") or in long form (starting with a double dashes "--"). For example: -h, --help or -c, --client.
Some options have its own arguments, that must be specified right after the option. For example:
-c 20 -u UC/UC. Other options have no argument and work as a flag. For example:-v,--verboseor-h,--help.The CLI tool can process none, one or more arguments that are not optional, called "main arguments". Main arguments and optional arguments (if available) can be entered with double quotes (” ”) or single quotes (‘ ‘) in a consistent way.
All APM commands have the following syntax:
apm <command> [option] [<arguments>]
Passwords
Passwords can be specified with the following commands: -pw or --password.
Important! The values will not be displayed in the command line while typing.
Common Options
The following options are available for all APM commands:
-
-v, --verbose
Display verbose output
Default: false
-
-vv, --very-verbose
Display verbose output
Default: false
-
-y, --yes
Respond "yes" to all prompted questions.
Default: false
Common Options for Automation Engine Connection Commands
-
-C <file>, <file>
Path to uc4config.xml. Default: $PM_HOME/conf
-
-L <file>, --login-dat <file>
Path to login_dat.xml. Default: $PM_HOME/conf
-
-T <template>, --user-template <template>
UC4 user template used to connect to the AE
-
-S <system>, --system <system>
AE system name. This command overrides the default value of the configuration file.
-
-H <host>, --host <host>
AE hostname or IP address. This command overrides the default value of the configuration file.
-
-c <client>, --client <client>
AE client number. This command overrides the default value of the configuration file.
-
-p <port>, --port <port>
AE port. This command overrides the default value of the configuration file.
-
-u <user/dept>, --user <user/dept>
AE user/dept. This command overrides the default value of the configuration file.
-
-pw [password], --password [password]
AE password, password may be not mandatory in command line, the tool will ask for it later.
-
-l <language>, --language <language>
AE language. This command overrides the default value of the configuration file.
-
-f <folder>, --folder <folder>
AE folder containing all installed packages. Default:
\PACKAGES
Get Help for a Command
For details on commands, call apm <command> -h or apm <command> --help.
Find more Commands
For a list of available commands, call apm -h or apm --help.
Analyze and Display Current Environment Issues
apm doctor check
Fix Current Environment Issues Detected by the Doctor Check Command
apm doctor fix
Note: Extended Packs: run this command if you want to scan for and update missing hooks and VARA objects of base Packs.
Display Pack Content
apm show [option] <pack_name>
Where [option] can be one of the following:
-
--from-file
Read Pack from local file or directory
-
--installed
Only show installed Pack.
Default: false.
-
--local
Only show Pack in local cache.
Default: false.
Download Packs
Download Packs from the Automation Engine client to the working directory.
Important! A package.yml file must exist in the current working directory. If the file does not exist, call the following command to create it: apm init <pack_name>
apm download [option]
Where [option] can be one of the following:
-
--force-overwrite
Objects which already exist in the local file system will be overwritten with content from the AE client.
Short:-force
Default: false.
-
--include-appdata
Download also the AppData folder.
Short:-ia
Default: false.
-
--remove-unused
Remove unused files which do not have matching objects in the working directory.
Short:-ru
Default: false.
Upload Packs
Upload Packs from the working directory to the Automation Engine client.
Important! A package.yml file must exist in the current working directory. If the file does not exist, call the following command to create it: apm init <pack_name>
apm upload [option]
Where [option] can be one of the following:
-
--force-overwrite
Objects which already exist in the AE client will be overwritten with content from the local file system.
Short:-force
Default: false.
-
--ignore-dependencies
Package dependencies are ignored.
-
--include-appdata
Upload also the AppData folder.
Short:-ia
Default: false.
-
--no-binary
Upload all objects except binary objects.
Short:-nb
Default: false.
-
--no-content
Upload binary objects that are defined in the Pack config only.
Short:-nc
-
--remote-password
Password of remote repository.
Note: required in case dependency packs need to be downloaded and installed before the current pack is installed.
-
--remote-user
Username of remote repository
Note: required in case dependency packs need to be downloaded and installed before the current pack is installed.
-
--remove-unused
Remove unused files which do not have matching objects in the AE client.
Short:-ru
Default: false.
See also: