Integrating Webhook Events from External Systems
As a systems administrator, how do you integrate your CRM, monitoring tool or ticketing tool with the Automation Engine? AWI lets you create Webhook Event objects, that enable you to integrate your external system webhooks with the Event Engine. The Webhook Event object can listen and retrieve webhook event payloads from external systems in real time.
The following high-level view diagram shows how a webhook event payload is dealt with by the Event Engine and Automation Engine:

This page includes the following:
To use the Webhook Event feature, the following components and knowledge are required:
- An installation of Analytics with the Rule Engine See: Installing Analytics
- The Analytics Action Pack, Rule Pack, and AWI plug-in from the Marketplace
- Prior implementation knowledge of Event and Variable(VARA)objects
- A good understanding of webhooks and how they are implemented
- Access to an external system that enables the use of webhooks
- Knowledge of the JSONPath syntax
- Knowledge of your external system JSON schema
For further information, see: WEBHOOK Events
Create a Scoped API Key
Webhook endpoints require a scoped API key. The scoped key must be generated for the client on which the Webhook object is running. If the external webhook API (for example, JIRA) is unable to send the authorization key in the HTTP header, it can also be provided as an URL parameter.
Example:
http://host:port/analytics/api/v1/100/12345?authorization=1cb812db-6616-49da-af97-3719aeaddc24
For further information, see Analytics REST API - General Info
Create an IA Event Definition
The IA Event Definition represents an event structure. The Event Engine uses the event structure to trigger Rules and execute jobs, scripts, and workflows and so on.
The following steps show you how to build an Event Definition using webhooks from your external system event payload.
- Log in to an Automation Engine Client where an IA Agent is assigned. See: Assigning Clients to Agents
-
Click Process Assembly in AWI
- Click Add Object from the toolbar
- Select and expand Variable tree Administration perspective
- Select and expand XMLvariables, then select IA > EVENT_DEFINITION Variable
-
To build an IA Event Definition from your webhook event payload, you must have prior knowledge of the payload content. Download a test event payload using a previously defined endpoint, or use your system guide to understand its schema.
Note: The event payload is in the JSON format. To map the Key Attributes, you must have prior knowledge of JSONPath syntax.
Example:
The following example shows an Event Definition page (left) and a webhook event payload in JSON (right). This information helps you deduce how to build your Event Definition.Important!
- When defining your Key Attributes, your event payload is displayed in a structured schema. You must define your Attribute Keys into a flat schema.
- Although there is no rule for naming Key Attributes, we recommend that you name them as they appear in the JSON. This practice enables you to map them easily when you create a Webhook Event object.
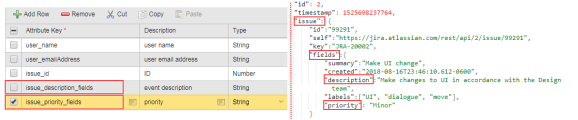
Enter the following details into the Event Definition sheet, keep in mind what you aim to achieve when external events are received:- Attribute Key: Key value pair (for example, application message, status event, acknowledgment and so on)
- Description: Optional
- Type: You can either select String, Number, or Boolean in relation to your Attribute Key
- Click Save after you have completed your Event Definition.

For further information about Event Definition, see: IA Event VARA Objects
Create, Map, and Filter a Webhook Event
A Webhook Event generates an endpoint for an external webhook to send payloads to the Event Engine to be processed. The following step-by-step shows you how to create, map values using JSONPath and filter received payloads.
-
In AWI, click Process Assembly.
- Click Add Object from the toolbar
- Select and expand Event (EVNT) tree
- Select and expand IA variables, then select WEBHOOK Event
Note: To secure the Webhook endpoint see: Securing the Backend. The Webhook runs on the IA Agent and uses the same SSL settings. If you want to use different certificates for each Webhook, install multiple IA Agents and use the certificate on each agent.
Two sections are in the Webhook Event object sheet:- Endpoint Information
- Path
- Map Received Data to Event Definitions
- Event Definition
- Filter Received Data with conditional operators
- Map Values using JSONPath
- Endpoint Information - Path:
When a new Webhook Event object is created in AWI, a URL is generated with a unique Path. The unique path is generated using the Automation Engine Client ID login and a unique number. This entire URL (including the path) is used in your external system webhook URL configuration.
The structure of the URL is as follows:
IA Automation Agent address/ + "analytics/api/" + version of the API (currently "v1") + client no. /+unique no.
Example:
The following example shows endpoint (url+path) structure.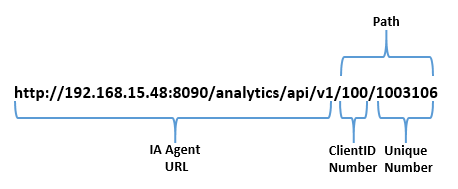
Example:
The following example shows endpoint (url+path) structure as it appears in AWI
- Map Received Data to Event Definitions - Event Definition Selection:
In the Webhook Event object sheet, select the Event Definition to begin the JSONPath mapping and filter process. The Event Definition should contain your previously defined Attribute Keys.
Example:
- Map Received Data to Event Definitions - Filter Received Data
This feature allows you to filter received event payloads using conditional operators. If the filtering conditions pass, then they are used to trigger Rules for incoming events.
Example:
The following example filter is based on a webhook event in the JIRA application called "Issue_created". If a JIRA event payload with the event name "issue_created" is received, it triggers a Rule in the Event Engine.
Note: The deep scan operator ".." is not supported for filter expressions. For further details, see here.
It is also possible to map several external system event types by using the Add Mapping feature. Therefore you can register the same Webhook URL (endpoint) in your external system for multiple event types.
Example:
The following example shows an external repository application that is configured to send two event payloads (Push and Modified) to one URL (endpoint).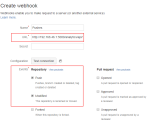
Note: The filter operator table has the same operators as outlined in the Simple Rule. - Map Received Data to Event Definitions - Map Values Using JSONPath:
Once you have selected the Event Definition, you see your previously created Attribute Keys listed. The next task is to map the Attribute Keys to the JSONPath of the incoming event payload. Mapping is necessary because Event Engine rule logic only works on events in the Event Definition format.
To map you must know the content of the incoming event payload, with the schema and the JSONPath syntax. The mapping process requires you transform the received structured data into a flat structure in the Webhook Event sheet.
Example:
The following example shows you how to transform your received JSONPath structured data into a flat structure.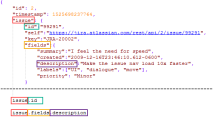
Important! Always test your JSONPath expressions against the Event Engine before putting them into production. JSONPath Expressions created in external tools might not work as expected as there are no common standard for the JSONPath query syntax.
Example:
In the following example, each Event Definition Attribute Key has been mapped to its corresponding JSONPath.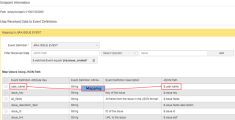
- Select the Attributes tab and select the IA Agent
- Save and then Execute the Webhook Event.


Create a Rule
Rules are building blocks that consist of rule logic. One way of looking at rule logic is to imagine a set of instructions (or a formula) that follows certain inferences. An example would be: IF some condition is met THEN take some action.
Two Rules types can be used to trigger an Event:
Note: To install the Analytics Action Pack Rules see: Installing an Analytics Rule.
All rules share the following features:
- They execute an Automation Engine Object whenever the rule triggers
- A rule type is defined by a set of parameters that can be easily mapped to the Prompt Set values of the selected AE Object
- A rule type offers a defined set of output parameters
-
Select and Add the rule type from the list.
-
Configure the rule (based on the selected rule type). Configuration is further outlined in detail with use case examples defined. See: RULE Events
Example:
Continuing with the UI message example, If the event type is equal to "repo: msg_change" the Rule is triggered and executes a job that creates a ticket for the translation team.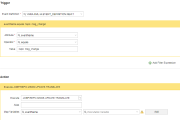
-
Save your created rule
-
Execute the rule and check if the rule is running by opening the Executions
- Whenever a rule is triggered, a new child execution is generated. You can open a child execution task to see the AE object executed by the trigger
- The "Event Count" increases each time that the rule is triggered


Note: The Event Count does not increase for every event that the rule might be listening on.