 Agent Client Assignment
You cannot use agents immediately after they have been installed. For security reasons, you must determine the clients in which the individual agents can be used and the rights that they should have.
Object Definition
Object class: System object
Object type/Short form: HSTA
Once the agents are installed in your system and you have created the clients, you must then establish the connection between agents and clients and define which rights each agent will have on which client.
You can grant agents the necessary rights individually on their Managing Authorizations at Object Level, but if you are dealing with many agents, this is very time-consuming. In this case a faster alternative is using the Agent/Client Assignment object (HSTA), where you collect agents and define an authorization policy that you assign to all of them in bulk. The HSTA object then enters the rights specified in the authorization policy in the individual agents.
HSTA objects can be created in the Process Assembly perspective in system client 0 only.
Defining Agent Client Assignment Objects
An HSTA object definition is made up of the following pages:
- Standard pages that are always available, no matter what type of object you are defining:
-
The Agent Authorization Policy page described here.

To Define the Authorization Policy
-
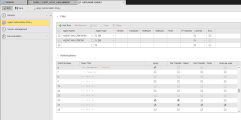
In the Filter section, create the list of agents to which you will apply the authorization policy in bulk.
-
Click the folder icon on the Agent name cell to open the Select Agent dialog, where you select the agent to include in the list.
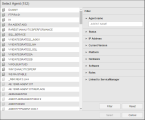
Use the Filter pane on the right hand side and click the Filter button to narrow down the number of agents on the list. When you have found the Agent you are looking for, select it and click the Select button. It is inserted in the Filter table.
-
Use the table toolbar to add more agents and to arrange them in the list:
Option Description

Inserts a new row at the bottom of the table

Deletes the row 
Removes the entry from the list and pastes it to the clipboard. Click Paste to add it to the bottom of the table. 
Duplicates the entry. Click Paste to add it to the bottom of the table. 

Activates all rows in the table. -
Activate the Exclude checkbox if you want this agent to be excluded from this authorization policy.
For example, in the illustration below, all Windows agents have been granted certain rights on a number of clients with just one exception: AGENT.WIN.CPBFGP, which is also a Windows agent, will have no access to those clients:

-
-
The Authorizations section provides the list of all the available agents in your system. Specify here the individual rights the agents should have (or not) on the clients.
The Client Number and Client Title columns are not editable; they provide the number and title(if available) of the client as specified upon creation.
-
Specify the rights you want to grant the agents in the selected client:
Right Description File Transfer - Read The client can transfer (send) files. File Transfer - Write The client can receive transferred files. Execute Jobs The client can start jobs. -
Activate the Apply checkbox to grant the selected rights to the agents in the Filter list.
Please note that you can also activate this checkbox if no rights have been specified for a client.
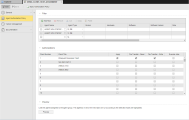
Example:
The agents depicted in this screenshot are assigned to clients 6, 25 and 27.
- On client 27 they have full rights.
- On client 25 they can only receive transferred files.
- Although the are assigned to client 6, they cannot perform any of the actions associated to these rights.
-
-
In the Preview section, check the client/agent assignment you have just defined.
Before applying the rights policy on clients to the collected agents you can check whether your definition is correct.
Click the Preview button at the bottom of this page to see the list of agents to which you are about to grant rights. This does not trigger agent assignment, it simply displays the effects that the agent assignment would have with this HSTA object.
You can save and preview your definitions or only preview them. In any case, make sure that you save them before approving the policy.
-
If you are satisfied with your settings, click the Apply Authorization Policy button on the toolbar:
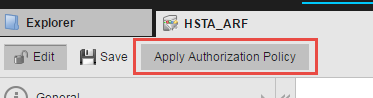
-
Activate the HSTA object. For this purpose, switch to the Administration Perspective, expand Agents & Groups and select Agent Authorization Policies.
The HSTA object you have just created is in the Inactive table. Select it and do one of the following:
- Right-click and select Set Active or
- Click the arrow to insert it in the Active table or
- Drag and drop it in the Active table
You can also select multiple objects and activate them in bulk.
- As soon as you save the object, it is written to the UC_AGENT_ASSIGNMENT static Variable and, therefore, it is activated. See UC_AGENT_ASSIGNMENT - Agent Assignment.


Important Configuration Details
The order of objects in the Active table is relevant! This order is mirrored in the UC_AGENT_ASSIGNMENT Variable. For example, consider this list of active agents:
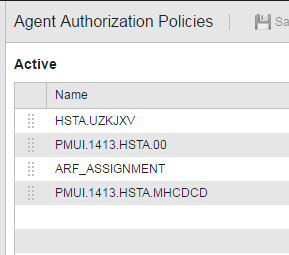
The UC_AGENT_ASSIGNMENT Variable is as follows:
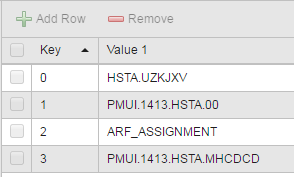
The list is processed from top to bottom; if two objects contain contradictory definitions, the rights of the HSTA object that is listed last are applied.
Deleting an HSTA object in the Explorer of the Process Assembly perspective also removes the corresponding entry in UC_AGENT_ASSIGNMENT and in the Agent Authorization Policies page in the Administration Perspective.
For performance reasons, rights are not assigned every time an agent starts but only when it starts for the first time.