 Unix Jobs
This subtype of the JOBS object defines Unix operating system processing steps to be carried out in a target system. Like all other job objects (JOBS), Unix jobs can run independently or they can be added to a group (JOBG) or to a workflow. For details on the integration between the Automation Engine and Unix please refer to AE and UNIX.
The ![]() page contains the Unix-specific execution parameters:
page contains the Unix-specific execution parameters:
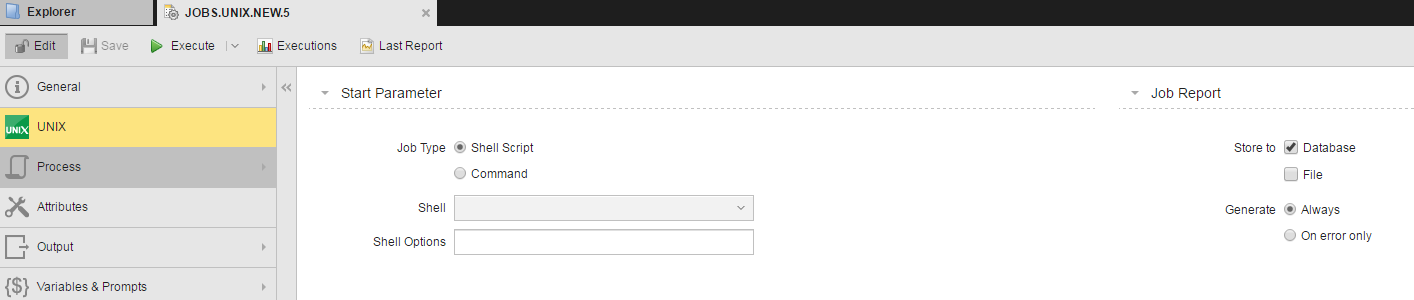
Start Parameters Section
The following table describes the available options:
| Option | Description |
|---|---|
| Job Type |
Select how the UNIX commands are executed:
|
| Shell |
Select the UNIX shell, under which the job runs. If you do not select a shell, the default shell from the password file is applied. Shells are listed with and without leading - characters. The shells with - characters are login shells. A login shell is one whose first character of argument zero is a -, or one started with the --login option. See for instance: http://linux.die.net/man/1/bash. Your administrator maintains the available shells in the UC_SHELL_UNIX - Defining UNIX Shells variable. |
| Shell Options | You can specify further shell options. The syntax depends on the selected shell. |
Job Report Section
The following table describes the available options:
| Option | Description |
|---|---|
| Store to |
You can select one option or both of them simultaneously. |
| Generate |
Define when the operating system process log is written.
|
Next Steps
The list below tries to depict a possible road-map to define and work with Job objects and provides short descriptions of the actions you can take, additional information that can help you understand how they work and links to topics that further describe them:
-
Define the job general settings, which include the following:
- The basics, on the General Page.
- If required, apply a Sync object to the job; You do so on the Sync Page.
- On the Runtime Page specify the job runtime settings.
- Fine-tune access rights at object level on the Managing Authorizations at Object Level.
- Specify the object Attributes on the Attributes Page.
- Register the output files that will be produced when processing them on the Output Page.
- To be able to carry out searches in those output files and, if required, perform follow-up actions, specify these settings on the Output-Scan Page.
- You may want to use variables or prompts. You do so on the Variables & Prompts Pages.
- You may want to define the settings to backup and restore a job task when included in a workflow. This is useful to recover the last successful status in case of failed processes. You do this on the Rollback Page.
- The Version Management Page lists all the versions of an object and allows you to restore it to an older version in case of a misconfiguration.
- Enter information on the job you are defining on the Documentation Page.
-
Job objects (JOBS) have three pages on which you enter the scripts to be processed. They provide a number of convenience functions to help you with your work. If you enter scripts on all of them, they are processed in the following order:
- Pre-Process Page
- Process Pages
- Child Post-Process (SAP and PeopleSoft only), see Child Post-Process Page.
- Post-Process Page
- You can easily reuse code using Include Object (JOBI), which saves time and helps you keep your scripts consistent.
-
Execute the job.
There are multiple ways to do this that can be grouped as follows:
-
By a parent task.
This is the case of jobs that are included in a parent object (for example a Workflow or a Group). When defining them, take into account that their activation time can be different from their start time; the latter usually depends on the parent object.
-
Stand alone
This is the case when the job is not part of a parent object or, even if it is, you execute it independently of its parent. You have three possibilities:
When executable objects are processed, they go through the following four stages: 1. Activation, 2. Generation, 3. Processing and 4. Completion. Take a look at these topics to understand what happens with every processing stage.
-
-
When processing jobs, the Automation Engine generates output files and reports that guarantee traceability and auditability. Have a look at the following topics to learn more about this:
-
Monitor the generated object.
As soon as the job is activated, it is available as task in the Process Monitoring perspective. In the Task list you can see its status.
Right-click it to open its monitor (see Monitoring Jobs); it contains three pages that provide the most important information on the job parameters.
You can also access the Job Monitor from the Process Assembly perspective.
- In the Process Monitoring perspective a number of functions are available, depending on the status of the job. See Working with Tasks.