Creating REST Actions
Actions can only be created inside an Action Pack.
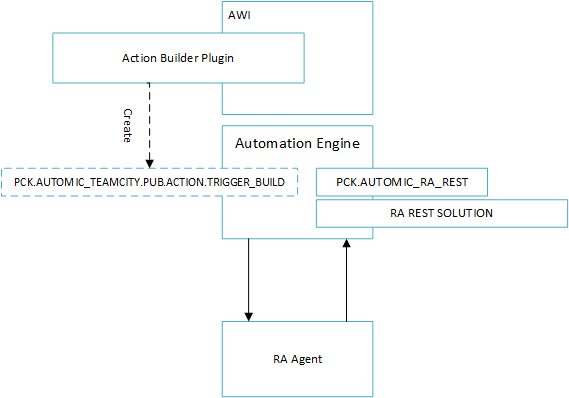
REST Actions can be created , for example, to trigger a TeamCity build via ARA REST API. For more information on the ARA REST API see ARA REST API - General Info.
Watch the video
The following components have to be installed on the client before creating REST Actions:
- PCK.AUTOMIC_RA_REST
- RA-Solution WEBSERVICEREST
- PCK.ITPA_SHARED
All of them can be downloaded from the Automic Marketplace.
To Create REST Actions
- Navigate to the Process Assembly perspective and click the Action Packs tab.
- Click the Action Pack where you want to create the Action or create a new one. (For more information see the Creating Packs section)
- Click Add Action. The Add Action window is displayed.
- Select the REST Action type (REST).
- Enter a Title for the Action. The Name for the Action is suggested automatically.
- Enter a new Category for the Action or select an existing one from the dropdown list. Categories are used to group and easily find the Actions and are displayed on the Actions tab.
- Click Next. The Add Action dialog is displayed.
- Select the Authentication type for the endpoint. None is selected by default.
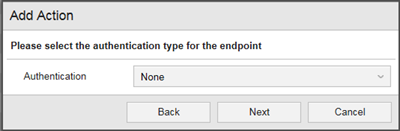
The following authentication methods are available: None, Basic, Digest, NTLM, Oauth 1.0a, Oauth 2.0, AWS Signed URL.
- Click Add to create the Action.
You can view all objects of the Action by right-clicking it and selecting Jump to source.
It is good practice to provide information to others in the Documentation tab of the Action workflow to help identifying your content.
See also:
Learn more on how to configure a REST Action by reading the following use case: Creating your First REST Action