The ONE Installer allows a fast single-box setup for demonstrations, testing, or feature previews on-site and is available for CA Automic Workload Automation (AWA), CA Automic Release Automation (ARA) and (Automic Service Orchestration) ASO.
The prerequisites are kept to a minimum (for example a database and user, a local login and free local ports are required).
The following document is a step by step guide for installing Automic ONE installer package.
Updating from previous AE or ARA versions is not supported.
Automic recommends using a separate VM for the DB or assigning a fixed amount of memory to the SQL Server.
System Requirements and Prerequisites
|
Component |
Requirement |
|---|---|
|
Supported Operating Systems |
Windows: Windows Server 2012, 2012 R2, 2016. Linux:
|
|
Supported Databases |
Microsoft SQL Server 2012, 2014, 2016. SQL Native Client 2016 is supported. |
| Ports |
The following ports and port ranges need to be free respectively: 2270-2279 (for WP connections) 8005, 8009, 8080 (for Tomcat connections used by the AWI) 8871 (ServiceManager) 8090, 5434,6124,8081,9092,2181 (for Analytics / Message Queue / Rule Engine) |
Note that a minimum of 8GB is required on the installation machine.
For ONE Installer setup recommendations, refer to the configuration section in AWA System Requirements and Sizing.
The following prerequisites are required before starting theONE Installer:
- Store the Automic license file on your machine and point the installer to it when requested.
- Install the correct database driver for the database that you will use on the same host that the installer will be executed on:
- Oracle: Oracle Database Client
- MS SQL: SQL Server Native Client 11
- Download the JDBC driver for the database you are using (Oracle, MS SQL Server).
- Create AE databases and users:It's important to remember that you need a new, empty AE database and a new dedicated user with dbowner permissions.
- In the profile configuration of an Oracle DB (SQLNET.ORA) in the parameter NAMES.DIRECTORY_PATH enter ezconnect to the list of values.
- The AE connects to the database via TCP/IP, so you need to make sure that your server and client have TCP/IP connection enabled. For an MS SQL Server, use the MS SQL Configuration Manager to configure this.
- User name and password of a local user account.
-
When using Windows Server 2016, make sure the following features are installed:
- NetFx3
- NetFx3ServerFeatures
To install them, enter the following in the command line:
Dism /online /Enable-Feature /FeatureName:NetFx3 /AllDism /online /Enable-Feature /FeatureName:NetFx3ServerFeatures /All
Important Notes
On Windows:
- Make sure you do not have a Windows service for the ServiceManager registered prior to running the installation.
- You require administrative rights to execute the installer.
On UNIX:
- You must execute the installer with root privileges.
- Executing the installer from network shares with NFS is not recommended.
The Automation Engine utility is linked against 11G OCI client. If you are using a different Oracle client version, you must create a SYM LINK for 11G like ln -s libclntsh.so.xx.x libclntsh.so.11.1, where xx.xis your Oracle client version.
Installed Packages and Components:
General Information
Additional Action packs and/or RA solutions will be installed, if present and a valid license contained in the license file. The contents of packages is determined by Automic and may vary between releases.
The installation will set up an AE system with additional client and user account besides the system client.
During the attended mode and the CLI mode installation you will be asked to enter the necessary information.
You will be able to configure the ports for communication processes and work processes (CPs and WPs). Please take into account that the installer will open the ports for and start 2 CPs and 5 WPs. You have to start additional processes manually.
The ONE Installer creates a log file in the root installation folder (e.g., C:\Automic\install.log).
The ONE Installer installation provides the following:
- Automation Engine (5xWP/2xCP/1xJWP)
- ServiceManager (all processes will be managed through the ServiceManager)
- ServiceManager dialog (Windows only)
- Automic Web Interface
- Analytics
- Utilities
- Java
- Tomcat
- Package Manager
- Local OS Agent
- RA Web Service REST, RA Web Service SOAP, FTP, JMS (will be installed, if present)
Post-installation Task (Optional)
As a performance enhancing task you can change Max Perm Size and Heap Size of your Tomcat prepared by the ONE Installer as described in Installing and Preparing the Apache Tomcat Web Server.
Available Installation Modes
- Attended installation using the ONE Installer installation wizard.
- Unattended installation using a file containing the required information.
- Command line interface installation
Attended Mode:
- Unzip the delivered files to a local directory of your choice and start the installer using install.exe / install.sh.
-
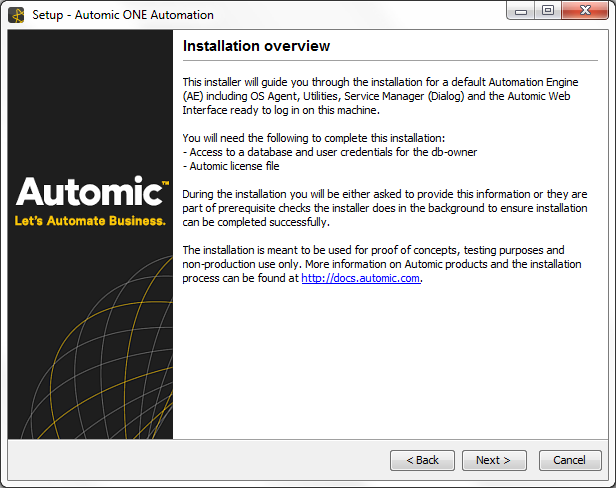
After starting the installer, the second screen will display the installation overview.
- The ONE Installer checks, if the preconditions are fulfilled.
On the left hand side of the pane you see a short list of the installation steps.
If the ONE Installer finds discrepancies, it will attempt to fix the preconditions.
- You will be asked to define the database you choose to install (MS SQL or Oracle).

- The installer will then check whether the necessary database drivers are present.
- You will be asked to point the installer to the JDBC driver of your database.
Use the provided download link, if you need to download the latest version.

Point to JDBC (example for Microsoft, if MS SQL has been selected as database before).
-
Port Configuration
The ONE Installer will present you with a default list of ports for CPs, WPs and the base components mentioned above.
It checks for unused ports in the system in the port ranges listed in the table above and will then configure those. The dialog displayed below will only be shown in case no suitable ports are found.
 The ONE Installer will check every entry you make as soon as a field looses focus and you enter values into the next one.
Only if all checks succeed will the installation proceed.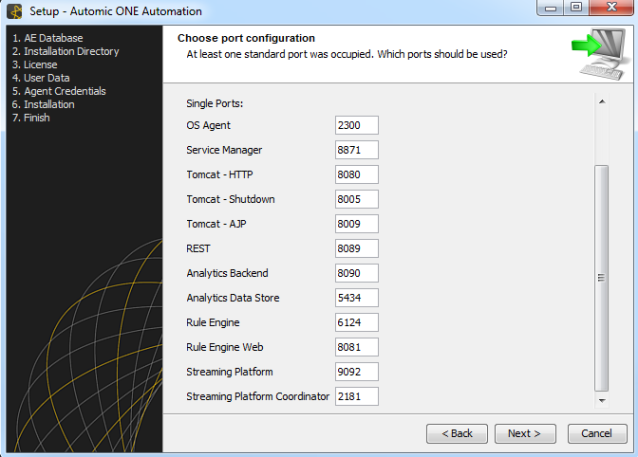
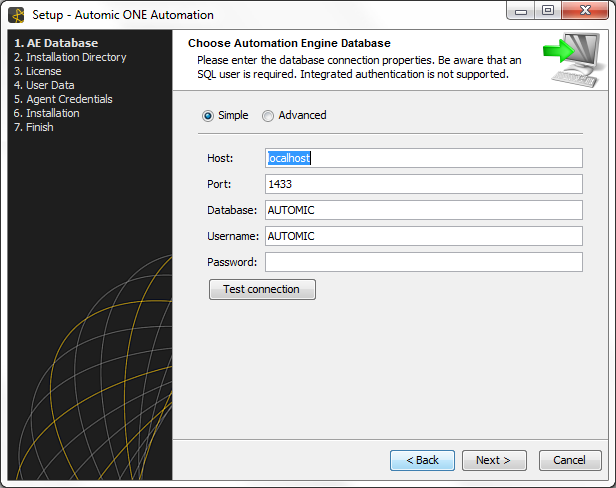
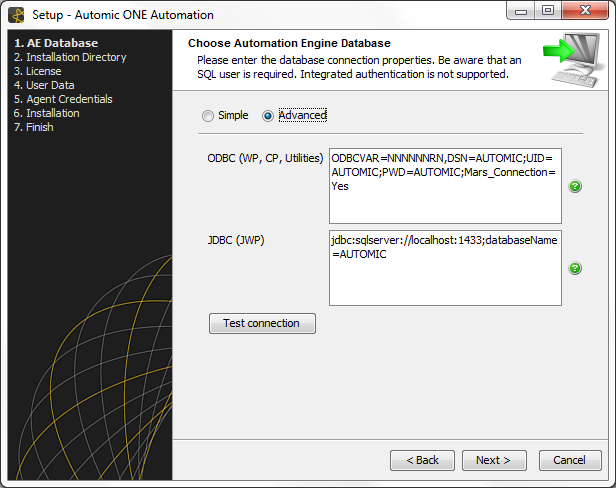
- Enter the database connection values for the AE database using either the Simple or Advanced mode.
Regardless of the mode being used, it is possible to test the connection using the Test connection button. Otherwise, the ONE Installer will test the connection automatically upon clicking Next.
When using the Simple mode, the connection string is generated automatically using the database connection information (Host, Port, etc.).
Using the Advanced mode allows you to set the connection string manually. Optionally, you can also set a separate JDBC connection string for the JWP.
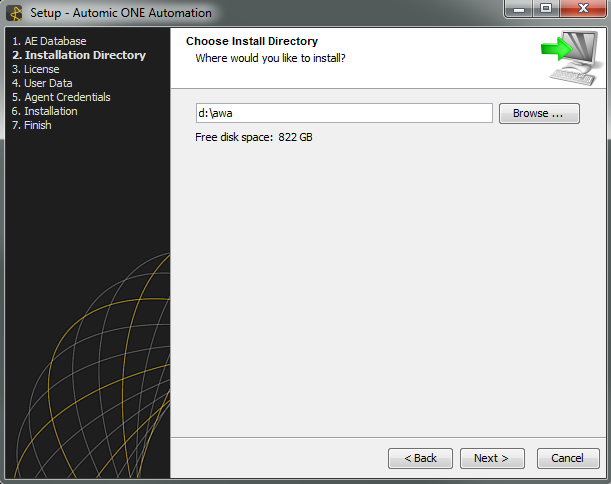
-
The default installation directory is C:\Automic, however you can specify your own custom path.
Spaces in paths are not allowed, ensure that to define a path without spaces.
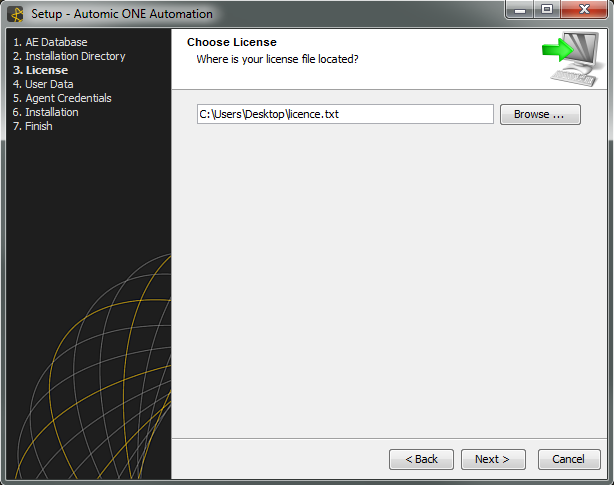
- Point to the path of your license file you got from Automic.
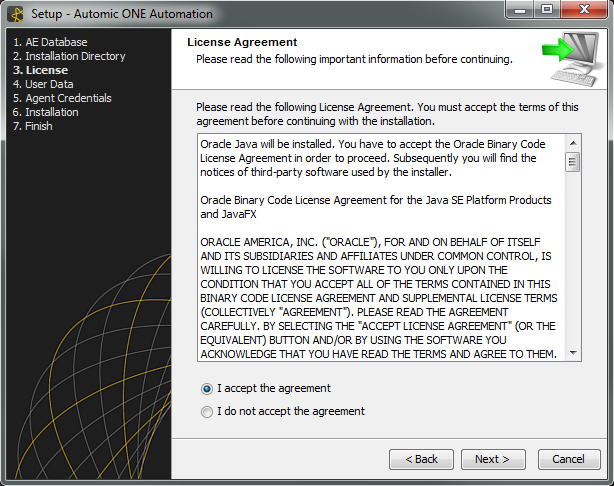
- You will be asked to confirm the license information pertaining to the external software (e.g. Java) that will be installed.
-
Enter the client data for the first client the ONE Installer will create.
Select a client number between 0001 and 9999 (0000 is reserved for the system client), a user name, the department and a password.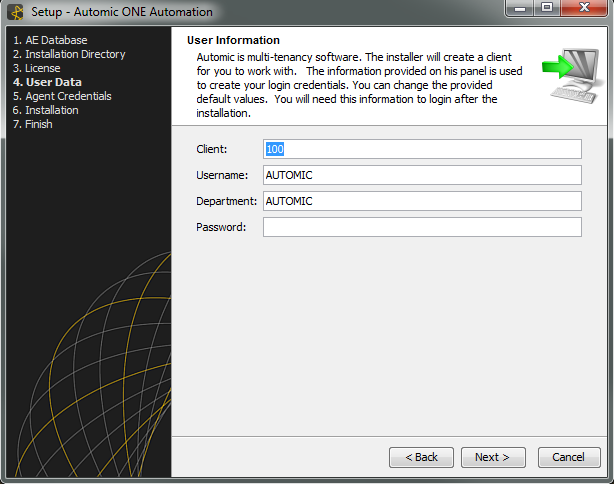
-
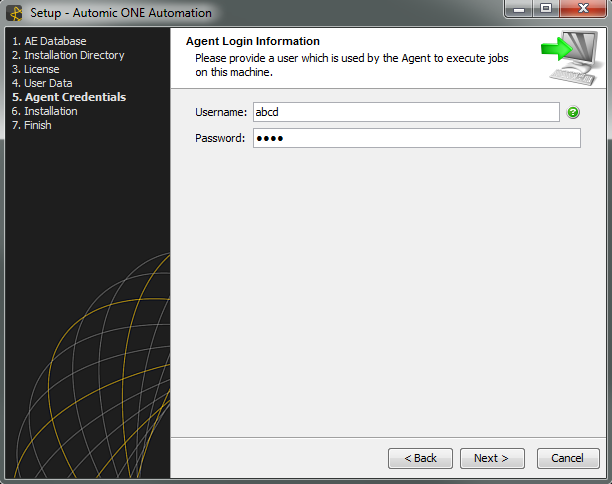
Enter the credentials which the agent should use to execute jobs on the machine on which the ONE Installer is running and the Automation Engine will be installed.
Ensure that your enter the correct user credentials, as this information is not verified in this step.
-
The installation will start and information relating to its progress will be visible on the screen.
The installer will automatically install all components you downloaded and unpacked, depending on the packages present.
After successful installation, the AWI login page opens in your default Internet browser. Log in with the user credentials that you specified during the installation.
To use the installer in unattended mode, start the installation and use a configuration file with the extension .varfile.
Call it by using the following arguments in the directory you extracted the files to:
| On Windows: | install.exe –q –varfile <path-to-varfile> -dir <path-to-installation-directory>
|
| On Linux: | install.sh –q –varfile <path-to-varfile> -dir <path-to-installation-directory>
|
Important Notes
You can choose any name for the .varfile. Defining an installation directory path is optional.
![]() Special characters have to be escaped out, as shown below. The parameters have to be entered and used as shown in the example.
Special characters have to be escaped out, as shown below. The parameters have to be entered and used as shown in the example.
The port configuration in unattended mode works with unused ports in the system only. If the ports cannot be configured in the above mentioned range, the ONE Installer will abort the installation with an error message in the install log.
To verify that your ports have been correctly specified in the .varfile, check the installation log file for the actual used ports.
Example .varfile
CLIENT=100
DB_INPUT_MODE=SIMPLE
DB_CODESET$Integer=0
DB_DATABASE=AE_DB
DB_HOST=mydbhostname
DB_PASSWORD=mydbpassowrd
DB_PORT=1521
DB_SERVER=1
DB_USER=mydbusername
DEPARTMENT=DEV
JDBC_DRIVER_JAR=C\:\\app\\oracle12c\\product\\12.1.0\\dbhome_1\\jdbc\\lib\\ojdbc7.jar
LICENSE_FILE=C\:\\installer\\licence.txt
LOGIN_PASSWORD=Nexus01@adm
LOGIN_USER=Administrator
PASSWORD=123
USERNAME=AUT
PORTS_CP=2217,2218,2219,2220,2221
PORTS_WP=2270,2271,2272,2273,2274,2275,2276,2277,2278,2279
PORT_OS_AGENT=2300
PORT_SERVICE_MANAGER=8871
PORT_TOMCAT_HTTP=8080
PORT_TOMCAT_SHUTDOWN=8005
PORT_TOMCAT_AJP_PORT=8009
PORT_IIS=80
PORT_ANALYTICS_BACKEND_PORT=8090
PORT_ANALYTICS_DATASTORE_PORT=5434
PORT_RULE_ENGINE=6124
PORT_RULE_ENGINE_WEB=8081
PORT_STREAMING_PLATFORM=9092
PORT_STREAMING_PLATFORM_COORDINATOR=2181
The .varfile Parameters:
|
Name |
Description |
|---|---|
| DB_INPUT_MODE |
Define if simple or advanced database connection values should be used for AWA. Allowed values: SIMPLE or ADVANCED |
|
DB_SERVER |
Type of the database server to use. 0 : Microsoft SQL-Server |
|
DB_HOST |
Name or address of the database server that the new AE installation should use. |
|
DB_PORT |
IP port that is used to connect to the AE database. |
|
DB_DATABASE |
Name of the database (MSSQL) or SID/Service-Name (Oracle) that the AE installation should use. |
|
DB_CODESET$Integer |
This setting is only used for installations that use an Oracle database (DB_Server = 1). 0 : UTF-8 |
|
DB_USER |
Name of the database user in the AE database. |
|
DB_PASSWORD |
Password of the database user in the AE database. |
| DB_ODBC |
Used when DB_INPUT_MODE = ADVANCED Connection string for ODBC connection of CP, WP and Utilities Example: |
| DB_JDBC |
Used when DB_INPUT_MODE = ADVANCED Connection string for JDBC connection of JWP Example: |
|
JDBC_DRIVER_JAR |
Location of a JDBC driver file that should be used to connect to the AE (and CA Automic Release Automation) database. |
|
LICENSE_FILE |
Location of the Automic license file that should be used by the newly installed system. |
|
CLIENT |
Client number of the AE client that is created by the installer. |
|
USERNAME |
User name of the AE user that is created by the installer. (Use AE allowed characters.) |
|
DEPARTMENT |
Department of the AE user that is created by the installer. (Use AE allowed characters.) |
|
PASSWORD |
Password of the AE user that is created by the installer. |
|
LOGIN_USER |
User name for a Login object that will be used by the OS agent. This should match a user account on your local system. |
|
LOGIN_PASSWORD |
Password for the user account specified in LOGIN_USER. |
|
PORTS_CP |
Group of ports that will be used by the CP processes. Exactly 5 ports have to be provided. Default value: 2217,2218,2219,2220,2221 |
|
PORTS_WP |
Group of ports that will be used by the WP processes. Exactly 10 ports have to be provided. Default values: 2270,2271,2272,2273,2274,2275,2276,2277,2278,2279 |
|
PORT_OS_AGENT |
Port for the Windows Default value: 2300 |
|
PORT_SERVICE_MANAGER |
Port for the Service Manager. This port is used by the ServiceManager Dialog to communicate with the ServiceManager. Default value: 8871 |
|
PORT_TOMCAT_HTTP |
Tomcat will serve the AWI installation on this port. Default value: 8080 |
|
PORT_TOMCAT_SHUTDOWN |
Port that is used to send a shutdown command to Tomcat. Default value: 8005 |
|
PORT_TOMCAT_AJP_PORT |
Tomcat AJP port. Default value: 8009 |
|
PORT_IIS |
The Microsoft Internet Information Services will be extended with a new site definition that uses this port. This site is then used by the AWI to communicate with ARA. Default value: 80 |
|
PORT_ANALYTICS_BACKEND_PORT |
Analytics Backend. Default value: 8090 |
|
PORT_ANALYTICS_DATASTORE_PORT |
Port that is used by the PostgreSQL installation that is installed with Analytics. Default value: 5434 |
| PORT_RULE_ENGINE |
Port that is used by the Rule Engine installation that is installed with Default value: 6124 |
| PORT_RULE_ENGINE_WEB |
Port that is used by the Web interface of the Rule Engine installation that is installed with Default value: 8081 |
| PORT_STREAMING_PLATFORM |
Port that is used by the Streaming Platform installed with Telemetry and the Rule Engine. Default value: 9092 |
| PORT_STREAMING_PLATFORM_COORDINATOR |
Port that is used by the Steaming Platform coordination service Default value: 2181 |
The installation steps will be the same as in GUI mode. You will have to enter the required information or confirm actions, using the displayed commands or options.
- In order to start the installer, in Windows
Windows:start /wait install.exe -cinstall.sh -c - A short installation overview will be displayed.
- The installer then will check if preconditions have been fulfilled and attempt to fix them, if discrepancies exist.
- Define the database that you installed (MS SQL or Oracle).
- Point the installer to the JDBC driver of your database.
- Enter the connection values for the database.
- Choose the installation path. Default is C:\Automic, but you can define a path of your choice.Spaces in paths are not allowed so take care that the installation path does not contain spaces.
- Point the installer to your license file you received from Automic.
- Confirm the license information pertaining to the external software (Java) that will be installed.
- Enter the client data for the first client the ONE Installer will create.
Choose a client number between 0001 and 9999 (0000 is reserved for the system client), a user name, the department and a password. - Enter the agent's credentials to execute jobs on the machine on which the ONE Installer is running and the Automation Engine will be installed.
 Take care to enter the correct user credentials, as the information will not be checked in this step.
 - The installation will start, and after successful installation, the AWI login page opens in your default Internet browser.
Login with the user credentials that you specified during the installation.
The system that has been installed is a basic Automation Engine system.
For high redundancy or more sophisticated setups please continue with the additional pages of the installation chapter.
Comments
The installation sets up the ServiceManager to be started automatically on system boot as a Windows Service
Example:
Tomcat cannot start because another process has already reserved the required port 8080, which results in the AWI not being available. In order to check that all processes could be started, do one of the following:
- Start the ServiceManager dialog and check if any processes are displayed in red.
- Open the ServiceManager log file and look for errors.
The Service Manager log file can be found in the ServiceManager ./temp directory.