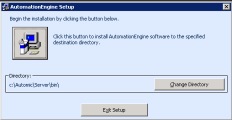
Do not use blank spaces when naming the directories for the Automation Engine and the Agents.
The Automic Web Interface and the AE server must have the same release version. To check other compatibility issues, see Automic Compatibility Matrix.
System Overview
Click the image to expand it.

Installation Steps

![]() If you would like to print this page, click
If you would like to print this page, click ![]() in the menu bar above to expand the steps below:
in the menu bar above to expand the steps below:
To Install the Automation Engine
-
 Set up the Database rights for the Automation Engine
- Read access to system tables such as SYSIBM.SYSTABLES,...
- Right to create tablespaces
- Right to create indexes
- Full access to the tables
Use the following command to set these rights:
grant dbadm on database to <user>;
No further steps are required at this point (provided you have followed the preparation steps).
The database user requires the "db_owner" role. To add it, use the following SQL query:
sp_addrolemember 'db_owner','uc4'
-
CREATE SESSION
- CREATE TABLE
- CREATE SEQUENCE
- CREATE PROCEDURE
- EXECUTE ANY PROCEDURE
- CREATE VIEW
- CREATE PUBLIC SYNONYM
- DROP PUBLIC SYNONYM
- ALTER SESSION
- Either the system privilege UNLIMITED TABLESPACE or the tablespace quotas for all tablespaces
- The right EXECUTE for the DBMS package (command so set this right: GRANT execute ON dbms_lock TO <schema_name>). This right can only be set by a user who has the SYSDBA privilege.
Example commands that can be used to assign the relevant rights to the database user uc4:
GRANT create table, create sequence, create session, create procedure, execute any procedure, create public synonym, drop public synonym, create view, alter session, select any dictionary TO uc4;
GRANT execute ON dbms_lock TO uc4;
GRANT unlimited tablespace TO uc4;The following example commands can be used to check the rights:
CREATE TABLE
CREATE TABLE UCDUMMY (UCDUMMY_PK INTEGER NOT NULL, UCDUMMY_System VARCHAR2 (8) NULL,
CONSTRAINT PK_UCDUMMY PRIMARY KEY
(
UCDUMMY_PK
) USING INDEX TABLESPACE UC4_INDEX
) TABLESPACE UC4_DATA;CREATE SEQUENCE
CREATE SEQUENCE SQ_UCDUMMY
INCREMENT BY 1 START WITH 1 MAXVALUE 999999999
MINVALUE 1 CYCLE CACHE 1000 NOORDER;CREATE PROCEDURE
create or replace PROCEDURE DUMMY_PROCEDURE
as
BEGIN
dbms_output.enable(buffer_size => NULL);
dbms_lock.sleep(5);
dbms_output.put_line('could start procedure');
END;SET SERVER OUTPUT
set serveroutput on;
ALTER SESSION:
ALTER SESSION SET NLS_DATE_LANGUAGE = American;
EXECUTE PROCEDURE, EXECUTE for the DBMS package:
execute dummy_procedure;
Use the following commands to delete the test data that has been created:
DROP TABLE UCDUMMY;
DROP SEQUENCE SQ_UCDUMMY;
DROP PROCEDURE DUMMY_PROCEDURE;Installation Progress

-
A three-figure code has been supplied for each supported UNIX platform because the utilities for UNIX are available for different platforms. This document replaces the specific codes with the characters "???."
Automic strongly recommends installing the utilities in a separate directory (such as /opt/uc4/utilities).
Requirements
- Valid user ID for installation (UC4)
To Install the Utilities (UNIX)
Utilities must be run as administror.
-
Install the Java Runtime Environment (JRE). (Admin computer)
This installation step can be ignored if the required version of JRE is already installed.
- Use the following command to check which version of the Java Virtual Machine (VM) is currently installed:
- Download the required Java Runtime Environment from http://java.sun.com and install it.
java -version
If several JRE or Java SDK versions are installed on your computer, make sure that the specified directories are in the proper order in the settings of %PATH% and $PATH. The Java Runtime Environment that is found first in the list of directories is used.
-
Unpack the TAR file and set up the system environment. (Admin computer)
- Copy the util???.tar.gz TAR file to a directory (such as AUTOMIC/utility) via FTP.
- Log on using the user ID UC4.
- Switch to the directory used for the utilities:
cd utility -
Unpack the tar file:
gzip -d util???.tar.gz or gunzip util???.tar.gz
tar xvfo util???.tarThe files are created in their corresponding directories as the file is unpacked. The tar file can be deleted after unpacking.
Pay special attention to tar messages, which can result from different owners, and verify that all files are correctly unpacked.
- Check whether all files show the correct owner and group entries. AE must be the owner and the group must correspond to the identification "UC4. Modifications can only be made by a privileged user (such as root).
chown UC4 * changes the owner of all files to UC4.
chgrp Group name * changes the user group of all files. -
Set the environment variables in $HOME/.profile.
-
For Oracle:
-
Sample for AIX:
ORACLE_HOME=/usr/oracle; export ORACLE_HOME
AUTOMIC=/opt/automic/utility; export AUTOMIC
PATH=.:$ORACLE_HOME/bin[:$PATH]; export PATH
LIBPATH=.:$AUTOMIC/bin:$ORACLE_HOME/lib:/usr/lib:/lib[:$LIBPATH]; export LIBPATH -
Sample for HP-UX:
ORACLE_HOME=/opt/Oracle; export ORACLE_HOME
AUTOMIC=/opt/automic/utility; export AUTOMIC
PATH=.:$ORACLE_HOME/bin[:$PATH]; export PATH
SHLIB_PATH=.:$AUTOMIC/bin:$ORACLE_HOME/lib:/usr/lib:/lib[:$SHLIB_PATH]; export SHLIB_PATH -
Sample for Linux, Solaris and zLinux:
ORACLE_HOME=/oracle/product/9.0.1; export ORACLE_HOME
AUTOMIC=/opt/automic/utility; export AUTOMIC
PATH=.:$ORACLE_HOME/bin[:$PATH]; export PATH
LD_LIBRARY_PATH=.:$AUTOMIC/bin:$ORACLE_HOME/lib:/usr/lib:/lib[:$LD_LIBRARY_PATH]; export LD_LIBRARY_PATH
-
-
For DB2:
-
Sample for AIX:
DB2DIR=/usr/lpp/db2_06_01;export DB2DIR
DB2INSTANCE=db2inst1;export DB2INSTANCE
UC4=/opt/uc4/utility; export UC4
PATH=.:$DB2DIR/bin[:$PATH]; export PATH
LIBPATH = $UC4/bin:$DB2DIR:usr/lib:/lib:/usr/lib64[:.:$LIBPATH] -
Sample for HP-UX:
DB2DIR=/opt/IBMdb2/V6.1; export DB2DIR
UC4=/opt/uc4/utility; export UC4
PATH=.:$DB2DIR/bin[:$PATH]; export PATH
SHLIB_PATH=$UC4/bin:$DB2DIR/lib:/usr/lib:/lib[:$SHLIB_PATH]; export SHLIB_PATH -
Sample for Linux, Solaris and zLinux:
DB2DIR=/opt/IBMdb2/V7.1;export DB2DIR
DB2INSTANCE=db2inst1;export DB2INSTANCE
UC4=/opt/uc4/utility; export UC4
PATH=.:$DB2DIR/bin[:$PATH]; export PATH
LD_LIBRARY_PATH=$UC4/bin:$DB2DIR /lib:/usr/lib:/lib[:$LD_LIBRARY_PATH]; export LD_LIBRARY_PATH
-
-
-
Adjust the INI Files to the system environment. (Admin computer)
The INI files and the corresponding utilities share the same name. Adjust the INI file entries as needed.
- AE.DB Archive: UCYBDBAR.ini
- AE.DB Change: UCYBCHNG.ini
- AE.DB Client Copy: UCYBDBCC.ini
Only when client copy is used. 2 databases needed (source and target).
- AE.DB Load: UCYBDBLD.ini
- AE.DB Reorg: UCYBDBRE.ini
- AE.DB Reporting Tool: UCYBDBRT.ini
- AE.DB Revision Report: UCYBDBRR.ini
- AE.DB Unload: UCYBDBUN.ini
-
Start the utilities. (Admin computer)
The utilities can be called as follows:
- *.sh: Regular utility start
- Without file ending: program to which start parameters can be assigned for batch calls.
Use the following command to process the start scripts:
For example:
chmod +x UCYBDBar.shNote that starting this utility's graphical interface on the platform HP Itanium requires the "libstdc++.so.6" library to be loaded with the environment variable LD_PRELOAD.
Example of a command loading the library:
export LD_PRELOAD=/automic/utility/bin/libstdc++.so.6
You can insert this command in the Shell scripts. The library will then automatically be loaded whenever a utility's GUI is opened.
Shell-script example "ucybdbld.sh" for opening the graphical user interface of the utility AE DB Load:
export LD_PRELOAD=./libstd++.so.6
java -jar ucybdbld.jar
To Install the Utilities (Windows)
Utilities must be run as administror.
-
Install the Java Runtime Environment (JRE) (Admin computer).
This installation step can be ignored if the required version of JRE is already installed.
- You can check the system's current Java Virtual Machine (VM) version by using the following command:
- Download the required Java Runtime Environment from http://java.sun.com and install it.
- Do not forget to set the JAVA_HOME and JAVA_PATH according to Java System Instructions. See: https://docs.oracle.com/goldengate/1212/gg-winux/GDRAD/java.htm#BGBFJHAB.
java -version
In case several JRE or Java SDK Versions have been installed on the computer, make sure that the order of the indicated directories is correct in the settings of %PATH% or $PATH (system environment variables). The Java Runtime Environment that is found first in the listing of directories is applied.
-
Install the Microsoft Visual C++ 2010 Re-distributable Package (Admin computer).
This installation step can be ignored if the package is already available in the required version. Refer to the Control Panel > Programs and Features to see if the package is installed, and if so, which version.
- Install the package from the CRts folder of the image.
-
Install the utilities (Admin computer).
- Start the program SETUP.EXE in the corresponding subdirectory of I
MAGE:UTILITY\WINDOWS\x64.
Automic strongly recommends to install the utilities in a separate directory (such as
C:\AUTOMIC\UTILITIES\BIN\).Please create a temp subfolder for log files in the utilities folder (such as
C:\AUTOMIC\UTILITIES\TEMP\) to comply with the predefined destination standards. - Start the program SETUP.EXE in the corresponding subdirectory of I
-
Adjust the INI files (located in the Utilities > Install folder) and set up the system environment (Admin computer).
You can use any text editor to modify the values in the INI files.
-
The INI files and the corresponding utilities share the same name. Adjust the INI file entries as needed:
- AE.DB Archive: UCYBDBAR.ini
- AE.DB Change: UCYBCHNG.ini
- AE.DB Client Copy: UCYBDBCC.ini
Only when client copy is used. 2 databases needed (source and target).
- AE.DB Load: UCYBDBLD.ini
- AE.DB Reorg: UCYBDBRE.ini
- AE.DB Reporting Tool: UCYBDBRT.ini
- AE.DB Revision Report: UCYBDBRR.ini
- AE.DB Unload: UCYBDBUN.ini
-
Almost all utilities require information about the AE database connection which is specified in the INI files. Automic recommends to create a new database user for AE.
Never create a user that is called "sa".
The appropriate password can be encoded by using the program UCYBCRYP.EXE.
-
Use the following parameters in order to specify the program via the command line:
UCYBCRYP[.EXE] -p -nPasswordThe Password.ucc file is created in the directory of the program that contains the encoded password.
-
Further Options
-
If you want to call the DLL from a freely selected path follow one of the options below (Admin computer):
- Utility DLL paths can be changed by making an appropriate entry in the system environment variables (system control -> system). Enter the variable JAVA_LIBRARY_PATH and the required path. Libraries are loaded from this directory.
- Alternatively, you can also use the parameter "-Djava.library.path=Path" in the INI files. Enter it in the line "cmd=" of the section [GLOBAL].
cmd="javaw" -Djava.library.path=..\libraries -jar -cp .;.\UC4LAF.jar UCYBDBAr.jar
Installation Progress

-
-
Copy the files in order to load the database (Admin computer).
Windows:
The files for the AE database are provided in IMAGE > DB folder.
-
Copy the complete DB folder to the installation folder of the utilities. (in our case C:\AUTOMIC\UTILITIES\).
The DB directory must be stored at the location specified in the INI-file parameter INPUT of the utility AE DB Load, which is set by default in the installation folder. (in our case C:\AUTOMIC\UTILITIES\DB)
Example for Windows:
Utilities in C:\AUTOMIC\UTILITIES\BIN
Database files in C:\AUTOMIC\UTILITIES\DB
UNIX
The database files are included in the db.tar.gz archive located in the IMAGE > DB folder.
-
Use the following commands to unpack the archive:
gzip -d db.tar.gz or gunzip db.tar.gz
tar xvfo db.tar
(Linux: tar -zxvf db.tar.gz)
- Copy the unpacked files to the defined directory.
-
-
Generate the database (Admin computer).
-
Run AE DB Load as administrator in order to load the database. Follow one of the three options below:
-
*G.EXE (
ucybdbldg.exe): regular utility start (G stands for GUI).cmd="javaw" -Djava.library.path=..\libraries -jar -cp .;.\UC4LAF.jar UCYBDBAr.jar
- *.EXE: program to which start parameters can be assigned for batch calls
- *.BAT: batch file for the utility.
As opposed to upgrade installations, new installations of AE DB Load do not display a mask in which you can select the authentication method. Start the program in batch mode using the parameters -T (authentication method) and -K (company key) in order to specify the authentication method.
To run the utilities by using an *.EXE file, you must have installed a 32-bit Microsoft Visual C-Runtime Library.
-
- Select the <DB directory>\DB\GENERAL\<vers>\UC_UPD.TXT file.
- A database scheme is created in the database, and the INITIAL and DEFAULT data are loaded.
If the database has been generated successfully you will see the following:
-
-
Optionally, activate partitioning with ILM (admin computer).
Note: You can activate ILM either during a new installation, and upgrade or at any given point in time.
-
Load the licenses (admin computer).
-
Run AE DB Load as administrator in order to load the licenses. Follow one of the three options below:
-
*G.EXE (ucybdbldg.exe): regular utility start (G stands for GUI).
cmd="javaw" -Djava.library.path=..\libraries -jar -cp .;.\UC4LAF.jar UCYBDBAr.jar
- *.EXE: program to which start parameters can be assigned for batch calls
- *.BAT: batch file for the utility.
-
- Select the Customer number.TXT file that is provided by Automic Support. The utility enters the licenses in the AE database.
- Click Open.
- Click Ok to Confirm the loading of the license.
If the license has been processed successfully you will see the following:
-
Potential Problems
- The code was not correctly converted when the ODBC access was set up. Solution: Ensure that the code is NOT converted.
- DB Load may not be able to connect to the DB if too many sessions are running simultaneously.
- The DBLOAD GUI may not start if the INI "cmd" parameter is not properly defined (
javaw.exelocation).
Further Files
The IMAGE:\DB\database\UC4 version directory includes several useful SQL script files for your database that can be also used.
Name
Description
DROP_ALL.SQL
Deletes all AE tables.
Use this SQL file when the installation could not complete successfully (for example, if there was not enough hard drive space). If not all tables could be created, this file deletes all tables that cause error messages. Check them or ignore them if no action is required.
UPD_STAT.SQL
For manual statistics updates.
Installation Progress

-
-
-
Installing the Automation Engine for UNIX
The Automation Engine for UNIX is available for different platforms; a three-figure code is supplied for each supported UNIX platform. The codes are the same as for agents. In this document, the specific code is replaced by the characters "???." This document describes the installation of the Automation Engine for Oracle and DB2 databases. Specific differences are described in the individual processing steps. MS SQL Server is not supported.
Automic strongly recommends installing the Automation Engine in a separate directory (such as /opt/automic/server).
Requirements
General:
- Root authorization during the installation. Not required for operating the Automation Engine.
- After installation, rebooting the UNIX System is NOT necessary.
- Own UNIX user ID for the Automation Engine (default: uc4, Home = /opt/uc4, Shell: ksh). The shell is only necessary during installation.
- For Solaris: The most current patch cluster for Sun OS has been installed.
Adhere to the note that describes processes on AIX.
When using an Oracle Database:
- Functioning Oracle installation (sqlplus access to the database must be possible)
- User ID for the Oracle database
When using a DB2 Database:
- Functioning DB2 installation
- User ID for the DB2 database
- Check or assign authorizations:
Open the Control Center and select the right host. Select the database for AE and click "User and Group objects." Selecting "User" lists all users in the window on the right. Use the context menu to open the authorization window of the required user.
At least the following options should be activated in the Database tab: - Connect database
- Create tables
- Create packages
- Create schemas implicitly.
- The LANG variable of the user who starts the Automation Engine should be identical to the variable DB2CODEPAGE in order to avoid problems at Server start.
To Install the AE for UNIX
-
Install the Automation Engine.
-
Server computer used with an Oracle database
- Log on as "AE".
- Create a new directory: /opt/automic/server.
- Transfer the ucs???.tar.gz file from
/cdrom/cdrom0/<version>/AutomationEngine/unix/<platform>with ftp (binary) to the created directory. - Unpack the tar file using one of the following commands:
gzip -d ucs???.tar.gzgunzip ucs???.tar.gz
tar xvf ucs???.tar - Set the environment variables in $HOME/.profile if the Automation Engine does not run on the same computer as the utilities. Further details, including an example, are available in the installation guide for the utilities.
- Rename the ucsrv.ori.ini file to ucsrv.ini:
mv ucsrv.ori.ini ucsrv.ini - Adjust the ucsrv.ini INI file to your system environment. The following list shows the INI file entries which must be adjusted in all cases. All other parameters can be configured as needed.
- Name of the AE system (system= )
- Activate the SNMP connection (snmp= ) if used.
- Port number of the primary work process (pwpport= )
- Assignment of communication processes and port numbers (cp1= ... cpn= )
- Assignment of work processes and port numbers (wp1= ... wpn= )
- Connection for the database (SQLDRIVERCONNECT= )
- Remove the AE IMAGE:
umount /cdrom or eject cdrom - Check the libraries:
AIX:
- Check the Oracle library libclntst9.a (see setting up an Oracle database).
- Library check:
dump -X64 -H ucsrvcp > wk.txt (use a blank after "dump"). - Open the created file with a text editor (sed or vi). Verify that all libraries were found.
- Repeat the above procedure with ucuoci.a and ucsrvwp. Some missing entries might be reported that refer to the file ucuoci.a, because it is a library instead of a main program. If these messages refer to the libraries ucuoci.a, libzu00132.a and libucudb32.a, they can be disregarded. If an entry cannot be found in a different library (Oracle, for example), this is an error.
HP-UX:
- Check the Oracle library libclntsh.so.9.0 (see Setting up an Oracle database).
- Library check:
ldd -r ucsrvcp > wk.txt
The option -s can be used instead of -r for ldd. - Open the created file with a text editor (sed or vi). Verify that all libraries were found.
- Repeat the above procedure with ucuoci.sl and ucsrvwp. Some missing entries might be reported that refer to the file ucuoci.sl, because it is a library instead of a main program. If these messages refer to the libraries ucuoci.sl, libzu00132.sl, or libucudb32.sl, they can be disregarded. If an entry cannot be found in a different library (Oracle, for example), this is an error.
Linux, Solaris and zLinux:
- Check the Oracle library libclntsh.so.9.0 (see Setting up an Oracle database).
- Library check:
ldd -r ucsrvcp > wk.txt
The option -s can be used instead of -r for ldd. - Open this file with a text editor (sed or vi). Verify that all libraries were found.
- Repeat the above procedure with ucuoci.so and ucsrvwp. Some missing entries might be reported that refer to the file ucuoci.so, because it is a library. If these messages refer to the libraries ucuoci.so, libzu00132.so, or libucudb32.so, they can be disregarded. If an entry cannot be found in a different library (Oracle, for example), this is an error.
-
Server computer used with an DB2 database.
- Log on as "AE".
- Create a new directory: /opt/automic/server.
- Transfer the ucs???.tar.gz file from
/cdrom/cdrom0/<version>/AutomationEngine/unix/<platform>with ftp (binary) to the created directory. - Unpack the transferred TAR file:
gzip -d ucs???.tar.gz
gunzip ucs???.tar.gz
tar xvf ucs???.tar - Set the environment variables in $HOME/.profile if the Automation Engine does not run on the same computer as the utilities. More details, including an example, are available in the installation guide for the utilities.
- Rename the file ucsrv.ori.ini to ucsrv.ini:
mv ucsrv.ori.ini ucsrv.ini - Adjust the ucsrv.ini INI file to your system environment. The following list shows the INI file entries which must be adjusted in all cases. All other parameters can be configured as needed.
- Name of the AE system (system= )
- Activate the SNMP connection (snmp= ) if used.
- Port number of the primary work process (pwpport= )
- Assignment of communication processes and port numbers (cp1= ... cpn= )
- Assignment of work processes and port numbers (wp1= ... wpn= )
- Connection for the database (SQLDRIVERCONNECT= )
- Remove the AE IMAGE:
umount /cdrom or eject cdrom - Check the libraries:
AIX:
- AE uses $DB2DIR/lib/libdb2.a.
- Library check:
dump -H ucsrvcp > wk.txt - Open the created file with a text editor (sed or vi). Verify that all libraries were found.
- Repeat the above procedure with ucucli.so and ucsrvwp. Some missing entries might be reported that refer to the file ucucli.so, because it is a library instead of a main program. If these messages refer to the libraries ucucli.a, libzu00132.a, or libucudb32.a, they can be disregarded. If an entry cannot be found in a different library (DB2, for example), this is an error.
HP-UX:
- AE uses $DB2DIR/lib/libdb2.sl.
- Library check:
ldd -r ucsrvcp > wk.txt
The option -s can be used instead of -r for ldd - Open this file with a text editor (sed or vi). Verify that all libraries were found.
- Repeat the above procedure with ucucli.so and ucsrvwp. Some missing entries might be reported that refer to the file ucucli.so, because it is a library instead of a main program. If these messages refer to the libraries ucucli.sl, libzu00132.sl, or libucudb32.sl, they can be disregarded. If an entry cannot be found in a different library (DB2, for example), this is an error.
Linux, Solaris and zLinux:
- AE uses $DB2DIR/lib/libdb2.so.
- Library check:
ldd -r ucsrvcp > wk.txt
The option -s can be used instead of -r for ldd - Open the created file with a text editor (sed or vi). Verify that all libraries were found.
- Repeat the above procedure with ucucli.so and ucsrvwp. Some missing entries might be reported that refer to the file ucuoci.so, because it is a library instead of a main program. If these messages refer to the libraries ucucli.so, libzu00132.so, or libucudb32.so, they can be disregarded. If an entry cannot be found in a different library (DB2, for example), this is an error.
-
-
Optionally, install the AE SNMP subagent. You may want to install this subagent to monitor the various conditions which occur within an AE system (e.g. availability of the Automation Engine and agents, active notifications or blocking tasks). (Server computer).
-
Start the Automation Engine. (Server computer).
Manually start the Automation Engine for a test.
- Log on with the AE User ID.
- Change to the installation directory of the executable programs:
cd $UC4/bin - Start the communication process in the background:
./ucsrvcp & - Start the work process in the background:
./ucsrvwp & - Verify that the Automation Engine is running:
ps -ef|grep ucsrv or ps -fu uc4 - It should now be possible to log on to the active Automation Engine with an AWI. The relevant information about the running Automation Engine is available in the Administration perspective.
-
Shut down the Automation Engine. (Server computer)
- Shutdown:
- Find out the Process ID pid:
ps -ef|grep ucsrv
- End a server process:
kill -TERM pid
- Cancel:
- Find out the process ID pid:
- End a server process:
kill -KILL pid
Use the ServiceManager to start and end server processes.
- Find out the Process ID pid:
Possible Problems
At program start:
- Automation Engine ends when starting up:
Activate traces (the database trace is the most important).
Missing libraries or other errors are best found by starting the Automation Engine using:
truss 2>truss.out -f ucsrvcp
The resulting file, truss.out, contains all system calls of the Automation Engine and all attempts to load shared objects.If a library is missing, the problem can be that it exists in the system, but its path has not been specified in the environment variable (LIBPATH, SHLIB_PATH or LD_LIBRARY_PATH). Search the library as "root" by using:
find / -name 'library' -print
(wildcard characters are allowed).
Add the located path to the environment variable. If the library cannot be found, it has not been installed on this system or it has been deleted. Search the library to check whether it is available:
AIX, Linux, Solaris and zLinux: /var/sadm/install/contents
HP-UX: /var/adm/sw/ sw install.log and /var/adm/sw/ sw remove.log- If it cannot be found here, it has been deleted. The names of the packages in which the libraries are available are found at the end of the relevant lines. The best solution in this case is to install the package again.
- Automation Engine drags and/or hangs.
Use
truss -f -p pid 2>&1 | tee -a truss.out
to trace the system calls of a running process. "tee" makes the output available on the screen and in the file truss.out. - Remove <CR> (^M) from the text files:
vi Text file
%s/<Ctrl-V><Ctrl-M>$//g
:wq!
See also:
Number of Server Processes
Installing the AE SNMP Subagent (UNIX) -
Installing the Automation Engine for Windows
Requirements
Requirements for using a DB2 Database
- The LANG variable of the user who starts the Automation Engine should be identical to the variable DB2CODEPAGE in order to avoid problems when starting the Server.
To Install the Automation Engine for Windows
-
Install the Microsoft Visual C++ 2010 Redistributable Package from the IMAGE > CRTS directory (server computer).
This installation step can be omitted if the required version of the package is already installed. Navigate to the Control Panel > Programs and Features to see if the package is installed, and if so, which version.
-
Install the Automation Engine (server computer).
-
Start the program SETUP.EXE in the corresponding subdirectory of IMAGE: AUTOMATIONENGINE > WINDOWS > x64.
Automic strongly recommends installing the Automation Engine in a separate directory (such as C:\AUTOMIC\SERVER\BIN).
-
-
Optionally, install the AE SNMP subagent. You may want to install this subagent to monitor the various conditions which occur within an AE system (e.g. availability of the Automation Engine and agents, active notifications or blocking tasks). (Server computer).
-
Set up the system environment (server computer).
- Adjust the UCSrv.INI file to the system environment.
- A temp folder is automatically created where logs will be saved. Refer to the INI file if you need to make any changes. (C:\AUTOMIC\SERVER\TEMP).
- If not already done, Use the database client to create a connection to the database. If you use the MS SQL Server, create the data source "AE" for ODBC access (64 bit ODBC).
-
Start and end the Automation Engine (server computer).
-
An AE system requires at least one communication process and one work process. Start them from the Windows Start menu > Automic folder (WP-Server first, CP-Server afterward) for testing purposes :
If the processes run successfully, their corresponding symbols will be displayed in the task bar as follows:

- Right-click the Server-process symbol in the task bar and click Close to end one or Shutdown to end all server processes.
- After all other programs have been installed and tested, the Automation Engine should run as a service. Use the ServiceManager to start the Automation Engine as a service. The server processes can be started and ended using the ServiceManager Dialog.
For starting the Automation Engine, a 64-bit Microsoft Visual C-Runtime Library is required.
-
See also:
Number of Server Processes
Installing the AE SNMP Subagent (Windows) -
Install the Service Manager (recommended)
-
Install the Service Manager (Windows)
Server computer or host computer.
-
Install the Microsoft Visual C++ 2010 Redistributable Package.
This installation step can be omitted if the required version of the package is already installed. Refer to Control Panel > Add or Remove Programs to see if the package is installed , and if so, which version.
- Host (32 bit): install the package from the IMAGE:CRTS\WINDOWS\X86 directory.
- Host (64 bit): install the package from the IMAGE:CRTS\WINDOWS\X64 or IMAGE:CRTS\WINDOWS\IA64 directory.
-
Install the ServiceManager.
- Host (32 bit)
- Start the program SETUP.EXE in the corresponding subdirectory of IMAGE:SERVICEMANAGER\WINDOWS\X86.
- Adjust the INI file UCYBSMGR.INI to your system environment.
- Adjust the definitions file (SMD file)
- Host (64 bit)
- Start the program SETUP.EXE in the corresponding subdirectory of IMAGE:SERVICEMANAGER\WINDOWS\X64 or IMAGE:SERVICEMANAGER\WINDOWS\IA64.
- Adjust the INI file UCYBSMGR.INI to your system environment.
- Adjust the definitions file (SMD file)
- Host (32 bit)
-
Install the Dialog and Command Line Programs of the ServiceManager.
- Host (32 bit)
- Start the program SETUP.EXE in the corresponding subdirectory of IMAGE:SERVICEMANAGERDIALOG\WINDOWS\X86.
- Adjust the INI file UCYBSMDI.INI according to your system environment.
- These programs can also be installed on computers where no ServiceManager runs, which enables the ServiceManager to be operated from these computers.
- Host (64 bit)
- Start the program SETUP.EXE in the corresponding subdirectory of IMAGE:SERVICEMANAGERDIALOG\WINDOWS\X64 or IMAGE:SERVICEMANAGERDIALOG\WINDOWS\IA64.
- Adjust the INI file UCYBSMDI.INI according to your system environment.
- These programs can also be installed on computers where no ServiceManager runs, thereby facilitating that the ServiceManager can be operated from these computers.
- Host (32 bit)
-
Install the ServiceManager as a service.
- Open an MS DOS window
- Start the program UCYBSMGR.EXE using the command:
UCYBSMGR[.EXE] -install Phrase [-iPath and name of the INI file]

The ServiceManager is entered in Windows as a service. You can use a string of your choice as the phrase.
- Verify in the Control Panel > Administrative Tools > Services that the service is correctly entered. The name displayed here is structured - as follows: "UC4.ServiceManager [Phrase]".
- Set the start type to "Automatic" if needed.
- The phrase name is "UC4" by default. If you choose to use a different term, you must adjust the following section in the INI file UCYBSMGR.INI:
[Destination Phrase]
deffile=Path to the SMD file
cmdfile=Path to the SMC fileExample:
[Destination UC4PROD]
deffile=C:\AUTOMIC\SMgr\bin\UC4PROD.smd
cmdfile=C:\AUTOMIC\SMgr\bin\UC4PROD.smc- Start the service
The ServiceManager can be installed as a service multiple times. This means that different ServiceManager environments can be created; one that serves as a test system and one that serves as a production system, for example. If several of these services are used, they are distinguished by the ServiceManager environment name (default name: UC4).
Note that the ServiceManager service must be started under a Windows user with administrator rights. The reason is that the ServiceManager can be used to start components that can start processes for various different users.
-
Start services using the ServiceManager.
Make sure that the ODBC data source is set up as a system DSN (Data Source Name) so that the Automation Engines (program UCSRVCP.EXE and UCSRVWP.EXE) are executable as a service.
The ODBC data source is configured in the UCSrv.INI file.
- Start the dialog program of the ServiceManager.
- Select the computer and the ServiceManager environment (phrase).
- All provided services are displayed (status "stopped").
- Right-click to start the service or to change a particular service's properties (such as starting automatically when the system starts or delaying its start).
Potential Problems
- Not all ServiceManager environments (phrases) are displayed:
A port number range must be specified in order for more than one ServiceManager to be selectable in the dialog program. Enter this range in the INI file of the utility, keeping in mind that it is limited to 10 port numbers. - Not all services are displayed:
Ensure that the correct instructions are given in the definitions file (SMD file). Each service should be displayed in an extra line. Also enter the path of the SMD file in the INI file of the ServiceManager. - A service cannot be started:
Verify that the path specified in the properties is correct (to be opened via the context menu in the dialog program).
Further information can be obtained from the ServiceManager's log file (default name of the latest file: SMgr_LOGG_00.txt), which is found in the TEMP folder and which contains detailed information on all procedures.
To Uninstall the ServiceManager
In some cases it is necessary to uninstall a specific ServiceManager environment (Phrase).
- Open an MS DOS window.
- Start the program UCYBSMGR.EXE with thecommand:
UCYBSMGR -remove Phrase
Example:
UCYBSMGR -remove AEThis command uninstalls the ServiceManager environment as a service under Windows.
- Check the Control Panel - Administrative Tools - Services in order to verify that the service has been removed.
-
-
Install the Service Manager (UNIX)
Because the ServiceManager for UNIX is available for different platforms, a three-figure code has been supplied for each supported UNIX platform. In this document, the specific code is replaced with the characters "???."
-
Transfer the tar file to the Host and set up the system environment. (Host)
- Log on using the user ID AE.
- Transfer the TAR file ucsmgr??.tar.gz to a directory (such as smgr) via FTP.
- Navigate to the ServiceManager directory:
cd servicemanager - Unpack the tar file:
gzip -d ucsmgr???.tar.gz or gunzip ucsmgr???.tar.gz
tar xvfo ucsmgr???.tar - The files will appear in their corresponding directories. The tar file can be deleted after unpacking.
- Verify that all files have the correct owner and group entries. AE must be the owner. The group must correspond to the identification AE. Modifications can only be made by a privileged user, such as root.
chown UC4 * changes the owner of all files to AE.
chgrpGroup name * changes user group for all files. - Rename the supplied ini file ucybsmgr.ori.ini to ucybsmgr.ini.
- Rename the supplied file uc4.ori.smd to uc4.smd.
- Adjust the INI file to the system environment.
- Set the variable:
AIX: export LIBPATH=Path of the system library directory
HP-UX: export SHLIB_PATH=Path of the system library directory
Solaris, Linux, zLinux: export LD_LIBRARY_PATH=Path of the system library directory
Be sure to note any tar messages (which can be called up by various users) and verify that all files have been correctly unpacked.
Start and stop services with the ServiceManager. (Host)
-
Start the ServiceManager:
nohup ./ucybsmgr [-iPath and Name of the INI file] Phrase > /dev/null 2>&1 &
The phrase is a ServiceManager environment.
-
For more information about ServiceManager functions (such as starting and stopping agents), see UCYBSMCL.
See also:
-
-
-
Distributed Server Environment
This functionality is needed in case you are using more than one server.
The computer containing the work process that connects to the AE system first becomes the active Automation Engine if AE.Nonstop-Server is licensed. Without this special license, all server processes participate in processing.
The computers on which the server processes are installed must have the same platform for operating with multiple Servers (for example, two computers with HP/UX). It is not possible to use computers with different UNIX derivatives or a mixture of UNIX and Windows.
The database scheme has been designed to support five communication processes. Additional tables must be prepared if more communication processes are required. Contact AE for more information about additional tables.
To Set Up a Distributed Server Environment
-
Install the Automation Engines. (Server computer)
- Install the Automation Engine on the particular computers as described in the relevant documentation about new installation.
-
Set up the system environment. (Server computer)
- Adjust the INI file UCSRV.INI for each computer:
- Enter the same system name (maximum 8 characters, no special characters) in all INI files.
- Activate the SNMP connection (if used) with the parameter snmp=.
- Enter the connection information to the AE database in the section [ODBC].
- Enter the same port number for the primary work process in all INI files (parameter pwpport=).
- Adjust the section [PORTS] in all INI files. The server processes defined in this section participate in the AE system's processing. The following rules apply:
- Port numbers must be unique even if they are distributed among several computers.
- The same guideline applies to server process names. Numbers must be used in ascending order; omitting numbers is not permitted. The following example illustrates a distributed Server environment with two communication processes and four work processes (cp1, cp2, wp1, wp2, wp3, wp4).
Leave the original list of server processes in the INI file. Non-required entries can be commented with a semi-colon. This can be helpful if you use two INI files; one file can contain even server process numbers, the other one the uneven numbers.
Short INI file version of computer A:
[PORTS]
cp1=2217
;cp2=2218
;cp3=2219
;cp4=2220
;cp5=2221
wp1=2271
;wp2=2272
wp3=2273
;wp4=2274
;wp5=2275
;wp6=2276
;wp7=2277
;wp8=2278
;wp9=2279Short INI file version of computer B:
[PORTS]
;cp1=2217
cp2=2218
;cp3=2219
;cp4=2220
;cp5=2221
;wp1=2271
wp2=2272
;wp3=2273
wp4=2274
;wp5=2275
;wp6=2276
;wp7=2277
;wp8=2278
;wp9=2279 -
If you have installed the ServiceManager you may use the ServiceManager Dialog to start or stop AE server processes. (Server computer).
See also:
-
-
General
As of v12, several important functions in the Automation Engine and thus AWA depend on the JWP being installed and running.
Therefore the JWP's installation is mandatory.As of v12.1.1, it is mandatory to use and enable the JDBC section in the UCSRV.INI file.
Files Provided
The JWP is provided in the same directory as all the other Automation Engine files.
The directory /configuration/ is created automatically when the JWP is first started and contains the OSGI bundle's cache.
To Install the JWP
Unpack the files
In Windows, the JWP files are automatically copied from the SETUP.EXE program to the BIN directory. In UNIX, the files are located in the respective TAR archive.
Copy the provided "plugin" and "lib" directories into the BIN directory of the Automation Engine.
If the BIN directory for this installation already has a "plugin" and/or "lib" directory make sure to delete them before copying the new ones.
The subsequent installation steps depend on the database type used.
Java Cryptography Extension (JCE) (Optional - Only for SSO)
-
Install Java Cryptography Extension (JCE) Unlimited Strength Jurisdiction Policy.
The JCE Unlimited Strength Jurisdiction Policy has to be installed on the machines where:
- The Automic Web Interface runs.
- The Automation Engine (JWP) runs.
Download at Java Cryptography Extension (JCE) Unlimited Strength Jurisdiction Policy
For IBM Java, you must use the policy files of IBM. The unlimited jurisdiction policy files are located in directory SDK /demo/jce/policy-files/unrestricted/. See https://www.ibm.com/support/knowledgecenter/en/SSYKE2_7.1.0/com.ibm.java.security.component.71.doc/security-component/sdkpolicyfiles.html
The Readme file contains the installation instructions on how to copy the .jar files to appropriate location (e.g.
<java-home>\lib\security). If there are multiple Java installations on the same computer, setting up a policy file for all installations is recommended.
-
Install JDBC driver.
- Download Microsoft JDBC Driver for SQL servers.
- Follow the installation instructions on the page (download the .exe file, run it and enter and installation directory).
- After installing, copy the .jar file from the appropriate JRE destination folder to the <server>\bin\lib directory of the Automation Engine. Make sure to use the latest JDBC driver available for your Java version. Check the Automic Compatibility Matrix to find out which Java versions are supported.
-
Activate TCP/IP in the MS SQL server. To do so:
- Open the SQL Server Configuration Manager.
- Expand SQL Server Network Configuration.
- Select Protocols for MSSQLSERVER under SQL Server Network Configuration.
- The TCP/IP must be set to Enabled in the right-hand section.
- Restart the SQL Server Services.
-
Determine the MS SQL server port.
The default port of the MS SQL server port is 1433.
If you are not sure of the port of your MS SQL server instance, you can find this out from its ERRORLOG file (MSSQL > LOG). One of these messages: "Server is listening on [ 'any'<ipv4> port number]" or "Server is listening on [ 'any'<ipv6> port number]" should be found in the current log file, which contains the port.
-
Configure the database connection
The JWP uses the same configuration file (UCSRV.INI) as all the other WPs of the Automation Engine system
JDBC connection to the database
Define a separate database connection string is for the JWP in the [JDBC] section. You can automatically generate this string by using the following command:
java -jar ucsrvjp.jar -setup
The system then verifies that the JDBC driver is available and that the database connection could be established.
The advantage here is that the connection string of the other WPs ([ODBC] section) does not need to be changed or restarted.
DSN-less ODBC Connection
This option uses the same database connection string that is also used by all the other WPs in the Automation Engine system. When installing a JWP for an existing system, all WPs must subsequently be restarted.
A connection string is required in the [ODBC] section of the configuration file, the syntax of which does not require DSN. The server and database name must be specified directly in this case.
SQLDRIVERCONNECT=ODBCVAR=SNNNNNRN,Driver={SQL Server Native Client VERSION};Server=tcp:SRVNAME,PORT;Database=DBNAME;Uid=DBUSER;Pwd=DBPWD
- VERSION- Version of SQL Server Native Client. Is displayed in the SQL Server Configuration Manager.
- SRVNAME - Name of the database computer.
- PORT - port of the MS SQL server instance.
- DBNAME - Database name.
- DBUSER - Database user.
- DBPWD - Database password.
Example:
[ODBC]
SQLDRIVERCONNECT=ODBCVAR=SNNNNNRN,Driver={SQL Server Native Client 11.0};Server=tcp:dbsrv01,1433;Database=AEV10;Uid=user;Pwd=passwordThe entry should be on one line (no break).
-
Install JDBC driver.
-
Copy the JDBC driver ojdbc8.jar from the Oracle database client installation to the lib folder of the JWP.
The file is located here: ORACLE_HOME/jdbc/lib/ojdbc8.jar. -
Copy the xdb6.jar and xmlparserv2.jar files to the lib folder of the JWP to ensure that XML variables are processed correctly.
The files are either part of the Oracle database or can be downloaded from the Oracle SQL Developer website. They are located here:
-
$SQLDEVELOPER_HOME/modules/oracle.xdk/xmlparserv2.jar
-
$SQLDEVELOPER_HOME/rdbms/jlib/xdb6.jar
-
-
-
Configure the database connection
JDBC connection to the database
Define a separate database connection string is for the JWP in the [JDBC] section. You can automatically generate this string by using the following command:
java -jar ucsrvjp.jar -setup
The system then verifies that the JDBC driver is available and that the database connection could be established.
More information on installing the JDBC driver is available in the Oracle JDBC installation instructions.
-
Install JDBC driver.
Copy the file "db2jcc4.jar" (JDBC driver) into the "lib" directory of the JWP.
This file is part of the DB2 client and is located in the sub-directory "SQLLIB/java".
-
Configure the database connection
JDBC connection to the database
Define a separate database connection string is for the JWP in the [JDBC] section. You can automatically generate this string by using the following command:
java -jar ucsrvjp.jar -setup
The system then verifies that the JDBC driver is available and that the database connection could be established.
SSL certificates for LDAP (Optional)
In order to use SSL, the certificate(s) of the LDAP server must be available to the Java Work Process.
Find the installation steps below.The JWP uses the default keystore file "cacerts" in the lib/security directory of the JRE.
Keystore file configuration options
Using an alternative keystore file:
If you want the JWP(s) to use an alternative keystore file, you have to define the file name and path to a centrally stored file in the key JWP_KEYSTORE_PATH, in the UC_SYSTEM_SETTINGS variable.
In case the defined path is not accessible or invalid, a log message will be written to the default log location and the JWP will use the default keystore file.
Creating an individual keystore file using the JWP:
If you want to use an individual keystore file, you can create it using the following command:
java -jar ucsrvjp.jar -installcert host:port keystorePathIn case the defined path in keystorePath does not exist, the JWP creates a new keystore file in that location. You can then define a password for that keystore file.
Using an alternative password for keystore file access:
The default password used by the JWP is the default password of the JRE keystore. If you want the JWP to use a different password, you have to define a Login object containing that password by following these steps:
- Create a Login object (or use an existing one).
- In the UC_SYSTEM_SETTINGS variable, using the key JWP_KEYSTORE_LOGIN, enter the name of that Login object.
- Open the referenced Login object, select the Login tab and add a new row there.
- In the column Name, select "*", in the column Type select "JWP_KEYSTORE".
- The Login info is optional for this function, but as this column cannot be empty by default, you have to enter something here.
- Enter the password you chose for the keystore file.
Adding the certificates
-
Add certificates using the keytool.
- To use the default keystore of the JRE, go to the jre\lib\security folder of the Java installation and import the certificate with the keytool command:
- To use your own keystore file defined in the variable UC_SYSTEM_SETTINGS using the key JWP_KEYSTORE_PATH, go to the defined path and import the certificate with the keytool command:
keytool -keystore cacerts -importcert -alias ldapServer -file certficate.cer
keytool -keystore <keystore> -importcert -alias ldapServer -file certficate.cer
When prompted to trust this certificate respond by typing "Y".
-
Add certificates via download.
- Another option to install the certificate is the command line parameter -installcert of the Java Work Process.
- This assumes that the Java Work Process has write access to the cacerts file of the Java installation.
- This command detects the path of cacerts, connects to the specified host and port and tries to create an SSL connection.
- This command to add a certificate via download will set an optional parameter for the file name of the keystore:
java -jar ucsrvjp.jar -installcert <host>:<sslport>
java -jar ucsrvjp.jar -installcert <host>:<sslport> <keystorePath>
When the parameter "keystorePath" is valid but the file doesn't exist, JWP creates a new keystore file in the same location.
During this process the user can define an individual password.If a certificate is missing, the message "unable to find valid certification path to requested target" is printed and the missing certificate is downloaded and stored in the cacerts file.
Start the JWP
Use this kind of command to start the JWP via the command line
java -Xmx512M -jar ucsrvjp.jar -IC:\temp\ucsrv.ini
The file "ucsrvjp.jar" is provided in the same directory as the other Automation Engine files. It is used exclusively to start the JWP.
The JWP can also be started via ServiceManager.
java -Xmx512M -jar ucsrvjp.jar -svc%port% -IC:\temp\ucsrv.ini
The -svc parameter should be omitted when starting directly via the command line.
The parameter -I to specify the INI file is optional. If the parameter is missing, the JWP attempts to find the file "ucsrv.ini" in the current working directory (= directory in which the file "ucsrvjp.jar" is located).
-
-
The files needed for JCP are the same as the files provided for JWP in the same directory as all the other Automation Engine files.
Since the JWP's installation is mandatory and the files necessary for the JCP are the same as those used to install the JWP, there is no need to unpack any files nor to carry out any other installation step.
The JCP installation is relevant for the AE REST API as well as for the advanced object search. Therefore, make sure to configure the REST section of the Automation Engine configuration file (ucsrv.ini) accordingly. Otherwise the AWA object advance search will not work.
We recommend using HTTPS.
HTTPS/SSL set up for AE REST API
In order to use HTTPS you need to set the parameter sslEnabled to 1 and continue with the setup of the following parameters in the Automation Engine configuration file (ucsrv.ini):
-
keystore
This parameter is mandatory and needs to point to the correct target, otherwise the JCP server will terminate.
-
keystorePassword
-
keyPassword
The keystorePassword and the keyPassword can be encrypted with the UCYBCRYP Utility.
Adding the certificates
JCP uses keystore as defined in the Automation Engine configuration file. For additional information as well as information on adding certificates, see https://www.eclipse.org/jetty/documentation/current/configuring-ssl.html.
Start the JCP
Use this kind of command to start the JCP via the command line:
java -Xmx512M -jar ucsrvjp.jar -IC:\temp\ucsrv.ini -rest
The file "ucsrvjp.jar" is provided in the same directory as the other Automation Engine files. It is used exclusively to start the JWP and JCP.
The JCP can also be started via ServiceManager.
java -Xmx512M -jar ucsrvjp.jar -Iucsrv.ini -svc%port% -rest
The -svc parameter should be omitted when starting directly via the command line.
The parameter -I to specify the INI file is optional. If the parameter is missing, the JCP attempts to find the file "ucsrv.ini" in the current working directory (= directory in which the file "ucsrvjp.jar" is located).
Setting Up Multiple REST API Processes
When using multiple JCPs it is imperative that each JCP uses its own Automation Engine configuration file (ucsrv.ini).
If only one INI file is used for more than one JCP, the first one will connect successfully while the others will terminate upon trying to register the same REST port if both run on the same node. An error message is written to the JCP's log file stating the reason for termination.
The AE REST API can be installed multiple times, either with different port numbers on one node or on different nodes (in this case the same port number may be used).
The following scenarios are supported:
Single JCP
In this case a single JCP is used and all REST requests are sent to this single AE REST API instance. This means that no fail-over capabilities are provided and no AE REST API is available if the JCP is down.
Clustered JCPs
In this case two JCPs are used in a cluster but only one of both is available at the time, thus providing fail-over capabilities. All REST requests are sent to only one of the two AE REST APIs, depending on their respective availability.
To use this configuration a JCP needs to be installed on each node but both JCPs share the same Automation Engine configuration file (assuming the cluster shares the same installed resources). If a virtual IP is being used, both JCPs can be reached via the same IP address. This means the endpoints have the same base URI: http(s)://{host}:{port}/ae/api/v1/{client}/...
Please note that a configuration with multiple JCPs is not intended for load balancing purposes.
-
Installation Progress

-
-
Installing the Online Documentation
The WebHelp format is available for the Automic Web Interface (AWI) as manually installed version or documentation online.
As of version 11, help is delivered only in English for major version releases. German and French versions are delivered with the first service pack.
In this document you find the following sections to help you decide on the help format and guide you through installation and copy&paste procedures:
- WebHelp Browser Compatibility
- Documentation Formats
- Documentation Types
- Deciding on a Location for Your Documentation
- Using the CA Automic Workload Automation Guides in WebHelp Format
- Copying and Unzipping the CA Automic Workload Automation Messages in WebHelp Format
For Automic WebHelp in HTML5 format the same browser compatibility applies as for the AWI. Please check our Automic Compatibility Matrix for details.
JavaScript must be enabled in order to use the complete functional range.CA Automic Workload Automation documentation is available in the following formats:
- WebHelp: You can run the WebHelp on all platforms with an HTML browser.
The documentation type: Is available in the following format(s): That you: All Guides WebHelp Install by:
- Copying language-specific .zip file(s).
- Unzipping the contents of the .zip file(s).
- Configuring the configuration.properties files for each AWI.
Messages WebHelp Install by:
- Copying language-specific .zip file(s).
- Unzipping the contents of the .zip file(s).
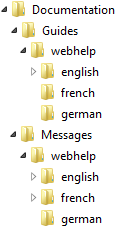
You can install each documentation type in the language(s) of your choice. In the image below, documentation in all formats, types, and languages are installed in a Windows directory.
Deciding on a Location for Your Documentation
CA Automic Workload Automation documentation can either reside locally on the machine where each AWI is installed or at a shared location that can be accessed by all users.
Using the CA Automic Workload Automation Guides in WebHelp Format
As of v12 the WebHelp can be used from any local folder or a network drive. Open the help.htm file of the documentation in that path.
Alternatively you can use the online WebHelp at this URL:docs.automic.com
Call that URL and choose the product and guide from the menu provided.As administrator provide the information where users can find the WebHelp, locally or online.
To install the CA Automic Workload Automation guides in WebHelp format:
- From IMAGE:DOCUMENTATION\GUIDES\WEBHELP, navigate to the language(s) you wish to add WebHelp documentation for.
- Copy and unzip the contents of the .zip file(s) to the location(s) you want them.
In each language's sub-directory, there is a .zip file.
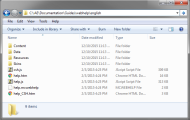
In the image below, the contents of the .zip file are unzipped in the \Documentation\Guides\webhelp\english directory.
To open the CA Automic Workload Automation WebHelp documentation: Do this: Manually from the Windows directory where you copied it Double-click the start page help.htm. Manually from the online URL Call the URL: docs.automic.com As of version 11, help is delivered only in English for major version releases. German and French versions are delivered with the first service pack.
Copying and Unzipping the CA Automic Workload Automation Messages in WebHelp Format
To copy and unzip the CA Automic Workload Automation messages in WebHelp format:
- From IMAGE:DOCUMENTATION\MESSAGES\WEBHELP, navigate to the language(s) you wish to add messages in WebHelp format for.
- Copy and unzip the contents of the .zip file(s) to the location(s) you want them (usually \DOCUMENTATION\MESSAGES\<language>).
In each language's sub-directory, is a .zip file.
Installation Progress

-
To see the list of agents available and the details on how to install them please see Installing the Agents.
Agents running on Windows Server 2012: To avoid problems while executing actions (access denied), you should change the value of User Account Control: Run all administrators in Admin Approval Mode to Disabled in the
Security Settings / Local Policies / Security Optionssection of the Local Security Policy application (secpol.msc). This ensures that the Windows Agent using the local Windows administrator account (although in the administrator group) can execute actions properly.Installation Progress

-
Installing the Additional Components
The additional components available are listed below. For more information on how to install them click the relevant link.
Installation Progress


Next steps:
Previous steps: