Unzip the content of the deployment package (Analytics.On.Premise_Analytics.Backend_.zip) into the folder where you want to run the backend (e.g.: C:\Automic\AnalyticsBackend).
- ARA folder
- Package Manager analytics-backend.jar
- application.properties.sample
- logging.xml
- LICENSE.txt
- README.txt
- NOTICE.txt
Copy the jdbc driver to the jdbc folder:
./analytics_backend.jar
./jdbc/sqljdbc4.jar (mssql)
./jdbc/ojdbc7.jar (oracle)
Rename the application.properties.sample file to application.properties.
- Add the datastore connection (last lines from executing the setup.psql script).
Set the database connection to the AEdatabase as described (ARA is not required!).
Make sure to also set the correct type to ORACLE or SQL.
Configure a free port on the host:
Parameter Value (Example) Remark datasource.analytics.url jdbc:postgresql://localhost:5432/analytics?tcpKeepAlive=true The value must be the JDBC connection string to your Analytics Datastore database datasource.username analytics The value must be the user name to connect to the Analytics Datastore database
You have created the user during the installationnull of the Analytics Datastore.
datasource.password analyticsPW The password for the user configured in spring.datasource.username server.port 8090 Set the HTTP server port for the Analytics Backend Tomcat webserver
The analytics-backend.jar has to be passed to a Java process. Assuming Java 1.8 is installed and executable via the 'java' command, the following line executed in a command shell (both Windows and Unix) will start the Backend:
java -jar analytics-backend.jar
This command only works when executed in the bin directory of the analytics-backend.
Connect to configured port (server.port) from the host where AWIAutomic-Produkt: Übersichtliche und einfach zu bedienende Weboberfläche, mit welcher der Zugriff auf verschiedene Funktionalitäten der Automation Engine möglich ist. is installed.
You may use curl, wget or a browser.
Request:
GET http://my-analytics-backend-url:8090/analytics/api/v1
Response:
{ "_links" : { "reports" : { "href" : "http://my-analytics-backend-url:8090/reports{?page,size,sort}", "templated" : true }, "collectors" : {"href" : "http://my-analytics-backend-url:8090/collectors" }, "profile" : { "href" : "http://my-analytics-backend-url:8090/alps" } } }
For a single-box installation, you can use localhost instead of my-analytics-backend-url.
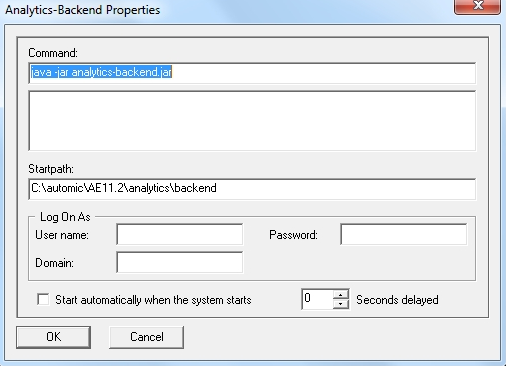
View in the Automic Service Manager (example)
For more information about the Automic Service Manager, see the Administration Guide of the Automation EngineDiese Komponente steuert ein Automation Engine-System. Besteht aus verschiedenen Serverprozessen., which you can find on docs.automic.com.
Now, the Analytics Backend is installed and configured.