Upgrade Process
As of version 11.2 of the Automation Engine you can use the Zero Downtime Upgrade (ZDU) to upgrade your AE system with no downtime.
A wizard is provided to guide you through the whole process. There is no need for scripting or use of AE internals. You only need to follow the steps that are visible in the UserInterface at each step.
Below you find a description of the steps necessary for upgrading your system without any downtime using the ZDU wizard.
 This process equally applies to an upgrade of a major or minor version or a service pack.
Our consultants are experts in upgrading AE systems. Contact Automic, our experts will be pleased to assist you whenever it is necessary.
 In order to print the whole contents of the collapsed pages below, use the button Expand all/Collapse all
  in the menu bar above.
Overview
- ZDU is a special function in the Automation Engine as of version 11.2. It is meant to enable system upgrades between major or minor versions without closing down the AE system.
-
 You can use this function to upgrade from a previous version and / or service pack to the next, but you cannot not skip a major version.
- The ZDU needs certain prerequisites in order to work properly.
Among others you should install two separate environments, either on separate hosts or on the same host.
Refer to the detailed description below to prepare your setup accordingly.
- Two special modes exist for this upgrade function, the compatibility mode and the parallel mode.
Compatibility mode: This mode is started as soon as you choose the option BEGIN from the ZDU wizard. In this mode, in effect until you choose the option FINALIZE, certain system optimization functions are not available. System performance will be reduced noticeably.
Parallel mode: A mode during the upgrade when base and target version processes are active at the same time.
- You will start the process by choosing the option BEGIN in the wizard. That way the system will be set into the compatibility mode.
This mode will persist during the whole time, even if you should conduct a rollback, until you choose the option FINALIZE to use the new target version.
In this mode the system will use base version and target version CPs and WPs as the upgrade process advances, but base version WPs may slow down until the upgrade is complete.
- In the course of the upgrade you will be asked to test (even for a few days), if all things work smoothly before finalizing the upgrade.
- If you encounter errors, you will be able to perform a rollback by using the Rollback option, also described further down this page.
 Although a rollback option has been implemented, changes will persist. The rollback is a temporary measure only.
Automic strongly recommends to start an upgrade only if the necessary preparations for setup and testing have been taken care of.
 The ROLLBACK option will only be visible in the wizard, after the option UPGRADE has been successfully processed.
- The whole upgrade process is finished by the option FINALIZE in the final step.
The compatibility mode is ended and the system will then run under ordinary conditions.
Once you have selected and confirmed the option FINALIZE, a rollback will no longer be possible!
Comments
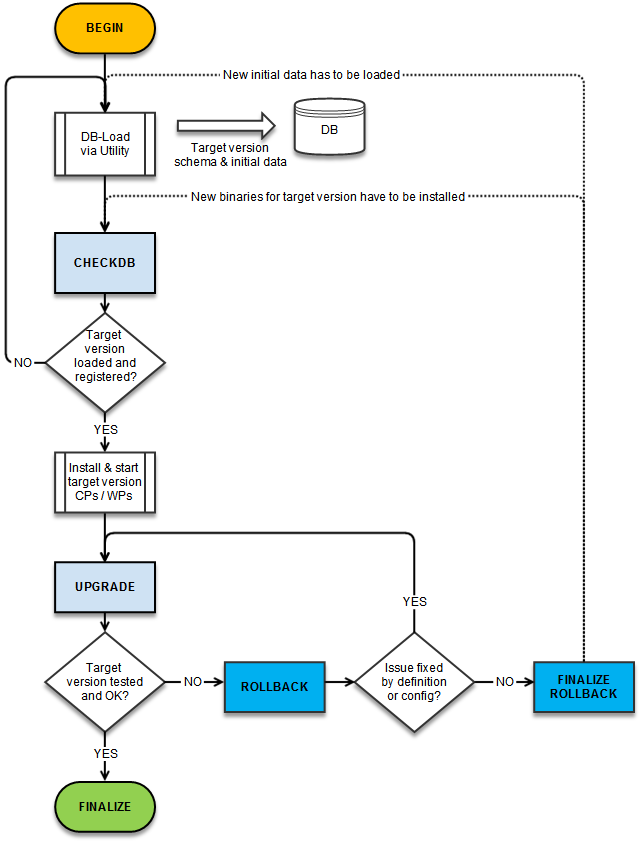
Flowchart of upgrade and rollback steps:
Preliminary Steps
Requirements
 A. System Setup
- In order to be able to conduct the ZDU properly, you have to use two separate environments. These environments can either be situated on two separate hosts or two separate installations on the same host, but in different bin directories.
- In the course of the upgrade description shown below there is a reference to either the base or the target system, which also represent the base and target version in the upgrade scenario.
- Should you use a PROXY and a firewall in the systems used for the upgrade, ports will have to be configured accordingly.
In a UNIX environment do not overwrite the existing installation, which is possible without warning on UNIX, even if the binaries are currently in use.
B. Set User Privilege
In order to upgrade your system you have to make sure that the respective user or users (usually the AE's administrators) have the necessary permissions.
The user (administrator) conducting the upgrade needs the privilege Execute Zero Downtime Upgrade to be set in the corresponding User object.
For details on how to set privileges in User objects see Privileges Tab
C. Upgrade the UserInterface
In case you upgrade to a major or minor version, upgrade the UserInterface before you start the Zero Downtime Upgrade process found below.
The UI upgrade is necessary for the administrator conducting the upgrade.
Other users may upgrade their UI at some point while the compatibility mode is active and they log on to the upgraded system for the first time.
As administrator you should prepare the seamless roll out of the new UI for the average users in advance.
Should a service pack contain UserInterface fixes, please conduct this step as well.
This is the only case a UserInterface upgrade for installing service packs is necessary.
Upgrade UserInterfaces
D. Upgrade the Enterprise Control Center
You have to install a new ECC instance every time you upgrade to a major or minor version of the Automation Engine.
For installing a service pack this step is only necessary if the SP contains changes or fixes for the ECC.
Upgrade the ECC
Upgrading from ECC 2.1 or 11.1 to 11.2
Upgrading an existing ECC installation to a new release upgrades the ECC framework and all its plug‑ins at the same time. Use the same steps to install hot fix packages between releases.
To upgrade from Enterprise Control Center 2.1.x or 11.0 to 11.2 .x.x involves the following steps:
No data migration is needed.
1. Stopping the Apache Tomcat Service
- Open your Windows Services manager.
- Stop the Apache Tomcat service.
2. Backing Up Current Configurations
These steps are optional. You can make a safety copy of your entire ECC installation, or just the configuration files. Although, you can use very little of the previous configurations in the new version, you might find it helpful to have a copy for later reference when you configure the upgrade.
- To backup your whole ECC installation, go to your Tomcat installation, open the webapps folder and make a backup copy of the entire Enterprise.Control.Center folder.
- To backup only the configuration files, go to the folder where you have the current ECC version installed, and make a backup copy of the folder webapps/<ECC>/config.
3. Upgrading Apache Tomcat
Upgrade the Apache Tomcat server where you have ECC currently installed to the latest version that complies with the new release.
- Check the System Requirements in our online database, the Automic Compatibility Checker to see which version of Tomcat you need.
- Go to the Tomcat home page and then download and install the required version. You will find the installation instructions and other relevant information on their home page.
http://tomcat.apache.org/index.html
For Windows: Download the package called "32-bit/64-bit Windows Service Installer." This will install Tomcat and a Windows service for it.
- Increase the memory that Tomcat can allocate to ECC to the amount described in the table that follows..
Reason: By default Tomcat allocates a low amount of memory to an application. This is not sufficient for ECC, which keeps a lot of UI state data in memory.
| Memory Parameter | Amount to Allocate |
|---|
| PermGen Space | 256m |
| Heap size | As much as possible (at the very least 2GB) |
On Windows:
- Go to the "bin" folder in your Tomcat installation (...Apache Software Foundation\Tomcat 7.0\bin).
- Right-click the file tomcat7w.exe and from the context menu select Run as administrator.
- On the Java tab make the following changes:
- In the Java Options, set the PermGenSpace by adding the parameter
"-XX:MaxPermSize=256m". (Attention: Case sensitive parameter!) - Set the heap size by setting the Maximum memory pool to the maximum possible on your system, for example 8192MB, as shown below.

On Linux: In the CATALINA_OPTS environment variable, set the permGen size to 256MB and the heap space to the maximum possible on your system. In this example, the heap space is set to 8192MB:
-XX:MaxPermSize=256m -Xmx8192m
4. Restarting the Apache Tomcat Service
- Open your Windows Services manager.
- Stop and restart the Apache Tomcat service.
5. Deploying the New ECC WAR File
Deploy the new version of the ECC on Tomcat.
- (Optional) Rename the ECC WAR file, keeping the "war" extension. The name of the WAR file will also be the context path of your ECC installation.
- On the server where you have Tomcat installed, copy the WAR file to the webapps folder of the Tomcat installation. If Tomcat is running, the WAR file will be deployed automatically, creating a folder with the same name.
Do not delete the WAR file! If you do, Tomcat will also remove the corresponding subfolder,which also undeploys the ECC!
6. Configuring the New ECC Version
- Configure your upgraded ECC using the file descriptions under Configuring ECC as a guide.
If you made a backup before you started the upgrade, then you can retrieve the following files and settings from the backup files from the previous webapps/<ECC>/config folder:
| In the new webapps/<ECC>/config | Configuration from ECC 2.1 that can be used for ECC 11.2 |
|---|
| uc4config.xml | You can replace the new file with your backup. However, if you have more than one AE system connection defined, be aware that if the configuration.properties file has the setting the automationengine.index=0, then users will be able to log into only the first connection that is defined in the file. If you want to keep these settings in both files, then make sure to move the preferred connection to the first place in the uc4config.xml. |
| configuration.properties | Do not replace the file in your new installation with your backup. Instead, define the file as described in this guide. However, you can refer to your backup files for the following two parameters, which may have optionally been defined in ECC 2.1: - defaultHomeDashboard (This would be the "dashboard" attribute in the navigation.xml file.)
- customHomeDashboardsFolder (This would be from the previous configuration.properties file.)
|
logback.xml | If you had changed the default setting for the severity level of ECC event messages (DEBUG) for the root element, then you might want to make the same change for ECC 11.2. |
| The "theme" folder | If you had customized the color or banner logo in ECC 2.1, then copy the contents of your backed up webapps/<ECC>/config/theme folder to the folder of the same name in ECC 11.2. For more information see the topics "Customizing the ECC User Interface" and "colors.properties." |
7. Starting the New ECC
- Enter the following URL in the address bar of your internet browser:
http://host name:8080/webapp name/ where:
host name = the name of the computer on which the Apache Tomcat web server runs
8080= the default port for Apache Tomcat
webapp name = the name of the WAR file (without the file extension).
- Login to the ECC with your and .
See the section Troubleshooting Browser Problems on ECC Clients for tips about how to ensure that users see all parts of the ECC user interface correctly.
The Upgrading Steps
In the course of the steps below you can leave the process (close the dialog by clicking Cancel) any time and return to it later at the step you left off by using the System menu.
Once you have finished the whole upgrade process by confirming the option FINALIZE in the final step, a rollback will no longer be possible!
Procedure
-
Logon to the UserInterface
If you granted the privilege Execute Zero Downtime Upgrade to a user for the first time in the preliminary step, that user will have to log off and restart and then log on to the UserInterface of the AE with those credentials.
- Open the System menu, select Zero Downtime Upgrade Wizard.
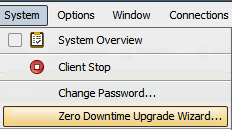
- In the following dialog select BEGIN from the drop down menu and confirm, clicking Done.
This will start the compatibility mode and enables upgrading the database with the target version's schema and initial data.
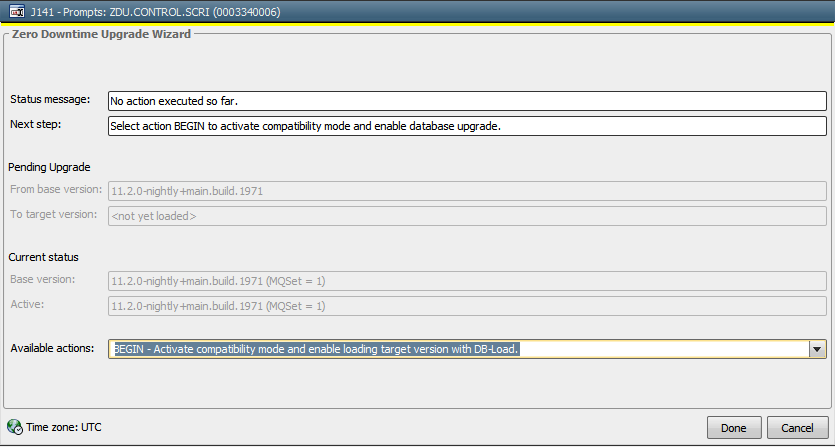
The dialog will close momentarily.
- After a few moments the dialog will open again.
Leave the dialog open and use the external DB Load Utility to upgrade the database.
When this step has been processed, the AE system has loaded the target version database schema and initial data.
DB Load Utility in this step checks the following:
Running System Check:
- Should ZERO_DOWNTIME_UPGRADE be set to N and the system be running, DB Load will end the loading process with a corresponding message.
Version Check:
- DB Load checks, if the correct version for the ZDU function is installed and used. If the version is not correct, a message to that effect will be returned.
New DB Schema and Initial Data - Check and Load:
- If the key ZERO_DOWNTIME_UPGRADE is set to N and the system is not running, DB Load will load the new DB schema and initial data. For future reference records are written into the appropriate database table.
- If the key UC_SYSTEM_SETTINGS / ZERO_DOWNTIME_UPGRADE = Y and the system is running, DB Load will also load the new DB schema and initial data, if a record of a previous load attempt is found in the database. Otherwise DB Load aborts and returns the corresponding message.
- In addition DB Load checks, if CPs and WPs of the target version are already active. In case active CPs/WPs of the target version are found, DB Load will end and return the corresponding message.
- After DB Load has finished, select the option CHECKDB from the drop down menu and confirm, clicking Done.
The dialog closes.
This action verifies that the target version was successfully loaded and registered in the system.
- After a few moments the dialog will open again.
Install and start communication processes and work processes from the target version parallel to the already running ones.
Use the second environment (see preliminary steps) for installing the new processes from the target version. Make sure not to use recurring names for processes you install. Best practice is the setup of two separate installations.
The new processes at this point are not yet in use.
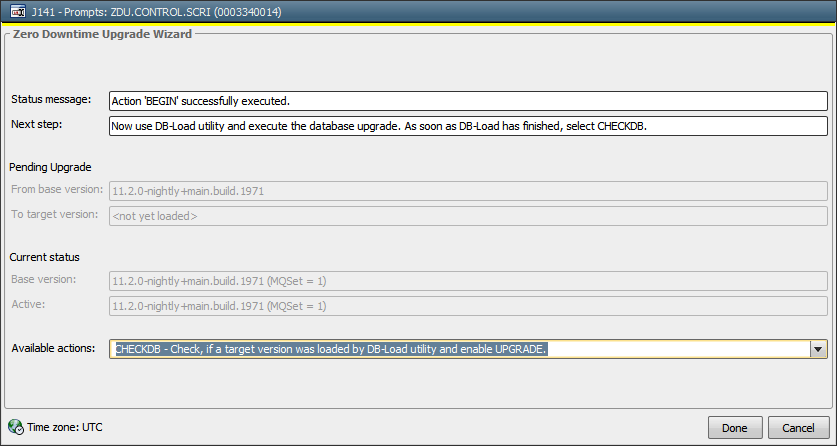
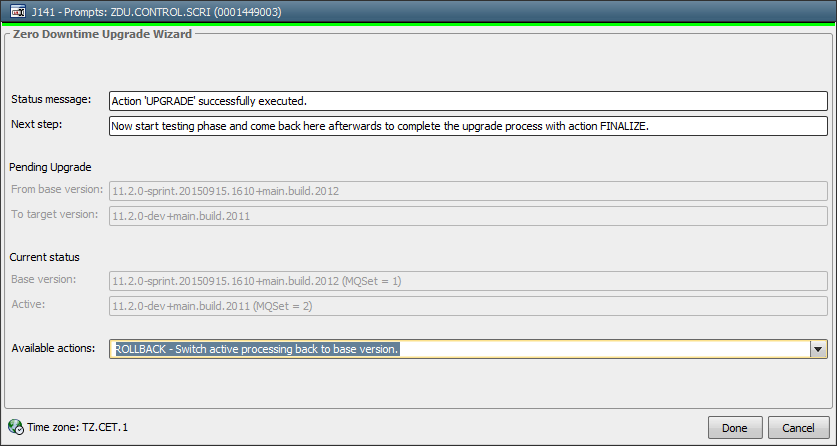
- Select the option UPGRADE from the drop down menu and confirm, clicking Done.
The system is now running with the target version initial data and processes, while the base version processes will be subsequently phased out.
This parallel mode should last as long as needed for proper testing.
Use it for testing the system to determine, if the upgrade has been successful and all processes or tasks run smoothly.
This is necessary in order for you to decide, if you want to finish the upgrade by using the FINALIZE option. For details refer to the ZDU FAQ page.
At this point the option ROLLBACK will be available as well, which is not visible in the previous steps.
During this period of time the following tasks have to be executed by the administrator:
- Inform users with active sessions established before the UPGRADE that they have to re-login in order to free base version CPs from active connections.
- Disconnect agents connected with base version CPs manually so that they reconnect automatically with the new CP generation. Make sure that agents can be disconnected without interruption of running executions.
- If you are ready after testing to use the new setup, select the option FINALIZE from the drop down menu and confirm, clicking Done.
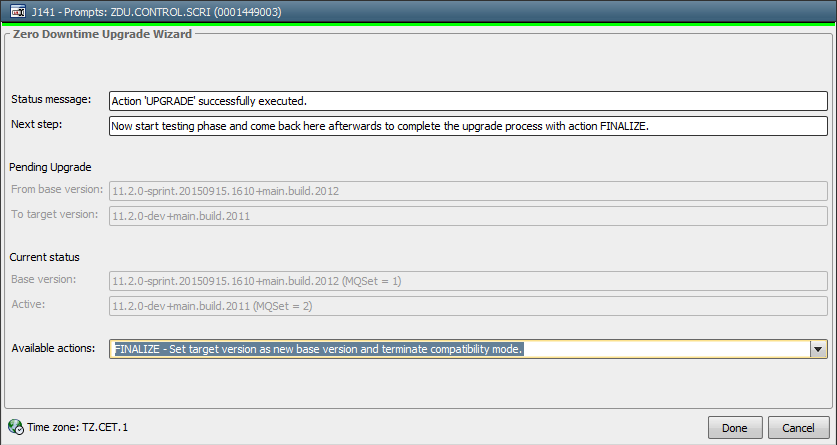
This will end the parallel as well as the compatibility mode.
FINALIZE will only be possible, if no base version processes are active anymore.
When you click Done, the following error message may be displayed:
"ZERO_DOWNTIME_UPGRADE - 'FINALIZE' not possible. Workprocesses to shut down are not idle yet./Please try FINALIZE again later."
In that case scheduled tasks may be active.
Wait for the scheduled tasks to change their execution period (usually the next day), then return to the wizard and try executing the option FINALIZE again.
Once you have finished the whole upgrade by confirming FINALIZE in this final step, a rollback will no longer be possible!
Rollback Option
This rollback function is meant for a possible troubleshooting. Certain tasks or processes may not be running quite as expected while testing the new installation. Choosing this option allows you to check on those tasks or processes.
The option will be visible in the Zero Downtime Upgrade, as soon as the option UPGRADE has been performed successfully.
Using this option will roll back the processing to the base version.
Once you have finished the whole upgrade by clicking the option FINALIZE in the final step above, a rollback will no longer be possible!
Conduct a Rollback
- Open the System menu and select the option Zero Downtime Upgrade Wizard.
- Select the option ROLLBACK from the drop down menu and confirm, clicking Done.
The system now switches back using CPs/WPs from the base version you started from while the new processes are subsequently phased out.
Exception: The primary role (PWP) remains with a new WP until FINALIZE_ROLLBACK has been executed.
- Use this stage for analyzing the reason which caused you to execute the ROLLBACK.
Two possible main scenarios are identified by Automic, which may cause a rollback:
- Something in AE object definitions or environment settings has to be adapted in order to work correctly with the target version.In this case get the necessary work done and continue afterward withthe upgrade procedure step UPGRADE
- The new processes / initial data from the target version have not been working as expected. In this case contact Automic Support for assistance in finding out what has to be done.
If new components have to be installed to solve the issue, execute the option FINALIZE_ROLLBACK.
This will end the parallel mode.
It will switch back the PWP role to base version and shut down running components of the target version so that they can be replaced.
Install components you may have received from AE Support and continue with the upgrade procedure stepCHECKDB.
When you clickDone, the following error message may be displayed:
"ZERO_DOWNTIME_UPGRADE - 'FINALIZE_ROLLBACK' not possible. Workprocesses to shut down are not idle yet./Please try FINALIZE_ROLLBACK again later."
In that case scheduled tasks may be active.
Wait for the scheduled tasks to change their execution period (usually the next day), then return to the wizard and try executing the option FINALIZE_ROLLBACK again.
See Also:
Zero Downtime Upgrade
New Installation
Upgrade Installation


 Changes made in the UserInterface's interface only become visible when the core components have been upgraded to the new version.
  Older UserInterfaces cannot be used with AE systems of a newer version. They must be upgraded at the latest when the core components are upgraded.