SAP Solution Manager - Use Cases
This document describes typical use cases for the SAP Solution Manager Integration.
SAP Solution Manager integration allows you to access functions of the Automation Engine. You can even schedule AE tasks from the job scheduling workcenter in the SAP Solution Manager.
You can either schedule them directly or out of a SAP job documentation. In doing so, you can integrate the Automation Engine in the SAP Change Management or the Service Desk.
For information about configuring and testing the integration, see the chapter SAP Solution Manager Integration.
For the following use cases, start the job scheduling workcenter (SOLMAN_WORKCENTER transaction) of the SAP Solution Manager.
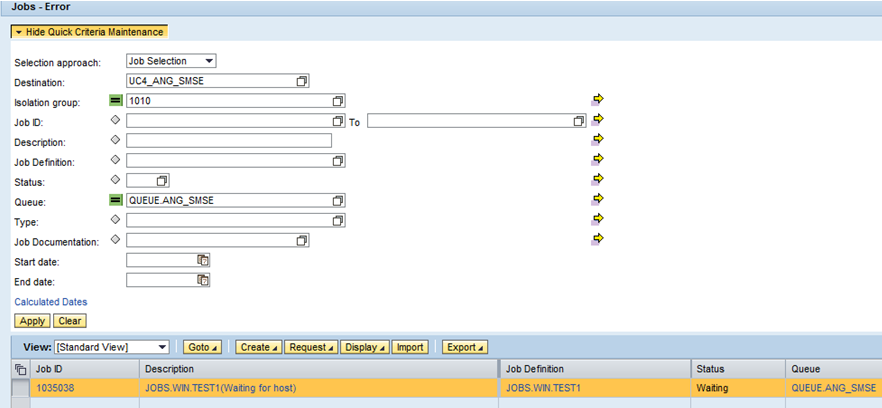
Use Case 1: Searching an AE Job Out of the Solution Manager
- In the SAP Solution Manager Workcenter, Job Monitoring section, select the entry External Job Scheduler.
- You can now define filters according to criteria that should be used for searching AE jobs. The Isolation group stands for the AE client.
- Click Apply to have the jobs that were found listed in a table.
Use case 2: Scheduling Tasks from a Job Documentation
The following steps are required in order to schedule objects in the Automation Engine out of a SAP job documentation:
- Open a SAP job documentation and select a system in the Systems tab.
- Click the Scheduling tab to see the interface in which you can schedule your tasks.
- Set the required parameters such as the AE client (Separation Group field), the RFC connection, Queue object, priority and the name of the object that should start (Job Definition field).
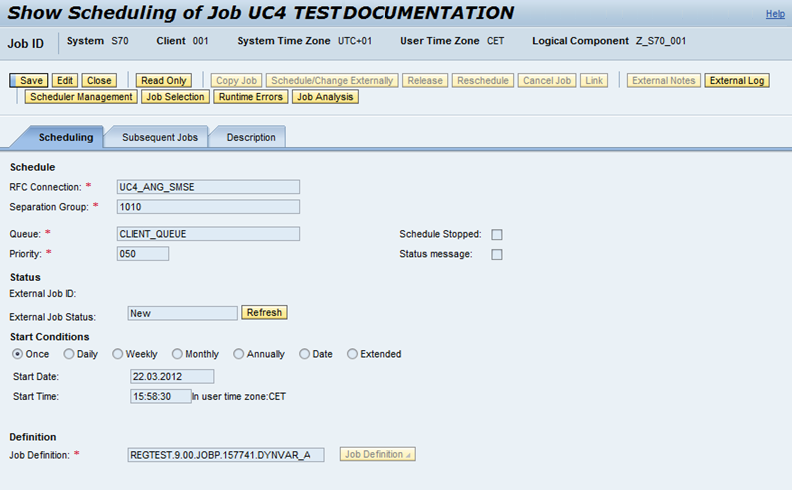
An input assistant is available for selecting the object that should start (Job Definition). All executable objects of the specified AE client will be listed. You can filter for the folder (ID of an application), the object type (Definition Type) or the object name (Job Definition).

- Click Schedule/Change Externally in order to schedule the task in the Automation Engine. The AE RunID of the activated task will then appear in the upper window area.

- By clicking External Notes, you can add comments to an execution.
- External Logs will show the task's AE reports. Note that no external reports are available.

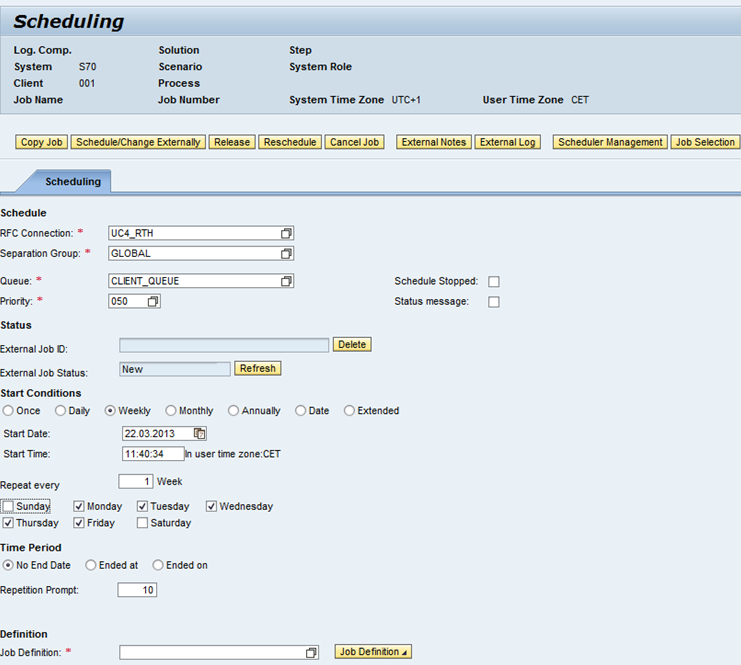
Use case 3: Directly Scheduling Tasks
When you open the Job Scheduling Workcenter, you can use the menu item Schedule Jobs in order to schedule objects directly in the Automation Engine.
- In the Scheduler section, select the entry SMSE for the Automation Engine.
- Now select the RFC connection with the corresponding AE client. Note that the AE client is shown in the Separation Group section. This means that when you directly schedule tasks for AE, the Separation Group must always be a number (such as 1010). You can ignore the RFC entry for Separation Group GLOBAL.

- Set the required parameter for the object that should start (RFC connection, Separation Group, queue, priority and object name). Specify the name of the object that should start in the Job Definition field (you can also use the input assistant for this purpose).
As in use case 2, you can now schedule this task in the Automation Engine by clicking Schedule/Change Externally.
 For the start conditions, the Automation Enginegenerates temporary Calendar objects.
Setting the option Schedule Stopped has the effect that the scheduled task will remain in the Automation Engine with the status "Waiting for manual release" until it is manually released.
You can also change existing schedules subsequently by adjusting them to your requirements and clicking Reschedule in order to update your Automation Engine


