Designing Workflows in the Editor
The Workflow editor is the canvas that you see when you open the Workflow page after creating a Workflow object. The editor contains graphic tools to insert, connect, move and work with the tasks in the Workflow. As a developer and object designer, you design the logic of your Workflow here not only by structuring and connecting tasks, but also by defining task-specific properties. You can define task-specific properties hat have an impact on the execution of the Workflow. For more information, see Object Properties in Workflows.
Notes:
-
Standard and ForEach Workflows have a START and an END node and, between these nodes, any number of executable objects.
IF Workflows do not have START and END nodes.
- The title bar of the Workflow editor shows the name, title or alias of the Workflow. For more information, see Name, Title, and Alias.
Tip: Read the following topics, where you find descriptions of functions that help you work faster:
- Opening and Arranging Multiple Views
- Example: Designing and Monitoring Objects
- Example: Working with Multiple Connections
- Bulk Operations and Drag & Drop
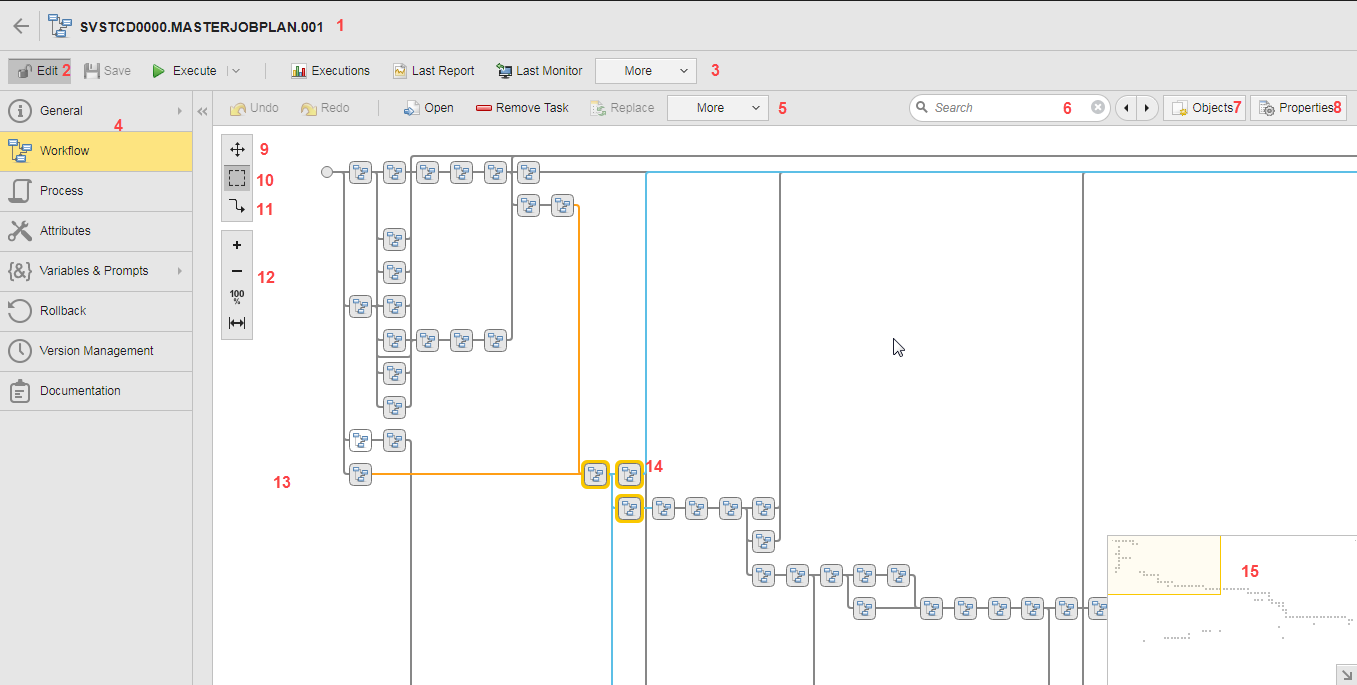
This screenshot shows the Workflow editor. Each main element of the editor has a number. The list after the screenshot briefly describes each element:
-
User Interface displaying the name, title or alias of the Workflow. It also contains the back button, which lets you navigate back to the page that you have previously visited.
-
Button to switch the edit mode on and off. A Workflow is in read only mode in the following situations:
- You have permissions to view it but not to edit it
- It is being edited by another user
-
Workflow toolbar with buttons to access the most important functions that apply to the Workflow.
- Execute, see Execution Options
- Executions, see Execution Data
- Last Report, see Reports
- Last Monitor, see Monitoring Workflows
- More > Monitoring > Show in Process Monitoring
- More > Monitoring > Create Forecast, see Creating Object Forecasts
- More > Move, see Moving Objects or Folders within a Client
- More > Duplicate, see Duplicating Objects
- More > Search for Use
- More > Transfer > Export, see Importing/Exporting Objects
- More > Transfer > Transport, see Transporting Data
- More > Add to Favorites, see Adding to Favorites
- More > Add to User Catalog, see Configuring the User Catalog
-
Navigation pane with tabs to access the pages where you configure the Workflow.
-
Editor toolbar with buttons to access the most important functions that apply to the tasks that are selected:
-
Undo (Ctrl + Z) reverts your last change, Redo (Ctrl + Y) restores your last undone action. Both apply to the Workflow design, that is, you can redo or undo the following operations:
- Add or remove tasks
- Copy and paste tasks
- Replace tasks
- Connect or disconnect tasks
- Change the position of tasks
- Insert or remove columns or rows
-
Function buttons that apply to the task that is selected. The buttons are grayed out if no task is selected.
-
-
Field for Searching for Tasks in the Workflow Editor.
-
Objects button for Adding Tasks to a Workflow.
-
Properties button for defining Object Properties in Workflows.
-
Move mode button for Moving Tasks in the Workflow and Panning.
-
Selection mode button for Selecting Tasks in the Workflow.
-
Connection mode button for Connecting Tasks in the Workflow.
-
Tool for Zooming in the Workflow.
-
Canvas. You design your Workflows here.
When you create a Workflow, the canvas displays the START and END nodes. You start designing the Workflow by adding objects that you arrange and connect to establish the processing sequence. If necessary, you can then configure the properties of each task in the Workflow.
-
Selected tasks. Incoming lines are always blue, outgoing lines are yellow.
-
Mini map.
Large Workflows spread over the visible part of the Workflow editor or monitor. When they contain hundreds of objects, panning is not enough to get an overview of the structure of the Workflow. The mini map at the bottom right corner helps you orientate within them. It provides a minimized and simplified view of the entire Workflow. In the Workflow monitor, it also displays the objects with the colors that identify their status.
The mini map is an indicator of where the current screen lies within the Workflow structure. A square highlights it. The editor and the mini map are synchronized. If you change the focus in one, it also changes it in the other.
See also:
- Workflows (JOBP)
- Adding Tasks to a Workflow
- Task Boxes in Workflows
- Selecting Tasks in the Workflow
- Connecting Tasks in the Workflow
- Moving Tasks in the Workflow and Panning
- Zooming in the Workflow
- Copying, Replacing and Removing Tasks in Workflows
- Inserting and Removing Rows and Columns in Workflows
- Exporting Tables to CSV
- Name, Title, and Alias
- Monitoring Workflows