Getting Started with the Event Engine
Under the Hood: How Does the Event Engine Work?
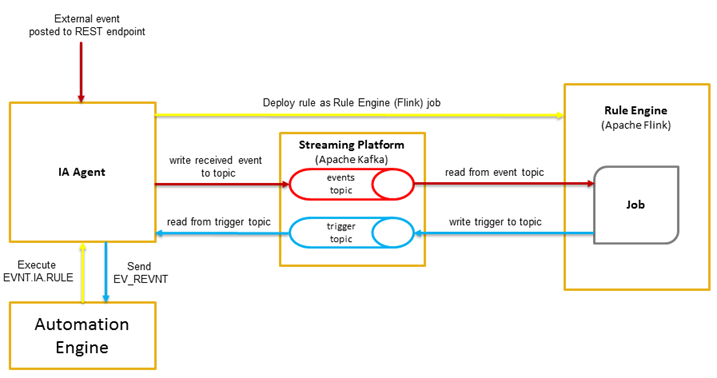
The following diagram outlines the information flow of the Event Engine.
-
Yellow arrow - A rule object (for example, SIMPLE_RULE Event) and Event Definition (for example, IA.EVENT_DEFINITION) is created and executed in the Automation Engine. The IA Agent then deploys the rule object as a Rule Engine (Flink) job which is then executed on the Rule Engine.
-
Red arrow - When an external event is posted to the REST endpoint, the IA Agent writes the received event to the topic named events in Streaming Platform (Kafka). The Rule Engine then reads the event topic and if a pattern is recognized a rule is triggered.
- Blue arrow -The Rule Engine (Flink) then proceeds to write the trigger to the Streaming Platform (Kafka) topic named trigger where an IA Agent is listening. The IA Agent then reads from the trigger topic and send the event to the Automation Engine. The Event Definition object will then take action according to its configuration.
Using the Event Engine Feature
Before you start using the Event Engine feature, ensure that the prerequisites have been considered. See the Component Grid found in the Using Analytics section.
The Event Engine feature requires the use of two AE Object types:
- An Event (EVNT) Object located in the Add Object panel under: Event (EVNT)>IA >RULE>
- Rule Event objects can be created like any other AE object.
See: Events (EVNT) and RULE Events for further information.
- A Variable (VARA) Object named EVENT_DEFINITION Variable - this is located in the Add Object panel, under: Variable (VARA)>XML>IA>EVENT_DEFINITION Variable.
See: User-Defined VARA Objects and XML VARA Objects.
Notes:
- Prior implementation knowledge of the previously mentioned Objects is required before you get started.
Event Definitions
An Intelligent Automation Event is based on XML VARA Objects VARA object, Events are defined by the following:
- a unique type (the event name)
- an optional event time (the timestamp when the event occurred in utc)
- and a key-value pair (KVP) representing the attributes of the event
To Define an Event Definition
- Log in to an Automation Engine Client where an IA Agent is assigned. See: Assigning Clients to Agents
-
Create and name new VARA.XML.IA.EVENT_DEFINITION object type.
-
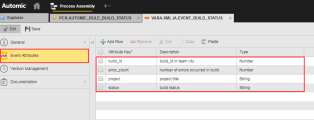
Enter the following details into the event definition sheet:
- Attribute Key: KVP (for example, application message, status event, acknowledgment, and so on).
- Description: Optional but advisable.
- Type: You can either select String, Number, or Boolean in relation to your Attribute Key.
Example:
A build status event from Team City will probably require attribute keys such as build_id or status, you can then build your rules around these attributes. Also keep in mind that you should associate the correct Type to an Attribute Key. There is no point assigning a string type to an error count attribute.
- Select Save after you have completed your attributes. Now you can begin to create your rules.


Rules
Rules are building blocks that consist of rule logic. One way of looking at rule logic is to imagine a set of instructions (or a formula) that follows certain inferences. This is the foundation of the Rule Engine. A good example of this would be: IF some condition is met THEN take some action.
A real use case might consist of a company that uses social media to extend its online marketing and sales campaign. For example, a shoe company might Tweet a unique link to an exclusive offer for subscribed follows only. When a follower clicks the link (Event), a rule is triggered, enabling the rule engine to continue to take action (that is, trigger a workflow). All this can take place in real time allowing the shoe company to see the impact of such offers. This is just one example, however the same use case can be applied to a book company, cinema company, an on-demand media company and so on.
Rules can be defined in AWI by adding the rule plug-in, which you can download from our marketplace on https://marketplace.automic.com/ . You can also find the plug-in in the main Automic Automation and CDA packs, which are listed under Core Components, Analytics.
Types of Rules
There are two types of Rules that can be used to trigger an Event:
All rules share the following features:
- They execute an Automation Engine whenever the rules triggers.
- A rule type is defined by a set of parameters that can be easily mapped to the Prompt Set values of the selected AE Object.
- A rule type offers a defined set of output parameters.
Notes: To install the Analytics Action Pack Rules see: Installing an Event Engine Rule.
To Create a new Rule
Notes: The following example is based on a Simple Rule.
-
Select the rule type from the list. START
-
Configure the rule (based on the selected rule type). This process includes defining the Event Definition, Expression Definition, and Actions. Configuration is further outlined in detail with use case examples defined.
See: RULE Events -
Save your created rule.
- Execute the rule.
- Ensure if the rule is running by opening the Executions.
- Whenever a rule is triggered, a new child execution is generated. You can open a child execution task to see the AE object executed by the trigger.
- The Event Count increases each time that the rule is triggered.
- Verify that the rule is running by opening the Executions.


Note: The Event Count does not increase for every event that the rule might be listening on.