Working with Packs and Plug-ins
As an Administrator, you can install Packs and Plug-ins to enhance the CDA functionality and allow integrations with third-party products. Packs and Plug-ins that are integrated into AWI can be managed from the user interface (by using the Plugin Manager plug-in) or via the Package Manager CLI.
Important! From version 12.3, Action Packs can be imported and exported in two different formats: .xml and .json . You can define which format to use in the PACKS_COMPATIBILITY_MODE parameter of the UC_CLIENT_SETTINGS (Plugin Manager) or by adding the corresponding option in the apm download command (Package Manager).
For more information, see:
- UC_CLIENT_SETTINGS - Various Client Settings
- Getting Help and Further Commands (CLI) - Download Packs

This page includes the following:
To View Packs (GUI)
Packs can be accessed:
-
From the Administration perspective: Click the Packs tab at the bottom of the Navigation pane.
Note: You can narrow down the list of Packs by using one or more of the filter criteria in the Filter panel:
- Name: name of the Pack.
- Version: select one of the following options:
- installed: all installed Packs are displayed.
- upgrades: all Packs for which an upgrade is available are displayed.
- not installed: all Packs available in the GIT repository but not installed on the system are displayed.
- Category: see Types of Packs
- Title: title of the Pack.
Tips:
- Select a Pack and click Jump to source in the toolbar to see/edit the objects that are contained in the Pack.
- To open and compare the source files of multiple Packs, hold the Ctrl key, select the Packs and click Jump to source.
-
From the Process Assembly Explorer: Click the PACKAGES folder.
Note:
- As an Administrator, you can configure the system to connect to a GIT repository containing an updated list of available Packs and versions. If this option is enabled, the full list of CA Automic Packs is displayed (also the Packs that have not been installed yet but exist in the index). For more information, see Administering the Plugin Manager.
To View Packs (CLI)
-
Update the Package Manager index to fetch new and edited packs from the local repository:
apm update
-
Search for a Pack in the local repository:
apm search [<any part of package name>]
Example
apm search SiebelNotes:
- If
[<any part of package name>]is not specified, all available packages are displayed. - To get a full list of installed Packs, enter the following command:
apm list
- If
Viewing the Release Notes of a Pack
A short description of the release notes of a Pack (new features, bug fixes and know issues) is displayed in the Details panel of the Packs view (Administration perspective) after selecting a Pack. This information helps you decide if you want to install the latest version of a Pack.
Prerequisites:
- The PM_PACK_RELEASENOTE_URL VARA object has been configured to connect to the repository containing the release notes of the Packs.
- The Update Index button in the toolbar has been triggered at least once.
Note: Visit https://downloads.automic.com/ to read the full description of the release notes.
Notes:
- You can configure the import method of Packs in the PACKS_COMPATIBILITY_MODE parameter of the UC_CLIENT_SETTINGS (for more information, see UC_CLIENT_SETTINGS - Various Client Settings).
- Packs exported in the new format (.json) cannot be imported into older CDA versions (12.2 and lower)
To Download and Install a Pack from the Marketplace (GUI)
Important! This method can only be used to install Packs that are available in the GIT index.
- Open the Administration perspective.
- Select the Packs tab.
- Select one or more Packs from the list.
- Click the Install button in the toolbar. The Packs are downloaded from https://marketplace.automic.com/
- Select the Ignore dependencies checkbox if you want to ignore possible dependencies to other Packs.
To Install a Pack from a File (GUI)
-
Download the Pack you want to install from https://marketplace.automic.com/ and save it to a local folder.
Note: To find the Action Packs on the Marketplace, search for their descriptive names (for example: Json Action Pack).
- Open the Administration perspective in AWI.
- Select the Packs tab.
- Click the Install from File button in the toolbar.
- Click the Upload button, navigate to the location where you have downloaded the Pack (.zip file), and follow the wizard instructions.
- Select the Ignore dependencies checkbox if you want to ignore possible dependencies to other Packs.
After the installation is complete, the new Action Pack can be found in the PACKAGES folder of the Process Assembly perspective.
Some Packs may contain AWI plug-ins, which are installed together with the Pack. To check if the Plug-in has been registered correctly, log out and log back into AWI, select the arrow in the user and session information area (top-right corner) and select About

For more information, see Logging In and Out.
Notes:
-
Active executions of objects that are included in the Pack must be stopped. You can cancel them in bulk from the wizard and resume the process or you can open the Process Monitoring perspective to review the executions and cancel them manually.
-
Click the Update Index button in the toolbar to retrieve an updated list of available Packs and versions from the GIT repository. For more information, see Administering the Plugin Manager.
To Install a Pack (CLI)
Use this command to install a Pack from your local file system to a target AE client.
Use the following command to install a Pack:
apm install [option] <pack name>
Alternatively, you can install a Pack from a file:
apm install --from-file <path to the pack archive or directory>
Where [option] can be one of the following:
-
--force
Force installation if the versions in the metadata and the index are inconsistent.
Default: false.
-
--from-file
Path to the local archive or directory containing the Pack to install
-
--ignore-dependencies
Ignore dependency Packs. Use this flag to install Packs without the dependency check.
Default: false.
-
--remote-user
Username of the remote repository
-
--remote-password
Password of the remote repository
Notes:
- If you want to avoid installing dependent Packs, set the flag to ignore pack dependencies.
- Multiple Packs can be installed by leaving a blank space between the names.
Examples
Single Pack installation:
apm install --from-file C:\Pack.Bond_PCK.AUTOMIC_BOND_1_0_0+build.164.zip
Multiple Pack installation:
apm install PCK.AUTOMIC_HTTP PCK.AUTOMIC_FTP -H automicdev -S AUTOMIC -p 1234 -c 123
Important! The installation of a Pack may be restricted to a limited number of clients. You can use the option -c <number> to change the target client of the installation or enter the following command to bypass the client check: --ignore-client-restriction.
To Upload a Pack (CLI)
Upload Packs from the working directory to the Automation Engine client.
Important! A package.yml file must exist in the current working directory. If the file does not exist, call the following command to create it: apm init <pack_name>
apm upload [option]
Where [option] can be one of the following:
-
--force-overwrite
Objects which already exist in the AE client will be overwritten with content from the local file system.
Short:-force
Default: false.
-
--ignore-dependencies
Package dependencies are ignored.
-
--include-appdata
Upload also the AppData folder.
Short:-ia
Default: false.
-
--no-binary
Upload all objects except binary objects.
Short:-nb
Default: false.
-
--no-content
Upload binary objects that are defined in the Pack config only.
Short:-nc
-
--remote-password
Password of remote repository.
Note: required in case dependency packs need to be downloaded and installed before the current pack is installed.
-
--remote-user
Username of remote repository
Note: required in case dependency packs need to be downloaded and installed before the current pack is installed.
-
--remove-unused
Remove unused files which do not have matching objects in the AE client.
Short:-ru
Default: false.
-
--compatibility-mode
Enter this option if you want to upload the Pack with the old structure (.xml).
Short: -cm
Default: false. Pack with new structure is uploaded (.json)
Upgrading Packs
To Upgrade a Pack (GUI)
Important! This method can only be used to upgrade Packs that are available in the GIT index.
Tip: Use the Upgrades option in the Version filter to show the Packs for which an upgrade is available.
- Open the Administration perspective.
- Select the Packs tab.
- Select one or more Packs from the list.
- Click the Upgrade button in the toolbar. The latest version is downloaded from https://marketplace.automic.com/
- Select the Ignore dependencies checkbox if you want to ignore possible dependencies to other Packs.
- Click Upgrade.
Notes:
-
Single pack upgrade:
Active executions of objects that are included in the Pack must be stopped. You can cancel them in bulk from the wizard and resume the process or you can open the Process Monitoring perspective to review the executions and cancel them manually.
-
Click the Update Index button in the toolbar to retrieve an updated list of available Packs and versions from the GIT repository. For more information, see Administering the Plugin Manager.
To Upgrade a Pack (CLI)
Use the following commands to upgrade Packs:
Command for updating the Pack index (to be run only once):
-
Updating the Pack index (to be run only once)
apm update
-
Upgrading a Pack
apm upgrade <pack name>
Alternatively, you can upgrade a Pack from a file:
apm upgrade --from-file <path to the package archive or directory>
Example
Upgrading the Tomcat Pack:
apm upgrade PCK.AUTOMIC_TOMCAT
Important! Upgrading a Pack may be restricted to a reduced number of clients. You can use the option -c <number> to change the target client of the upgrade or enter the following command to bypass the client check: --ignore-client-restriction.
Notes:
-
The following elements are updated:
- All Actions within the Pack
- All Templates within the Pack
- Configuration object templates within the Pack are updated
- Referenced Actions within the Pack
- The following elements are not updated:
- Instances of configuration object templates
- Instances of Templates
- Custom actions
- Post-fixes are also allowed in the package format schema integer.integer.integer+(chars|integer)(.(chars|integer)*) to support semantic versioning.
- Artifacts in the Pack folder are removed
- Object execution and history data (displayed in the version management page of an object) are kept.
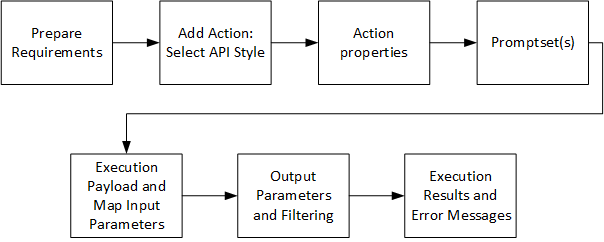
The following should be defined before creating an Action Pack:
- Purpose of the Action Pack
- Type of technology to be used.
- What Actions are needed and what parameters are necessary for running the Actions.
- What variables are needed.
The following graphic depicts the typical workflow when creating an Action Pack:
To Create a Pack (GUI)
- In the Process Assembly perspective, click the Packs tab in the sidebar.
- Select Add Action Pack. The New Action Pack dialog is displayed.
- Enter a title for the Action Pack. The name for the Action Pack is suggested automatically and consists of the following parts:
- PCK.CUSTOM (prefix). The prefix can be configured via the
actionbuilder.propertiesfile. For more information, see, Installing and Configuring the Action Builder. - Title of the Action Pack.
- PCK.CUSTOM (prefix). The prefix can be configured via the
-
Select Add Action Pack.
Notes:
- It is good practice to provide information to others in the documentation object of the Action Pack to help identify your content. The documentation object can be found in the Documentation folder of the Pack in the Explorer.
- You can define a category type for the Pack in the METADATA VARA object. See:Types of Packs.
Use this command to build a Pack in the AE and make it transferable to other systems.
apm build [option] <package_name>
Example:
apm build PCK.AUTOMIC_SHARED -o tar -d /home/deploy/pmRepo -bm xml
Where [option] can be one of the following:
-
--output-format
Defines the output format of the package.
Options:
- solution: ZIP archive with the extension .solution
- zip: ZIP archive with the extension .zip
- tar: GZIP compressed tar-archive with the extension .tar.gz
- folder: Folder in the specified target directory.
Short:-o
Default: folder
-
--target-dir
Path to target directory in local filesystem
Short:-d
Default: <current_dir>/packages/
-
--build-mode
Path to target directory in local filesystem
Short:-bm
Options:
- xml
- json
- all
Default: json
Important! This command overrides the setting defined in PACKS_COMPATIBILITY_MODE.
Creating Template Action Packs for Component Workflows
Templates for component workflows can be easily distributed and installed on different CDA systems by using CA Automic Package Manager.
Note: The Action Builder must be installed and configured.
To Create a Template Action Pack for Component Workflows (GUI)
- Create the Action Pack structure:
- Go to the Process Assembly perspective and click the Packs accordion tab in the sidebar.
- Click Add Action Pack. The New Action Pack window is displayed.
Enter a title for the Action Pack (for example: Component Workflow Template). The name for the Action Pack is suggested automatically.
- Click Add Action Pack.
- Clean up and define the Action Pack metadata:
- Switch to the Explorer.
- Navigate to the Action Pack, which is located in the PACKAGES sub-folder.
- Delete the following folders:
- ACTIONS
- RESOURCES and its subfolders.
- SOURCE (this folder should only be deleted if not needed. The sub-workflows (SOURCE/SHARED/JOBP) and PrompSets (SOURCE/SHARED/PROMPTSETS) are stored here).
- Delete the VARA object that is located in the CONFIG folder (for example: PCK_CUSTOM_COMPONENT_WORKFLOW_TEMPLATE.PUB.PROMPT_EXTERNAL.MAP).
- Add a new XML VARA object:
- Click Add Object.
- Name it PCK.<pack-name>.PUB.INTERFACE (for example: PCK.CUSTOM_COMPONENT_WORKFLOW_TEMPLATE.PUB.INTERFACE)
- Optionally, enter a title.
- Click Rename.
Click Add Key to create a key and name it Interface.
- Click the new key and add the following XML-structure to list the Workflow Templates with the corresponding settings for the component custom type:
<interface><templates><add-templatekey="ARA.INSTALL.<CustomType>(.DEFAULT)">PCK.<pack-name>.PUB.TEMPLATE.INSTALL.<WF-name>(.DEFAULT)</add-template><add-templatekey="ARA.UNINSTALL.<CustomType>(.DEFAULT)">PCK.<pack-name>.PUB.TEMPLATE.UNINSTALL.<WF-name>(.DEFAULT)</add-template></templates>For example:
Install key=
<add-templatekey ="ARA.INSTALL.TOMCAT.DEFAULT">PCK.CUSTOM_COMPONENT_WORKFLOW_TEMPLATE.PUB.TEMPLATE.INSTALL</add-template>
- Go to the Action Pack main folder (for example: PCK.CUSTOM_COMPONENT_WORKFLOW_TEMPLATE).
- Open the metadata VARA object (for example: PCK.CUSTOM_COMPONENT_WORKFLOW_TEMPLATE.PUB.VAR.METADATA) and redefine the files if needed.
- In the Dependencies row, enter any dependent Action Pack. (An Action Pack depends on another if Actions of this Action Pack are used inside the Template workflow).
- Optionally, enter a description for the Action Pack.
Open the DOCUMENTATION folder and double-click the PUB.DOC DOCU object.
Click the Documentation accordion tab and enter any general information that may be helpful to use the Action Pack.
- Back to the DOCUMENTATION folder, open the PUB.LICENSES DOCU object and enter any relevant information related to licensing (for example: this Action Pack may not be modified).
- Create template workflows:
- Open the TEMPLATES folder.
- Click Add Object.
- Unfold the Workflow (_FLOWS) object and select COMPONENT_FLOW Workflow.
- Click Add Object. The Rename Object dialog is displayed.
- Enter the same names as the ones specified in the XML VARA object and set the title accordingly.
Use the Process Assembly to design the template workflows by dragging and dropping the desired Actions into the workflow and setting the parameters.
Note: A copy of an existing component workflow can be used as a starting point to design a workflow template.
Important! The keys that are specified in the interface-XML must follow the previously mentioned structure. Workflow names must follow the naming conventions too.
- Export the Action Pack (see Exporting Packs)
This Action Pack can be used to install the created workflow template into another CDA systems.
Note: Templates can only be used in the same AE/ARA-System where the Action Pack was created if they are installed via the Package Manager.
Packs can be exported in the Process Assembly perspective to be reused in another client or system.
Important!
- When exporting a Pack, ensure that the metadata contains the correct values. Increase the version number with subsequent releases of your Pack to distinguish between different versions. The version number can be set in the Metadata object of the Pack.
- Packs exported in the new format (.json) cannot be imported into older CDA versions (12.2 and lower)
To Export an Action Pack
-
On the Packs page of the Process Assembly perspective, right-click the relevant Action Pack and select Export.
-
On the Export Pack window, select Export to validate and build the Pack automatically.
-
Select Download to download the Pack and select a destination.
A semantic check is performed before exporting the Action Pack, thus ensuring that the Actions are defined correctly. The following properties are checked:
- Generate Job at = Runtime
- Deactivate on Finish = After error-free execution.
- Error-free status = ANY_OK
- Overwrite Agent's value = “&AGENT#“ or leave it empty
Tip: Do not export Action Packs with a hard-coded Agent/Login set.
Note: You can configure the export method in the PACKS_COMPATIBILITY_MODE parameter of the UC_CLIENT_SETTINGS (see:UC_CLIENT_SETTINGS - Various Client Settings).
To Export an Application Pack (GUI)
Applications that have already been added to an Application Pack can be exported.
- From the Process Assembly perspective (see: Exporting Packs)
- From the Applications list.
- Right-click an Application.
- Navigate to Application Pack > Export.
- From the Properties view of an Application.
- Double-click an Application to open it and click the Properties tab.
- Navigate to Application Pack > Export.
To Download a Pack (CLI)
Use this command to download Packs from the Automation Engine client to the working directory.
Important! A package.yml file must exist in the current working directory. If the file does not exist, call the following command to create it: apm init <pack_name>
apm download [option]
Where [option] can be one of the following:
-
--force-overwrite
Objects which already exist in the local file system will be overwritten with content from the AE client.
Short:-force
Default: false.
-
--include-appdata
Download also the AppData folder.
Short:-ia
Default: false.
-
--remove-unused
Remove unused files which do not have matching objects in the working directory.
Short:-ru
Default: false.
-
--compatibility-mode
Enter this option if you want to download the Pack with the old structure (.xml).
Short: -cm
Default: false. Pack with new structure is downloaded (.json)
The cloning functionality of the Action Builder allows you to save time when creating Packs which are similar to existing ones.
Important!
- Cloning Application Packs and the PCK.AUTOMIC_BOND Pack is not supported.
Note: Cloning an Action Pack results in all Actions and objects that directly belong to it (Includes, Prompsets, Workflows) to be copied.
To Clone Packs
-
On the Packs page of the Process Assembly perspective, right-click the relevant Action Pack and select Clone.
-
(Optional) Change the title for the cloned Action Pack.
Tip: Enter a descriptive name. The title helps you and others to identify better the purpose of the Action Pack.
-
Enter a Name. A prefix is automatically added by the system to adhere to the Action Pack naming conventions.
Note: Prefixes can be configured via the
action.builderfile.
The cloned Action Pack is displayed on the list.
To Delete a Pack (GUI)
- On the Packs page of the Administration perspective, select the Pack that you want to remove. To select multiple Packs, hold the Ctrl key.
- Click the Remove button in the toolbar.
- Select the Ignore dependencies checkbox if you want to ignore possible dependencies to other Packs.
- Click Yes
Note:
-
Single pack deletion:
Active executions of objects that are included in the Pack must be stopped. You can cancel them in bulk from the wizard and resume the process or you can open the Process Monitoring perspective to review the executions and cancel them manually.
To Delete a Pack (CLI)
Use the following commands to remove Packs:
-
Removing a Pack
apm remove [option] <package name>
Where [option] can be one of the following:
-
--ignore-dependencies
Ignore dependent Packs.
Default: false
-
--remove-appdata
Remove application data from the Pack
Default:false
Getting Help and Further Commands (CLI)
For more details on sub-commands, options and syntax, refer to the built-in help.
Command Structure
The APM CLI uses a multipart structure. Each command consists of:
- A base (APM)
- An action specifying the operation to be executed (for example: install).
-
Arguments and options, which can be specified in any order.
Options can be specified in short form (starting with a single dash -) or in long form (starting with a double dash --). For example: -h, --help or -c, --client.
Some options have its own arguments, that must be specified right after the option. For example:
-c 20 -u UC/UC. Other options have no argument and work as a flag. For example:-v,--verboseor-h,--help.The CLI tool can process none, one or more arguments that are not optional, called main arguments. Main arguments and optional arguments (if available) can be entered with double quotes (” ”) or single quotes (‘ ‘) in a consistent way.
All APM commands have the following syntax:
apm <command> [option] [<arguments>]
Passwords
Passwords can be specified with the following commands: -pw or --password.
Important! The values are not displayed in the command line while typing.
Common Options
The following options are available for all APM commands:
-
-v, --verbose
Display verbose output
- Default: false
-
-vv, --very-verbose
Display verbose output
- Default: false
-
-y, --yes
Respond yes to all prompted questions.
- Default: false
Common Options for Automation Engine Connection Commands
-
-C <file>, <file>
Path to uc4config.xml. Default: $PM_HOME/conf
-
-L <file>, --login-dat <file>
Path to login_dat.xml. Default: $PM_HOME/conf
-
-T <template>, --user-template <template>
User template that is used to connect to the AE
-
-S <system>, --system <system>
AE system name. This command overrides the default value of the configuration file.
-
-H <host>, --host <host>
AE hostname or IP address. This command overrides the default value of the configuration file.
-
-c <client>, --client <client>
AE client number. This command overrides the default value of the configuration file.
-
-p <port>, --port <port>
AE port. This command overrides the default value of the configuration file.
-
-u <user/dept>, --user <user/dept>
AE user/dept. This command overrides the default value of the configuration file.
-
-pw [password], --password [password]
AE password, password may be not mandatory in the command line, the tool asks for it later.
-
-l <language>, --language <language>
AE language. This command overrides the default value of the configuration file.
-
-f <folder>, --folder <folder>
AE folder containing all installed packages. Default:
\PACKAGES
Get Help for a Command
For details on commands, call apm <command> -h or apm <command> --help.
Find More Commands
For a list of available commands, call apm -h or apm --help.
Analyze and Display Current Environment Issues
apm doctor check
Fix Current Environment Issues Detected by the Doctor Check Command
apm doctor fix
Note: Extended Packs: run this command if you want to scan for and update missing hooks and VARA objects of base Packs.
Display Pack Content
apm show [option] <pack_name>
Where [option] can be one of the following:
-
--from-file
Read Pack from local file or directory
-
--installed
Only show installed Pack.
Default: false.
-
--local
Only show Pack in local cache.
Default: false.
See also: