Use Case: Closed Loop Remediation
These service orchestration scenarios show how you as a system administrator or Workflow designer can integrate an Automic Automation (Automic Automation) Workflow in a closed loop remediation process. We will look at how events in an external system can trigger an automated process. Specifically, we will look at cleaning up disk space on a Windows server automatically as its disk space gets low.
Your IT landscape is not likely to look like the one described in these examples. Nevertheless, you can use the examples to get a sense of how to orchestrate a remediation process with Automic Automation. They can also help you understand what you need to consider to implement a similar scenario in your organization.
For general information about this type of process in a business environment, see Closed Loop Remediation .
This page includes the following:
Planning for Automated Remediation with Automic Automation
To ensure a successful and optimal implementation of a closed remediation process, like the one in the example in this topic, you need to start with thoughtful planning. For guidance with this crucial stage of the project, see Planning Considerations for Service Orchestration.
What You Will Learn
- How you might integrate Automic Automation and an external system, in this case CA UIM, to run a remediation process
- How to setup CA UIM to trigger a remediation Workflow in Automic Automation
- What setup you need in Automic Automation to prepare for designing the remediation Workflow
- What planning considerations are involved for implementing an automated remediation process
Example: Triggering a Disk Cleanup with a Monitoring and Alarm System
In this example, we look at how you can maintain healthy disk space on a server by monitoring its free disk space and automatically cleaning it up when the free space drops too low. This way, you support the optimal performance of the databases and the business-critical applications on the server.
Prerequisites
The disk cleanup scenario in this example required the following prerequisite setup and preparation activities:
Setup: On the Windows server
Two kinds of agents need to be installed on the server that you want to manage:
- A CA Unified Infrastructure Management (CA UIM) probe to pull disk space statistics
- An automation agent to perform the remediation actions that are orchestrated by the Automic Automation Workflow
Setup: Automic Automation and Automation Engine
The following things need to be prepared in Automic Automation:
- Ensure the following action packs are installed. You should see them in the PACKAGES folder in the Explorer sidebar in the Process Assembly perspective.
- PCK.AUTOMIC_FILE_SYSTEM (Filesystem Action Pack)
This action pack contains actions to manipulate the files and directories on the external servers that you want to clean up.
Note: If they are not listed in the Explorer sidebar, then you need to download them from our marketplace on https://marketplace.automic.com/ and install them. For instructions about installing an action pack, see Installing Packs in Working with Packs and Plug-ins.
- PCK.AUTOMIC_FILE_SYSTEM (Filesystem Action Pack)
Communication and planning among teams
You need to coordinate among teams to ensure that all systems can authenticate at the various endpoints and pass on the necessary data. These junctures lie in the following places:
- From CA UIM to the Windows server
- Between CA UIM and Automic Automation
- From Automic Automation to the Windows server
There are several ways to communication with Automic Automation, but the REST APIs are the most technology agnostic and therefore often a good choice, and it is the one we use in our example.
The Process Overview
The general process would look like this:
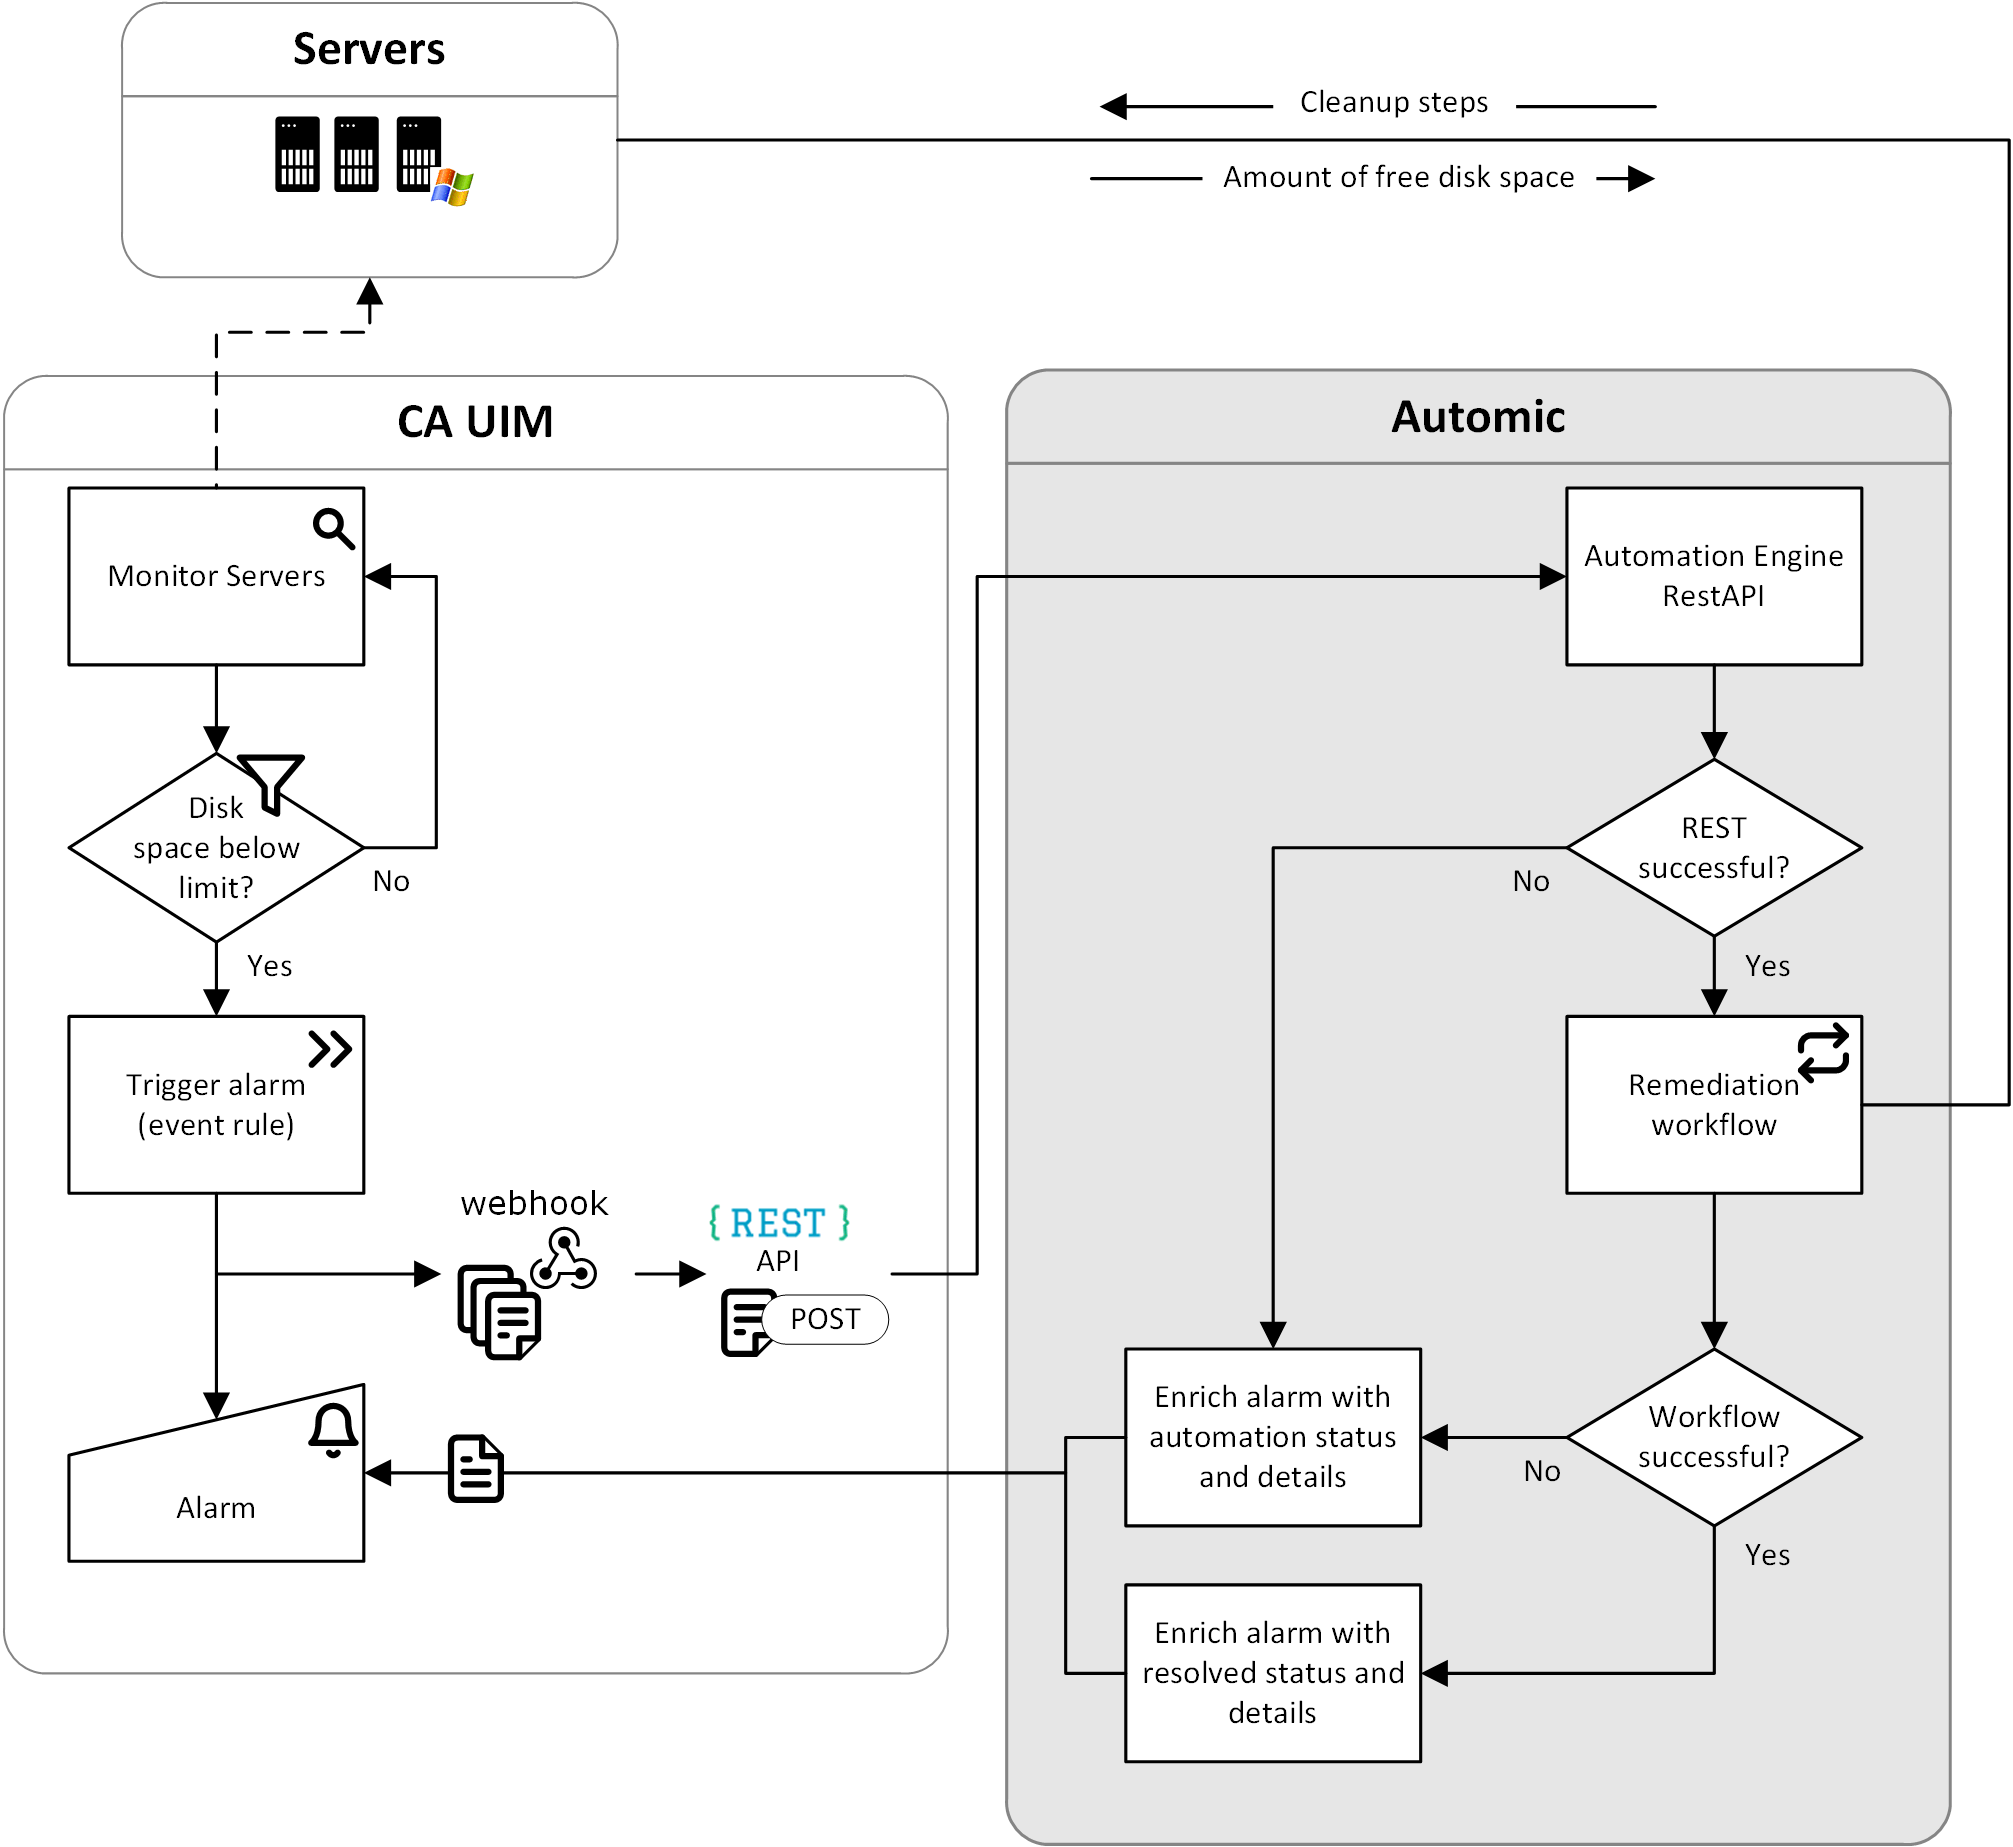
The automated disk space cleanup involves the following tasks:
- An IT monitoring system watches the disk space.
In our example: The on-premise Windows servers are being monitored by CA Unified Infrastructure Management (CA UIM). When the free disk space on a server drops below the set threshold, an alarm is generated.
- The alarm triggers a notification process that carries details for the cleanup Workflow.
In our example: The alarm function in posts an AE REST-API call to the Automation Engine (AE) of Automic Automation. The REST call includes details to login to AE and the input values for the PromptSet for the Workflow. These values include details such as the server location, authentication specifications, and the target amount of free disk space.
- An automated Workflow in Automic Automation is started.
In our example: The Workflow uses the prompt-set values provided by the AE REST-API to locate, log into, and clean up the server.
- The alarm is cleared when the disk is clean.
In our example: While the cleanup process is running, the alarm system continues to check the disk space. when the free space drops to the acceptable amount, the alarm is cleared. With that step the automated remediation loop is closed.
For a cloud-based server, the process is the same, but you would use a monitoring system that is cloud-based, such as CA Digital Experience Insights (CA DXI).
Who Is Involved
The following people play a role in this implementation:
- The IT service manager
- Automic Automation administrator
- Automic Automation Workflow designer
- System administrators of each of the other systems involved
- REST and Webhook developers to code the posts and retrievals
Step 1: Defining the Workflow in Automic Automation
Define a Workflow that defines the following steps of the remediation procedure.
Tip: Consider creating sub-workflows for individual tasks that you can use in other remediation Workflows. Building your workflow in a modular approach increases the scalability of your efforts.

- Define a PromptSet with named variables for input to the Workflow.
These will need to be added to the incoming REST call from CA UIM. Coordinate with the CA UIM Webhook and REST API developers to ensure that they post the inputs for the promptSet variables and that you provide the variables they need to
- Using the input parameters, parse the address of the server and drive. Using this address, you can identify the AE agent that is running on the server.
- Use the related actions from the PCK.AUTOMIC_FILE_SYSTEM action pack to do the following:
- Check the disk space.
Example output:
Total # of free bytes: 7110569984
Total # of bytes: 524288000
Total # of avail free bytes: 167292928
- Find the folders you want to delete.
- Delete those folders.
- Create a temporary folder.
- Find and then move files that you want to delete into the temporary folder.
- Delete the temp folder.
- Check the final disk space again
- Check the disk space.
- Get a list of the 10 biggest files.
- Output the results into variables.
Step 2: Defining the Webhook to transport the alarm data in CA UIM
For complete instructions with a detailed example of how to define an alarm and webhook to the Automic system in CA UIM, see Integrate CA Automic in the CA Unified Infrastructure Management documentation. Also see, messagegtw (Message Gateway) in the CA Unified Infrastructure Management Probes documentation.
The overall procedure is this:
- Deploy nas on the Primary Hub
- Create a Hub Attach Queue
- Deploy the Message Gateway Probe (messagegtw) to send messages to a webhook
- Configure the messagegtw probe with the following specifications for the Automic Automation remediation Workflow
- The endpoint details
- The payload details
- The webhook details
You must coordinate with the Automic Automation Workflow developers to get the names of the PromptSet variables for the remediation Workflow. You need to map the UIM fields to these variables for the inputs in the REST call post. f you want to request execution data for alarm enrichment, you also need those variable names for a separate .
Note: Each instance of the Message Gateway Probe can have multiple webhooks configured.
- Define a Profile in the nas Auto‑Operator
Step 3: Defining the communication via REST calls in CA UIM
Note: Also see the example use case in Integrate CA Automic in the CA Unified Infrastructure Management documentation.
Remember that for all calls to the Automic Automation, you need to provide the basic authentication parameters, Username and Password. For example:
- Username: AUTOMIC
- Password: automic
You need REST calls for the following actions:
- To post the alarm:
Define a REST call from the CA UIM alarm service that will post the start data for the disk cleanup Workflow in Automic Automation. For example:
POST: http://10.243.44.171:8080/ae/api/v1/100/executions
{
"object_name": "JOBP.DISK_SPACE",
"inputs": {
"DISK#": "C",
"DNSNAME#": "domain.name.au",
"IP#": "10.0.0.1“
}
}
When the Workflow execution starts successfully, the Automic Automation responds with the execution run ID.
{
"run_id": 1017267
}
- To request the execution status:
Define the REST call that will periodically get the status and details of the execution from Automic Automation to enrich the alarm data. For example:
GET: http://10.243.44.171:8080/ae/api/v1/100/executions/1017267
Here is a sample response.
{
"name" : "JOBP.DISK_SPACE",
"type" : "JOBP",
"run_id" : 1017267,
"status" : 1900,
"status_text" : "ENDED_OK - ended normally",
"runtime" : 0,
"activation_time" : "2018-09-24T22:42:59Z",
"start_time" : "2018-09-24T22:43:00Z",
"end_time" : "2018-09-24T22:43:00Z",
"parent" : 0,
"user" : "AUTOMIC/AUTOMIC",
"estimated_runtime" : 1,
"alias" : "JOBP.DISK_SPACE"
}
Note: If the Workflow has child Workflows, then to get a more complete picture, request the executions details for the main and sub-tasks. For example:
GET: http://10.243.44.171:8080/ae/api/v1/100/executions/1017267/children
For information about all the REST endpoints for AE, see REST API Reference.
Step 4: Defining the monitoring and alarm systems in CA UIM
Define the following in CA UIM:
- A probe for the server that you want to monitor for disk space
- Define an nas Alarm with an Auto-Operator rule that triggers the Message Gateway Probe defined in the previous steps.
Variation: Adding Incident Management
You can always integrate Automic Automation Workflows into your incident management system. This gives you the following added advantages:
- Transparency for your support staff within the incident management system that they already use
This helps them keep an overview of all current activities and enables them to answer customer queries about those incidents.
- Easy hand-off to support staff for exceptions when an automated processes cannot resolve an issue
- Integration with your incident management procedures
You have precise historical data about all incidents, regardless of whether they were resolved with an automated or manual process.
Keeps all data together and comparable, which creates the framework for continuous improvement.
To integrate a incident management system, change the following to your process:
- Trigger the remediation Workflow when a ticket for a corresponding issue is created.
- Include the ticket number and any other relevant details.
- Include steps in the Workflow to do the following:
- Enrich the ticket with progress details
- Close the ticket when the issue is successfully resolved
- Alert a member of support if the ticket is not resolvable
See also: