Creating Your First Notification
This topic is interesting for first users of Automic Automation. It describes how to create a basic Notification object and the type of messages that can be triggered by the Notification object. The example described here addresses developers and object designers (who create the Notification objects) and operators and managers (who receive the messages).
In this example we are going to create a Notification object that will be triggered by the Windows Job that we have created here: Creating Your First Job. The Notification object will send the user an online message. Later we will use a Workflow to design the automation logic to link the Job to the Notification object.
What You Will Learn
- How to configure a basic Notification object
- How to execute it
- How an online message looks like and how to react to it
What You Should know Beforehand
-
What is a Notification object?
Notification (CALL) objects are executable objects that send customized messages and alerts to users. There are four templates to create Notification objects.
-
What types of Notification templates are there?
The following templates are available:
- ALARM
- SLM
- STANDARD
All templates except STANDARD are supplied with some predefined settings. All templates except MAIL can trigger either online messages or e-mails. Apart from that, the difference between the messages produced by each template is only what the receivers can do to react to them.
-
What types of messages can Notification objects send?
Notification objects can send the following types of messages:
- Alerts
- E-mails
- Requests
- Messages
The last three types can be either online messages that are displayed in the Requests view, or e-mails. Alerts and requests can be escalated and the recipients can accept or reject them. Messages cannot be escalated and the recipients can only acknowledge them.
-
What are requests and what is the Requests view?
Requests are messages triggered by the execution of objects. They can be the result of a Notification object, although Notification objects are not the only source of requests. Some requests inform you of potential problems and other requests require that you enter data for the execution to continue.
Requests can be either online messages that are displayed in the Requests view, or e-mails.
Overview
- Create a Message Notification
- Test the Notification Object
- Open and React to the Request Created by the Notification
- Next
Create a STANDARD Notification object that sends an online message. Add it to the GETTING_STARTED_OBJECTS folder that you have created for the Windows Job (see Creating Your First Job).
-
Open the GETTING_STARTED_OBJECTS folder and add the Notification object.
-
Select the Call > STANDARD template and call it CALL.MESSAGE.DISK.SPACE.
-
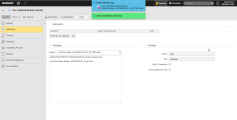
The new CALL.MESSAGE.DISK.SPACE Notification object opens to the Notification page. It is divided in three sections:
Recipients section, where you specify the user or users who will receive the message.
-
In the Recipients section, open the Recipient combo box and start typing your user name, which is the name with which you have logged in. Select it.
In a production environment, instead of sending messages to only one user, you will probably want groups of users to be informed. The Recipient combo box lets you select User Groups too. You can add as many recipients as you need.
-
In Select Calendar Event you can apply a Calendar condition to the Notification. If you do, the message is sent only on the dates specified by the Calendar Event. We will not use this attribute now.
For more information, see Calendars (CALE) and Calendar Events.
- Click Add.
Message section, where you write the content.
- In Subject enter Free disk space ( &FREESPACE_IN_BYTE# bytes).
- In the input field below Subject, you write the content of your message. Enter Free Disk Space (Bytes): &FREESPACE_IN_BYTE#.
Settings section
- The Priority is set to High by default. We will leave it as it is.
- From Type, select Message.
-
-
Save the Notification object.
To test whether the Notification behaves as expected, we will execute it. For this purpose, click the Execute button in the toolbar. The following happens:
- A green pop up message is displayed for a few seconds. It confirms that the task has been submitted. This is the standard message that you get when you execute objects manually.
- A blue pop up is displayed for a few seconds. It informs you about a request that you have to attend to. It contains a link to the request. It also indicates the object that triggered the request (the Notification) and the subject.
- The Requests button in the menu bar displays the request count.
This is what it looks like:
Open and React to the Request Created by the Notification
You have two options to open the Requests view:
- Click the Open link in the blue pop up message
- Click the Requests button in the menu bar
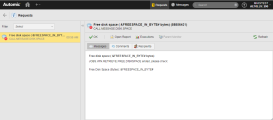
The Free disk space ( &FREESPACE_IN_BYTE# bytes) message is listed in the left pane of the view. Select it. This is what it looks like:
You can do several things with the message and with the object that triggered it. Since we have executed the Notification manually, all these functions refer to the Notification object:
- To acknowledge and remove it from the Requests list, click OK. The request count disappears from the Requests button.
- To open the report of the Notification object, click Open Report.
- To see the list of past executions of the Notification object, click Executions.
- To store a comment with the message, open the Comments tab and enter a text in the box at the bottom of the view. Then click Add Comment.
- To see the list of recipients, open the Recipients tab. In our case, this list contains your user name only.
Prepare the Notification for Executing in the Workflow
We want the message sent by the Notification object to publish the value of the variable. The time at which the variable is resolved during the execution of the Workflow is very important. At the time at which the Notification object runs, the value of the variable must be already available. To understand the setting that ensures that this happens, you must know how tasks execute.
When executing, tasks go through four stages. Each stage comprises various processing steps. Click the links in the following list to read more about each execution stage:
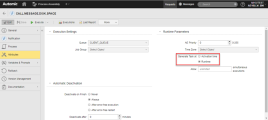
For our example, it is important to understand the difference between generating a task at activation time and at generation time (also called runtime). You configure this setting in the Runtime Parameters section on the Attributes page of executable objects.
Generate at activation time
With this option, the Notification is generated as soon as it is activated. One of the implications of this option is that the variable is resolved after the Notification object has been activated. Therefore, the Notification cannot read the value of the variable.
Generate at runtime
With this option, the variable is resolved before the Notification is generated. Therefore, the Notification can read the value of the variable.
Generation times in tasks in Workflows
One of the peculiarities of Workflows is that as soon as they are activated, all the tasks within them are activated too. For this reason, it is important to set the correct generation time in the tasks in a Workflow.
For more information, see Generating at Activation or at Runtime.
So far we have created a Notification that can be executed manually. However, Notifications are key objects in process automation. To connect the Notification to the Job that should trigger it, we use a Workflow. For more information, see Creating your First Workflow.


