Creating Your First Job
This topic is interesting for first users of Automic Automation. It describes how to create a basic Windows Job and how to execute it.
The example described here addresses not only developers and object designers. It is also relevant for operators and managers. As an operator or manager, to be able to monitor processes, analyze them and identify potential problems, you must understand how objects work and how they interact.
The aim of this example is to give you an overview of how to create objects, specifically Job objects. It introduces you to the concepts of executing and reporting. It also provides many useful links to the topics that describe objects and processes in detail.
Purpose of the Job
The Windows Job queries the amount of free space available on drive C on the server, where the Windows Agent runs. For this purpose, we use the following standard Windows command:
fsutil volume diskfree c:
In this example we are going to create a basic Windows Job. We will configure the mandatory properties only. We will execute it and we will have a look at its report. Later, we will build up on the basic Job to add more logic.
Prerequisites
- The Windows Agent is installed and configured. The Agent establishes the connection with the Windows server. It starts the execution of tasks there, and it makes their monitoring and reporting possible.
- A Login object is available with the credentials that your Job requires to login to the Windows server.
What You Should Know Beforehand
Before we start, you should know what these basic concepts mean:
-
What is a Job object?
A Job (JOBS) object is an executable object. A Job executes commands on computers or in enterprise business solutions. These solutions differ from each other. This is why Automic Automation has specific Job templates for each solution.
For more information, see Jobs (JOBS).
-
What does Execute mean?
To execute an object means to trigger its processing. When an object is executed, it gets a RunID. The RunID is a unique number that identifies that particular execution.
For more information, see Executing Objects.
-
What is the Executions list?
Every time an object is executed, the details of the execution are written to the Executions list. There are various types of execution lists, depending on how the execution of the object has been triggered.
For more information, see Execution Data.
Overview
In this example, we will cover the following:
Create the folder where you will add the Job. Later, we will use this folder to store more objects as we build up on this Getting Started section.
-
Go to the Process Assembly perspective. In the Explorer list, click the Add Folder toolbar button.
-
On the Add Folder dialog, enter the Name of the folder. For this example, we are going to call it GETTING_STARTED_OBJECTS.
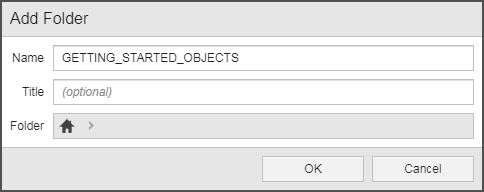
The Title is an optional property of all Automation Engine objects. You do not have to enter a title for the purpose of this example.
Folder displays the path in the Explorer where you are going to create the folder. In a new installation, this path shows the Home icon.
-
Click OK.
The GETTING_STARTED_OBJECTS folder is now available in the Explorer:

Create the Windows Job in the new folder.
-
Open the GETTING_STARTED_OBJECTS folder.
-
Click the Add Object toolbar button.
-
The Add Object dialog is displayed.
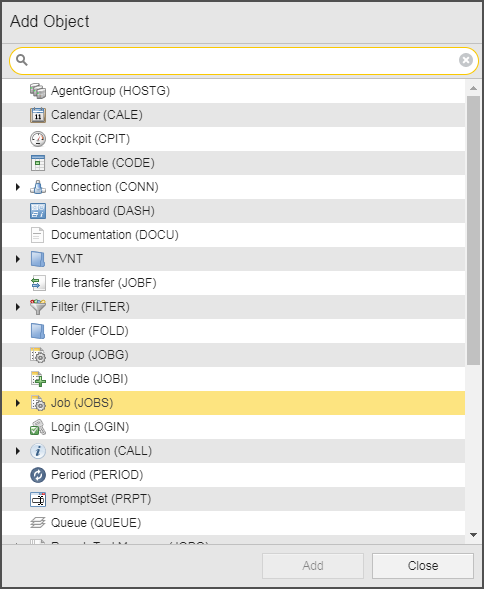
Do one of the following and then click OK:
- Scroll down until you see Job (JOBS), expand the node and select WIN
- Start typing Win in the Search field and select WIN Job
-
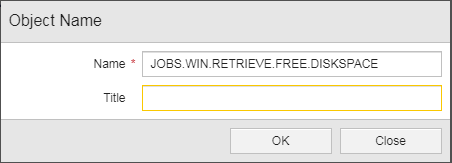
The Object Name dialog is displayed. Enter JOBS.WIN.RETRIEVE.FREE.DISKSPACE in Name.
The Title field is optional. It lets you give a more descriptive extra name to the object that helps you recognize it when you use it in other objects. You do not have to enter a title for this example.
-
Click OK.
The Job is stored in your database. You can configure it now, or you can revisit it later and define its attributes, write the script, and so on. We will configure it now.
-
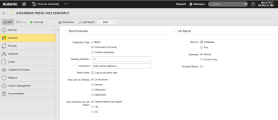
The new JOBS.WIN.RETRIEVE.FREE.DISKSPACE Job object is opened to the Windows page.
Objects consist of several definition pages that contain their configuration options. For Jobs, all pages are identical for all Job types except the platform-specific one. In this example, as we are creating a Windows Job, the platform-specific page is Windows.
Since we are going to use a standard Windows command to retrieve the data, we can enter it on the Windows page. In the Start Parameter section, do the following:
- Activate the Interpreter Type: Command (cmd.exe) option.
- In Command, enter fsutil volume diskfree c:. This command retrieves the free space data.
Note: If you want your Job to execute commands that are not Windows standards, or if the Job should execute more complex processes, you write the script on the Process page instead of here.
-
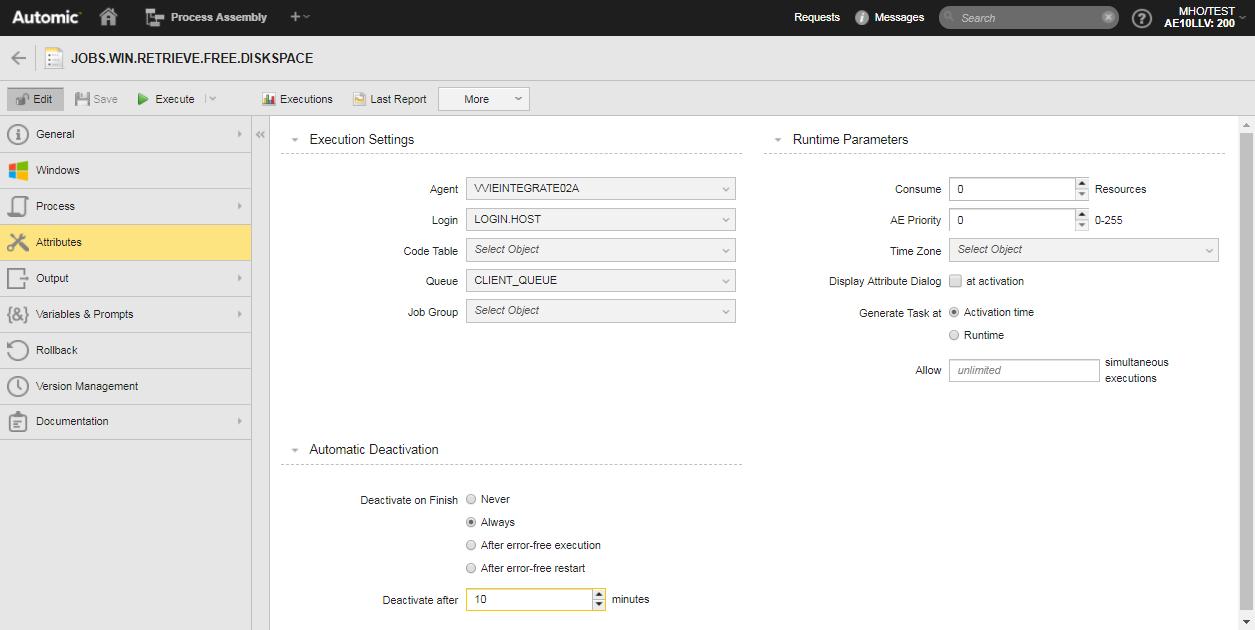
Go to the Attributes page.
The Attributes Page provides many important options. For our example, we are going to set only the mandatory ones.
In the Execution Settings section, do the following:
- Select the Windows Agent on which the Job should run.
- Select the Login (LOGIN) object that contains the credentials that the Agent needs to access the Windows server.
- The Job is processed in a Queue (QUEUE). If you do not explicitly assign a Queue to the Job, the system automatically uses the CLIENT Queue. The CLIENT Queue is available by default in each Client.
If you are not sure about which Agent, Login or Queue to use, ask your system administrator.
In the Runtime Parameters section, leave all other attributes as they are. You do not need to enter any other values for this example.
In the Automatic Deactivation section you define when executed tasks should be deactivated. Deactivated tasks are removed from the list in the Process Monitoring perspective. In a production system, you will probably have the performance of your system in mind when setting this attribute. However, since our Job will end in milliseconds, we must change this setting. Otherwise, the task will disappear from the list of Tasks too quickly.
- Deactivate on Finish: Always
-
Deactivate after 10 minutes
This means that the Job will be deactivated 10 minutes after its execution has finished

Note: In production systems, where the deactivation settings are configured to optimize the performance, you can still access deactivated tasks. The task filter options in the Process Monitoring perspective provides this possibility.
- Save the Job.

The Job is now fully configured for our purposes.
For more information, see:
- Defining Objects
- Attributes Page
- Windows Jobs
- Agents (HOST)
- Login (LOGIN)
- Queue (QUEUE)
- Process Pages
- Scripting
- Working with the Script Editor
There are many ways of executing objects, both manually and automatically. We are going to use the most straightforward option in this example.
- Click the Execute button in the toolbar.
- The Execute Object confirmation dialog is displayed. Click Execute.
- The Job is executed. A pop up is displayed at the top of the screen during a few seconds. It confirms that you have executed the object and it contains a link to the execution report.
There are other options to execute objects. For more information about those options, see Execution Options. For more information about executing objects in general, see Executing Objects
Automic Automation has reporting and auditing capabilities that help you keep track of your objects. It produces multiple types or reports. It also stores the execution data of each execution run of each object.
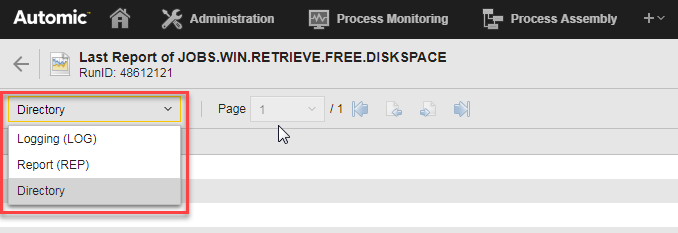
The reports provide the details of each execution. You can access them in various ways:
- Click the link on the pop up that is displayed at the top of your screen when you execute an object.
- Click the Last report button in the object toolbar
- Go back to the Explorer and right-click the Job. Then select Monitoring > Last Report.
The report window opens to the Report (REP) page, where the information retrieved from the Windows server is displayed. This screenshot shows it:

There are other types of reports in addition to Report (REP). You can access them using the drop down list in the toolbar. After executing this Job, the Logging (LOG), Report (REP), and Directory reports are available.
For more information about reports, see:
Next
The next step in this Getting Started guide is to enhance the Job that we have just created. For more information, see Enhancing Your First Job.