Enhancing Your First Job
This topic is interesting for first users of Automic Automation who have already read Creating Your First Job. This topic explains how to enhance the Job. The basic Job retrieves the data about the free space available on drive C on the Windows server. In this example, the Job prepares the results of the query and the report so that they can be further processed. For this purpose, it contains an object variable and a script. The object variable is replaced by the results of the query (free disk space). The script uses the variable and prepares the report.
The example described here addresses not only developers and object designers. It is also relevant for operators and managers. As an operator or manager, to be able to monitor processes, analyze them and identify potential problems, you must understand how objects work and how they interact.
What You will Learn
- How to define an object variable
- How to write the script using the Automation Engine scripting language
- What the list of Executions is and how to access it
Overview
- Enhance the Job with an Object Variable
- Execute the Job and Check the Report
- Write the Script to Prepare the Results
- Execute the Job and Check the Report Again
- Open the List of Executions
Enhance the Job with an Object Variable
The variable will store the values retrieved by the Windows command. We need the variable to be able to use the retrieved values in the script that will prepare the results for further processing.
- Open the JOBS.WIN.RETRIEVE.FREE.DISKSPACE Job that you have previously created.
- In the left navigation pane, expand the Variables & Prompts drop down list and select Variables.
- Click on the Name cell in the first row to activate it and enter the name of the object variable. In our example, it is called &FREESPACE#.
- Save the Job.
This is what it looks like:

Note: Your system has various types of variables. For more information about the types of variables that are available, see Variables and VARA Objects.
Execute the Job and Check the Report
Execute the Job and then open the report to see what is different now compared to the basic Job we have created previously.
- Click the Execute button in the toolbar.
- The Execute Object confirmation dialog is displayed. Click Execute.
- The Job is executed. A pop up is displayed at the top of the screen during a few seconds. It confirms that you have executed the object and it contains a link to the execution report.
-
Open the report and expand the drop down list:
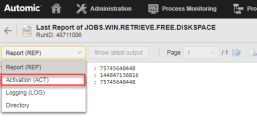

An additional type of report is available now, namely, the Activation (ACT)report. There are two main reasons for this.
-
Executable objects go through four execution stages when they are processed. Each stage consists of several processing steps.
The first stage is the Activation. Among other steps, this is when a runID is assigned to the task.
The second stage is the Generation. At the very beginning of this stage, the variables are resolved.
For more information, see Execution Stages.
-
The Job contains a variable now.
Write the Script to Prepare the Results
Now we will write a script that prepares the values (free disk space) provided by the Windows command. This step is necessary to be able to use these values later in other objects.
Job objects have three pages where you can enter scripts:

The scripts on the different pages are processed at different stages of the Job execution. The script on the Pre Process page prepares the Job for execution. The Process page contains the JCL. The script on the Post Process page is processed when the Job has finished.
Since we need the results of the Job to pass them on to other objects, we must write the script on the Post Process page. We will use the Automation Engine scripting language for this purpose.
- Expand the Process drop down list.
- Select Post Process. Here is where you write the scripts that affect the report.
-
Enter the following script:
:SET &HND# = PREP_PROCESS_REPORT("JOBS",, "REP","Total # of free bytes*","COL=DELIMITER","DELIMITER=*:*" )
:PROCESS &HND#
: SET &FREESPACE# = GET_PROCESS_LINE(&HND#,2)
: SET &FREESPACE# = STR_TRIM(&FREESPACE#);
: PRINT &FREESPACE#
:ENDPROCESS
-
Save the Job.
This is what it looks like:

For more information about the execution stages of objects, see Execution Stages. For more information about what happens with the scripts on each process page, see Process Pages.
This is what the script does:
-
:SET &HND# = PREP_PROCESS_REPORT("JOBS",, "REP","Total # of free bytes*","COL=DELIMITER","COL=DELIMITER=*:*" )
Assigns a value to a script variable that is called &HND#
The value is taken from the Job (JOBS) report (REP) in the database. It retrieves the number of free bytes. It specifies the column delimiter.
-
:PROCESS &HND#
Starts a processing loop
-
: SET &FREESPACE# = GET_PROCESS_LINE(&HND#,2)
Assigns a value to the &FREESPACE# object variable taking the content of a specific line in a data sequence. In this case, column 2 from &HND#
-
: SET &FREESPACE# = STR_TRIM(&FREESPACE#);
Lets the value of the variable be passed on to potential parent tasks. It also prepares the string, removing leading and trailing blanks.
-
: PRINT &FREESPACE#
Writes the result to the Activation report (ACT)
-
:ENDPROCESS
For more information about the Automation Engine scripting language and the script elements used in this example, see:
Execute the Job and Check the Report Again
Execute the Job and then open the report again. In the reports drop down list, the Post Process (POST)report is also available now. This report logs the steps that have been carried out by the script on the Post Process page.

So far, we have executed the Job several times. Your system records every execution and stores them in various forms, one of them being the lists of Executions. These lists provide detailed information about what happened during each execution of each task. The Executions lists help you monitor and troubleshoot your processes.
- Return to the Job definition pages and click the Executions button in the toolbar.
-
The Executions of JOBS.WIN.RETRIEVE.FREE.DISKSPACE view is displayed.
This is what it looks like:

Each record in the list represents an execution run. By default, the most recent execution is displayed at the top of the list. Recording the execution data is triggered as soon as an object is activated and ends when the execution is completed.

Tip: Right-click an entry in the list and explore the context-menu options that are available for each execution run.
Next
The next steps in this Getting Started guide are to create a Notification object that retrieves the result of the Job and sends an e-mail. After that, we will create a Workflow to connect the Job and the Notification objects.
For more information, see: