Examples: SAP Solution Manager
This topic describes typical examples of the SAP Solution Manager Integration.
The SAP Solution Manager integration lets you access functions of the Automation Engine (AE). You can even schedule AE tasks from the Job Management Work Center in the SAP Solution Manager. A Job Scheduling Assistant is available for this purpose. In doing so, you can integrate the AE in the SAP Change Management or the Service Desk.
For information about configuring and testing the integration, see SAP Solution Manager.
For the following examples, start the Job Management Work Center (SOLMAN_WORKCENTER transaction) of the SAP Solution Manager.
Searching for an AE Job Out of the Solution Manager
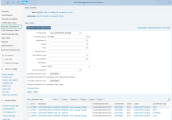
- In the SAP Solution Manager Work Center, Job Management Administration section, select the External Scheduler Management field in the left window pane.
- Define filters according to criteria that should be used for searching AE Jobs. The Destination in SAP represents the name of your AE system, the Isolation group stands for the four-digit AE client number, and the Application ID is a folder in the AE. See also Terminology
- Click Apply to have the Jobs that were found listed in a table.

Scheduling Tasks in the AE Out of the Job Scheduling Assistant:
- In the Job Management section, open the Job Scheduling Assistant.
-
In the window that opens, select the Schedule job directly radio button.
Alternatively, you can activate the Schedule with help of assistant button. This function supports the planning process as it allows you to analyze and compare background work process utilization, memory, area, queue, and CPU that is used, etc. You can follow the guided procedure to have the assistant show your data graphically displayed and suggest optimal time slots before you continue scheduling your jobs.
In the System Selection section, define the Technical Connection and the Client to which you want to connect, and for the Scheduler, select SMSE. Click Next
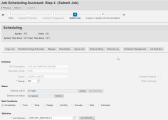
- In the Scheduling window that opens, define the mandatory parameters (indicated by *), and specify the start conditions. Input assistants provide help when you click the symbol that is shown on the right side of the relevant input field.
- RFC Connection
Name of your AE system - Separation Group
Four-digit AE client number. If you are using the input assistant, ignore the GLOBAL entry. - Queue
Name of the Queue object - Priority
The priority that you define here it the SAP priority. It does not reflect the priority that the Job has in your AE system. To learn more about AE priorities, see Automation Engine Priority - Job Definition
The name of the object that should start - Schedule Stopped checkbox: If you activate it, the scheduled task remains in the AE with the status "STOP - Automatic processing has been stopped" until you release it manually.
-
Time Zone
UTC is used by default, and a corresponding object is created in the AE client of the use if it does not yet exist. Alternatively, you can search for and select a specific AE TimeZone object. - Time Window
This reflects a Period object in the AE - Submit Frame (Repetition Pattern)
This field is only used to describe the Period object. You cannot search for it. - Click Schedule/Change Externally to schedule the task in the AE. A message informs you that the Job has been scheduled. It includes the AE RunID of the activated task.
Schedule section:
Start Conditions section: Here you define how often and when the task should start. The AE will generate temporary Calendar objects.
Further options:
- Click External Notes if you want to add a comment.
- Click External Logsto see the AE reports of the task. No external reports are available.
- Click Reschedule if you want to adjust your scheduled tasks in the AE subsequently.
See also:
