Defining Avaloq Jobs
Processes in Automic Automation are combinations of individual steps that are linked to each other. Objects are entities that work together to form coherent automated sequences. As a developer and object designer, you create, edit and work with them in the Process Assembly perspective. Objects that are executing or have been executed are called tasks and they are visible in the Process Monitoring perspective, where you can access their history and monitors.
An Avaloq job is a specific unit of work that executes processing steps on the target Avaloq system. As any other Automic Automation object, it consist of several definition pages. After adding a Job you start configuring it by defining the relevant attributes on its definition pages. Some of these pages are standard and available for all object types. Others are available for some object types only.
An Automic Automation Avaloq job represents an Avaloq job on the cloud environment. When you execute the Automic Automation Avaloq Job, you trigger a run of the job on the target cloud environment. You can then monitor its execution from Automic Automation too.
The Automic Automation Avaloq agent solution supports the following Avaloq jobs for which you can define the parameters relevant to run that job on the Avaloq system from Automic Automation:wing jobs are available for Avaloq:
-
RESETDEPENDENCY
-
RESETJOBS
-
EXECUTEJOB
-
EXECUTETASK
-
CONFDEPT
-
WFEO_EOD
-
FETCHALLAVALOQBATCHES
-
FETCHAVALOQTASKS
-
SHOWBASETABLE
-
KILLJOB
-
KILLTASK
This topic describes how to add a new Job to your system. The rest of the topics in this section describe how to configure the Job on its definitions pages.
This page includes the following:
Adding Avaloq Jobs
Follow these steps:
-
In the Automic Web Interface, go to the Process Assembly perspective. It opens to the Explorer view that contains the list of jobs that are available to you in your system.
-
You have two options:
-
Right-click anywhere on the list and select Add > Add Object.
-
Click the Add Object button on the toolbar.
-
-
On the Add Object dialog, start typing Airflow in the Search field.
-
Select Run DAG Job and click Add. The Object Name dialog is displayed.
-
Enter a descriptive Name.
-
Optionally, enter a short and descriptive Title that helps you recognize the purpose of the object.
-
Click OK. A new page opens where you can start with the object definitions.
Preparatory Avaloq Jobs
After installing and configuring the Agent, you must ensure that the jobs defined in the system are not processed by the internal scheduler any more. Failing to do so would prevent the Automation Engine from taking over the scheduling operations.
For this purpose, make sure that the following dependencies are resolved:
-
jobs that will depend on Automation Engine processes must not have dependencies to any other job. To remove such dependencies, you execute JOBS.AVALOQAGENT.RESETDEPENDENCY jobs. For more information, see JOBS.AVALOQAGENT.RESETDEPENDENCY.
-
The execution intervals and End-Of-Day behavior of jobs are adjusted. For more information, see JOBS.AVALOQAGENT.RESETJOBS.
-
The Automation Engine manages the dependencies between jobs. Therefore, internal job dependencies should be reviewed; in the most cases, these dependencies will not be necessary any more.
Restrictions for Avaloq Jobs
When you create a new Avaloq job, you can determine how many instances of the job can run simultaneously on its Attributes page:
(Click to expand)
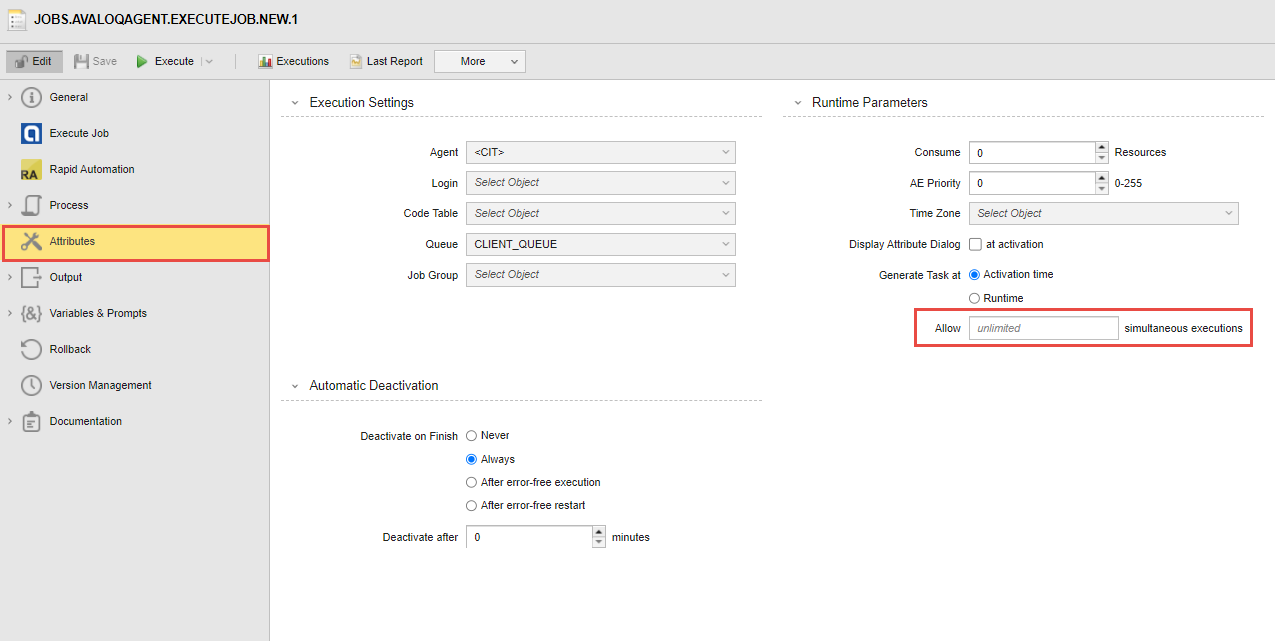
Enter 1 here to make sure that only one instance of the job can run at a time. This is necessary because the job_intf# package does not allow an explicit selection of the instantiation of a job (job_intf# in the official interface provided by Avaloq to the Avaloq internal scheduler). This means that if the same job is started several times via Automic System, the Avaloq agent will prevent this and the job will end with the corresponding error message.
This restriction does not apply to Avaloq tasks.
Creating Avaloq Jobs
Although jobs consist of various definition pages, you will most probably have to configure only the following ones:
-
The job-specific page
Here you specify the job parameters.
-
The Rapid Automation page
Here you specify the job reporting options
-
The Attributes page
Here you specify the Agent that operates on your instance
-
The Process page
Here you specify the script that the job will execute on the instance
The following topics describe how to create, configure and work with the supported Avaloq jobs: