Setting Up the Automic Connector
AAI for Automic Automation allows you to put the runtime information of executions from different Clients in multiple Automic Automation systems into a single view. This means that you can see running executions (and possible failed ones) of more than one Automic Automation system in a single interface, without having to switch from one Automic Web Interface to another.
This topic gives you an overview of the AAI integration for Automic Automation and instructions on how to setup and configure your Automic Connector.
For performance reasons, it is recommended to install the Automic Connector near the Automic Automation installation, not near AAI.
This page includes the following:
Overview
Click the image to expand it.
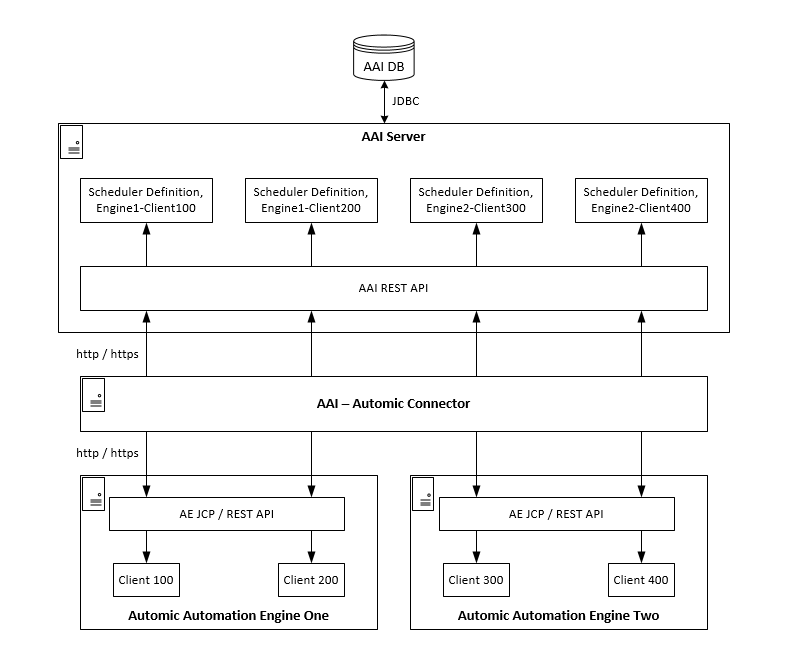
Each Automic Automation Client that you want to add to your AAI environment requires its own scheduler. Several schedulers can be linked to one Connector. However, only one Connector can be linked to an AAI environment. For more information, see Adding/Editing/Deleting Automic Automation Schedulers.
Before adding an Automic Automation instance to your AAI system, you must have AAI up and running. For more information, see Installation and Upgrade.
If you need help with the installation, please contact our support team at https://support.broadcom.com/.
The naming conventions for the Automic Connector.zip file are AAI.Automic_Connector_<product_version>.zip.
-
For performance reasons, it is recommended to install the Automic Connector near the Automation Engine, not near AAI.
-
Make sure that the EXECUTION_TRIGGER parameter of the UC_SYSTEM_SETTINGS variable in Automic Automation is set to Y[es]. Otherwise, Automic Automation cannot establish the connection to the Automic Connector. For more information, please refer to the Automic Automation documentation at https://docs.automic.com/.
Also, you can secure your Connectors using TLS 1.3 secure connections. For more information, see Securing AAI: TLS and Kerberos
The two-way certificate-base authentication is used to secure the connection between the Automic Connector and the AAI Server.
The connection between the Automic Connector and Automic Automation is established using the AE REST API and can be secured (HTTPS) or not (HTTP). If you want to secure the connection (HTTPS) make sure that the certificate used for the communication between the REST process and the Automation Engine in Automic Automation is also included in the Java Truststore where the Automic Connector is installed.
For more information about the relevant certificates, see Securing Connections to the AE (TLS/SSL), Preparing TLS/SSL Certificates, and Types of Server Processes in the Automic Automation documentation at https://docs.automic.com/.
-
Check the compatibility matrix (compatibility matrix) to find the relevant information on supported versions and possible dependencies. For more information, see Compatibility Information.
-
When upgrading AAI and connectors, make sure you take down the relevant connectors, upgrade and start AAI, and then upgrade and start each connector.
Installing/Upgrading the Automic Connector on Windows
To install or upgrade the Automic Connector on Windows:
-
Go to https://downloads.automic.com/, log in with your Broadcom account and download the relevant version of the Connector. For more information ,see Downloads.
-
Run the automic-connector.exe file to setup the installer.
-
Follow the instructions in the setup wizard. You can define a destination directory, if you want to create a Start Menu folder and / or shortcuts for all users.
Make sure you enter the information required:
-
AAI server URI
You must specify the protocol, domain host name or IP address, and a listening port number of the AAI server. This information should be captured during the AAI server installation.
If you are using the Connector certificate, this URI may use HTTPS and port 4443. Otherwise, it will likely be the same port that is used to launch the AAI client from a browser, for example http{s}://hostname:port.
-
Connector name
Name of your choice. This name will be selected from the web UI when adding a scheduler to AAI.
-
Host name
Domain name or IP address of the host where the Connector runs
-
Connector key password
This is only required if an HTTPS connection is used between the Connector and the AAI server. If HTTP is used, leave this empty and hit Enter.
-
AAI server user name
Only required when using HTTP.
Name of the user ID that will be used to establish a connection to the AAI server. The user must be authorized to add new schedulers.
-
AAI server password
This is required only if a HTTP connection is used between the Connector and the AAI server. If HTTPS is used, this can be omitted.
-
Connector domain
Typically this is JAWS. This is the login domain for the user/password provided and it can be any of the list of domains that have been set up in AAI. For more information about domains, see Domains.
-
Log file output path
The path to the location of the log files. The directory must exist and be writable for the connector user account.
-
Max log file size
The maximum size of the log files. Must be defined as an integer in MB and must be 1 or larger.
-
Max log file count
The number of log files to be retained. Must be defined as an integer in MB and must be 5 or larger.
When you are done with the wizard, you can find the Automic Connector folder in the directory that you defined.
The Connector starts as a Service (automic-connector). You can use the services.msc to start and stop the service.
If the connection is successful, the application.yml file is created in the folder where you have installed the Connector. This is a configuration file that contains the configuration values that you have just entered. At the same time, a backup copy of the application.yml is automatically created and renamed to application.yml.bak.
In the case of a failure, the application.yml file is not populated with the values you entered. You would have to manually repeat the configuration process.
-
Once you have installed the Connector, you have to add Automic Automation schedulers to your AAI environment. To do so, go to System > Schedulers in your web interface (http://servername:8080/aai/web/v2/) and follow the steps in the dialog to add an Automic Automation scheduler. For more information, see Adding/Editing/Deleting Automic Automation Schedulers.
If the process was successful, the new schedulers are listed with all the schedulers available in your system.
You must add a new Automic Automation scheduler for each Automic Automation Client that you want to integrate into your AAI environment. You can add the Automic Automation schedulers in AAI before installing the Automic Connector. However, you will not be able to use them until the Connector is up and running.
Starting, Stopping, and Connector Status
You can also run the installation file to start or stop the connector on a Windows installation or to check its status.
.\aai-automic-connector.exe /start
.\aai-automic-connector.exe /stop
.\aai-automic-connector.exe /status
Expected output if the service is running:
Running.
Auto-start.
Expected status if the service is not running:
Not running.
Auto-start.
For details, refer to the output.log file that is created in the folder where the Connector was installed.
Installing the Automic Connector on UNIX
The installation steps bellow will guide you through installing the Automic Connector using the automic-connector/broadcom user/group in the /opt/automic-connector location.
To install the Automic Connector on UNIX:
-
Go to https://downloads.automic.com/, log in with your Broadcom account and download the relevant version of the Automic Connector. For more information ,see Downloads.
-
Unzip the .zip file that you downloaded and unpack the .tar.gz file within to get the connector-install.sh and connector.automic-<version>.rpm files.
-
Run connector-install.sh to start the installation, for example:
./connector-install.sh install
The Connector is installed using the .rpm file provided.
-
Configure the Connector to point to your AAI installation. To do so, run the configure script:
cd /opt/automic-connector
sudo -u automic-connector ./configure-automic-connector.sh
Follow the prompts and make sure you enter the information required:
-
AAI server URI
You must specify the protocol, domain host name or IP address, and a listening port number of the AAI server. This information should be captured during the AAI server installation.
If you are using the Connector certificate, this URI may use HTTPS and port 4443. Otherwise, it will likely be the same port that is used to launch the AAI client from a browser, for example http{s}://hostname:port.
-
Connector name
Name of your choice. This name will be selected from the web UI when adding a scheduler to AAI.
-
Host name
Domain name or IP address of the host where the Connector runs
-
Connector key password
This is only required if an HTTPS connection is used between the Connector and the AAI server. If HTTP is used, leave this empty and hit Enter.
-
AAI server user name
Only required when using HTTP.
Name of the user ID that will be used to establish a connection to the AAI server. The user must be authorized to add new schedulers.
-
AAI server password
This is required only if a HTTP connection is used between the Connector and the AAI server. If HTTPS is used, this can be omitted.
-
Connector domain
Typically this is JAWS. This is the login domain for the user/password provided and it can be any of the list of domains that have been set up in AAI. For more information about domains, see Domains.
-
Log file output path
The path to the location of the log files. The directory must exist and be writable for the connector user account.
-
Max log file size
The maximum size of the log files. Must be defined as an integer in MB and must be 1 or larger.
-
Max log file count
The number of log files to be retained. Must be defined as an integer in MB and must be 5 or larger.
Example
This example shows the Connector installed running HTTPS and on the default port. The Connector name can be freely defined and shows up in the UI when adding the scheduler.
[sudo -u automic-connector./configure-automic-connector.sh
If you are planning to make a TLS based connection to AAI then before proceeding
please obtain the connector certificate package from the AAI server
and copy it to ./secure/
Press ENTER to continue...

*** CONFIGURING CONNECTOR ***

Backing up configuration file to: application.yml.bak...
...Configuration file backed up to: application.yml.bak.

Please enter the following configuration parameters.

AAI server URI [https://localhost:4443]: https://<host>:4443
Connector name: automic
Host name: host
Connector key password (will not echo, required for HTTPS):
AAI server username (required for HTTP):
AAI server password (will not echo, required for HTTP):
Connector domain: JAWS
Log file output path. The directory must exist and be writable for the connector user account. [./logs]:
Max log file size. An integer, in MB. Must be >= 1. [10]:
Max log file count. An integer, in MB. Must be >= 5. [5]:
If the installation ended successfully you see the following:
Verifying AAI server connectivity (please stand by)...2020-12-08 23:54:55,708 INFO [ApiCallerUtil] Attempting HTTP connection to AAI

...AAI server connectivity verified.

Saving connector configuration to: application.yml...
...connector configuration saved to: application.yml.

*** CONNECTOR CONFIGURED ***
-
-
Start the service using the following command:
sudo systemctl start automic-connector
Once you have installed the Connector, you have to add Automic Automation schedulers to your AAI environment. To do so, go to System > Schedulers in your web interface (http://servername:8080/aai/web/v2/) and follow the steps in the dialog to add an Automic Automation scheduler. For more information, see Adding/Editing/Deleting Automic Automation Schedulers.
If the process was successful, the new schedulers are listed with all the schedulers available in your system.
You must add a new Automic Automation scheduler for each Automic Automation Client that you want to integrate into your AAI environment. You can add the Automic Automation schedulers in AAI before installing the Automic Connector. However, you will not be able to use them until the Connector is up and running.
Starting, Stopping, Upgrading, Uninstalling and Connector Status
You can verify the service for a Unix installation by running the following command:
sudo systemctl status automic-connector
You can also use the systemclt command to stop or to restart the connector, or to get its status. For example:
sudo systemctl stop automic-connector
sudo systemctl restart automic-connector
sudo systemctl status automic-connector
If for any reason the service is disabled, you can use the following systemctl command to enable it:
sudo systemctl enable automic-connector
This is recommended to have the Connector restart automatically as part of the server reboot process.
You can also run the connector-install.sh to upgrade or uninstall the connector, or to get its status using the following commands:
./connector-install.sh upgrade
./connector-install.sh uninstall
./connector-install.sh status
If the current status of your system does not allow you to run a specific command, you get a corresponding error message. For example, you cannot upgrade a package that has not yet been installed.
./connector-install.sh upgrade
Can't upgrade the connector 'connector.automic" isn't installed. Please 'install' instead.
-
Make sure you stop the Connector before upgrading or uninstalling it.
-
During the upgrade, you are prompted to configure the Connector once more and you can choose to do so, if necessary. However, when upgrading, the system creates and saves a backup of the Connector's configuration and uses that setup for the installation of the upgraded version.
-
Running the uninstall command removes the Connector (including the service) from the system. It also gives you information on which files and directories are left behind, which can be relevant if you want to re-install the Connector. If not, you can delete them manually.
Additional Information for a Unix installation
-
Log file location
/opt/automic-connector/logs/automic-connector.log
tail -f /opt/automic-connector/messages/automic-connector.log
-
greps for process status
ps -eaf | grep connector
-
Uninstall the connector
rpm -e automic-connector-2.0.0.x86_64
rm -rf /opt/<Connector Install Dir>
See also: