AAI Integration for Automic Automation
Automic Automation Intelligence (AAI) for Automic Automation allows you to put the runtime information of executions from different Clients in multiple Automic Automation systems into a single view. This means that you can see running executions (and possible failed ones) of more than one Automic Automation system in a single interface, without having to switch from one Automic Web Interface to another.
This page includes the following:
Overview
Click the image to expand it.
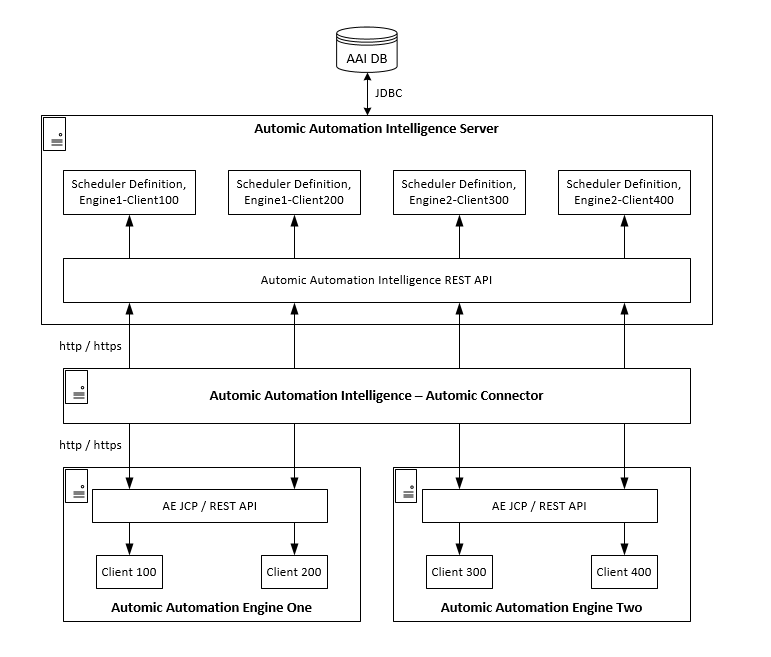
The Automic Connector uses the AE REST API to establish the communication between Automic Automation and Automic Automation Intelligence. It is a stand-alone component. As such, it runs in its own process space, has its own installer and writes its own log files. It consists of two main parts:
- The universal connector framework, which handles the communication between the Automic Connector and AAI. It also triggers the Connector to fetch job definitions and events (executions) from the Automation Engine.
- A mapper, which extracts job definitions and events (executions) from the Automation Engine and translates them into a format that Automic Automation Intelligence can process.
Therefore, it is recommended to install the Automic Connector near the Automation Engine.
The Connector uses the AE REST API and Automic Automation Intelligence to periodically extract job definitions and executions (current and historical runs) from Automic Automation and import them into AAI.
Important! Make sure that the EXECUTION_TRIGGER parameter of the UC_SYSTEM_SETTINGS variable in Automic Automation is set to Y[es]. Otherwise, Automic Automation cannot establish the connection to the Automic Connector. For more information, please refer to the Automic Automation documentation at https://docs.automic.com/.
It has different settings that can be modified at any time. For example, you can define the following behaviors:
- The interval in which the job definitions and events (executions) are fetched. You can set the interval for fetching both individually.
- Upon starting, how far back should the Connector look the first time it fetches information.
- How far forward should the Connector look, thus gathering information on planned start times.
Once the Automic Connector is installed and running for the first time, it reaches to Automic Automation Intelligence and registers itself. It also reads either job definitions or events (executions) from Automic Automation, translates them into the relevant format and passes the information to the framework, which then passes the information to Automic Automation Intelligence.
Each Automic Automation Client that you want to add to your AAI environment requires its own scheduler. Several schedulers can be linked to one Connector. However, only one Connector can be linked to an Automic Automation Intelligence environment.
Performance
In Automic Automation, be aware that the database increases in size when using Automic Automation Intelligence in combination with the security audit log function in Automic Automation. For more information, see the SECURITY parameters in the UC_CLIENT_SETTINGS variable in the Automic Automation documentation at https://docs.automic.com/.
If you use the AE DB Unload utility to reorganize your Automic Automation database, make sure that you turn off the Automic Connector in AAI while the utility runs.
Setup and Configuration
Before adding an Automic Automation instance to your Automic Automation Intelligence system, you must have Automic Automation Intelligence up and running. For more information, see Installation and Upgrade.
The Automic Connector has to be installed as well. You can find the relevant installation files (AAI Automic Connector 2.0) for Windows and UNIX at https://downloads.automic.com/. If you need help with the installation, please contact our support team at https://support.broadcom.com/.
The naming conventions for the Automic Connector.zip file are the following:
-
AAI.Automic_Connector_<product_version>.zip
-
For performance reasons, it is recommended to install the Automic Connector near the Automation Engine, not near Automic Automation Intelligence.
-
Make sure that the EXECUTION_TRIGGER parameter of the UC_SYSTEM_SETTINGS variable in Automic Automation is set to Y[es]. Otherwise, Automic Automation cannot establish the connection to the Automic Connector. For more information, please refer to the Automic Automation documentation at https://docs.automic.com/.
Also, you can secure your Connectors using TLS 1.2 based secure connections. For more information, see Securing Automic Automation Intelligence.
The two-way certificate-base authentication is used to secure the connection between the Automic Connector and the AAI Server.
The connection between the Automic Connector and Automic Automation is established using the AE REST API and can be secured (HTTPS) or not (HTTP). If you want to secure the connection (HTTPS) make sure that the certificate used for the communication between the REST process and the Automation Engine in Automic Automation is also included in the Java Truststore where the Automic Connector is installed.
For more information about the relevant certificates, see Securing Connections to the AE (TLS/SSL), Preparing TLS/SSL Certificates, and Types of Server Processes in the Automic Automation documentation at https://docs.automic.com/.
-
Check the compatibility matrix (compatibility matrix) to find the relevant information on supported versions and possible dependencies. For more information, see Compatibility Information.
-
When upgrading AAI and connectors, make sure you take down the relevant connectors, upgrade and start AAI, and then upgrade and start each connector.
Installing the Automic Connector on Windows
To install the Automic Connector on Windows:
-
Go to https://downloads.automic.com/ and log in with your Broadcom account. .
-
On the Downloads page, select Automic Automation Intelligence and download the relevant version of the Automic Connector.
-
Run the automic-connector.exe file to setup the installer.
-
Follow the instructions in the setup wizard.
You can define a destination directory, if you want to create a Start Menu folder and / or shortcuts for all users.
When you are done with the wizard, you can find the Automic Connector folder in the directory that you defined.
The Connector starts as a Service (automic-connector).
Note:You can use the services.msc to start and stop the service.
-
Configure the aai-server section of the application.yml file located in the Automic Connector installation directory. This allows you provide the Connector with the relevant AAI connection information.
Make sure you define the following parameters:
-
uri: Point to the AAI endpoint
If located on the same host, you can use http://localhost:8080. Otherwise, use the server name in the URL.
-
username: define the user name
-
password: define the password
-
domain: JAWS by default
Example
connector-settings: aai-server: uri: http://localhost:8080 username: admin password: password domain: JAWS license-key: <none> -
-
Restart the Connector service (automic-connector) after changing the application.yml file.
Note:You can use the services.msc to start and stop the service.
Once you have installed the Connector, you have to add Automic Automation schedulers to your Automic Automation Intelligence environment. To do so, go to System > Schedulers in your web interface (http://servername:8080/aai/web/v2/) and follow the steps in the dialog to add an Automic Automation scheduler. For more information, see Adding an Automic Automation Scheduler.
If the process was successful, the new schedulers are listed with all the schedulers available in your system.
You must add a new Automic Automation scheduler for each Automic Automation Client that you want to integrate into your AAI environment. You can add the Automic Automation schedulers in AAI before installing the Automic Connector. However, you will not be able to use them until the Connector is up and running.
-
Check the compatibility matrix (compatibility matrix) to find the relevant information on supported versions and possible dependencies. For more information, see Compatibility Information.
-
When upgrading AAI and connectors, make sure you take down the relevant connectors, upgrade and start AAI, and then upgrade and start each connector.
Installing the Automic Connector on UNIX
To install the Automic Connector on UNIX:
-
Go to https://downloads.automic.com/ and log in with your Broadcom account. .
-
On the Downloads page, select Automic Automation Intelligence and download the relevant version of the Automic Connector.
-
Unzip the .zip file that you downloaded and unpack the .tar.gz file within to get the connector-install.sh and connector.automic-<version>.rpm files.
-
Run connector-install.sh to start the installation, for example:
./connector-install.sh install
The Connector is installed using the .rpm file provided.
-
Configure the Connector to point to your AAI installation. To do so, run the configure script:
cd /opt/automic-connector
sudo -u automic-connector ./configure-automic-connector.sh
Follow the prompts to enter the AAI URI.
Example
This example shows the Connector installed on the AAI server, running HTTP and on the default port. The Connector name can be freely defined and shows up in the UI when adding the scheduler.
[sudo -u automic-connector ./configure-automic-connector.sh
*** CONFIGURING CONNECTOR ***

Backing up configuration file to: application.yml.bak...
...Configuration file backed up to: application.yml.bak.

Please enter the following configuration parameters.

Enter AAI server URI (e.g., "https://localhost:4443"): http://localhost:8080
Enter connector name: automic
Enter host name: localhost
Enter connector key password (will not echo, required for HTTPS):
Enter AAI server username (required for HTTP): admin
Enter AAI server password (will not echo, required for HTTP): password
Enter connector domain: JAWS
If the installation ended successfully you see the following:
Verifying AAI server connectivity (please stand by)...2020-12-08 23:54:55,708 INFO [ApiCallerUtil] Attempting HTTP connection to AAI

...AAI server connectivity verified.

Saving connector configuration to: application.yml...
...connector configuration saved to: application.yml.

*** CONNECTOR CONFIGURED ***
-
Start the service using the following command:
sudo systemctl start automic-connector
-
Verify the service by running the following command:
sudo systemctl status automic-connector
-
Use the systemclt command to start the service:
systemctl start automic-connector
You can also use the systemclt command to stop or to restart the connector, or to get its status. For example:
systemctl stop automic-connector
systemctl restart automic-connector
systemctl status automic-connector
-
Use the systemctl command to enable the service:
systemctl enable automic-connector
Tip:This step is recommended to have the Connector restart automatically as part of the server reboot process.
Upgrading, Uninstalling and Connector Status
You can also run the connector-install.sh to upgrade or uninstall the connector, or to get its status using the following commands:
./connector-install.sh upgrade
./connector-install.sh uninstall
./connector-install.sh status
If the current status of your system does not allow you to run a specific command, you get a corresponding error message. For example, you cannot upgrade a package that has not yet been installed.
./connector-install.sh upgrade
Can't upgrade the connector 'connector.automic" isn't installed. Please 'install' instead.
-
Make sure you stop the Connector before upgrading or uninstalling it.
-
During the upgrade, you are prompted to configure the Connector once more and you can choose to do so, if necessary. However, when upgrading, the system creates and saves a backup of the Connector's configuration and uses that setup for the installation of the upgraded version.
-
Running the uninstall command removes the Connector (including the service) from the system. It also gives you information on which files and directories are left behind, which can be relevant if you want to re-install the Connector. If not, you can delete them manually.
Once you have installed the Connector, you have to add Automic Automation schedulers to your Automic Automation Intelligence environment. To do so, go to System > Schedulers in your web interface (http://servername:8080/aai/web/v2/) and follow the steps in the dialog to add an Automic Automation scheduler. For more information, see Adding an Automic Automation Scheduler.
If the process was successful, the new schedulers are listed with all the schedulers available in your system.
You must add a new Automic Automation scheduler for each Automic Automation Client that you want to integrate into your AAI environment. You can add the Automic Automation schedulers in AAI before installing the Automic Connector. However, you will not be able to use them until the Connector is up and running.
Additional Information
-
Log file location
/var/log/messages/automic-connector.log
tail -f /var/log/messages/automic-connector.log
-
greps for process status
ps -eaf | grep connector
-
Uninstall the connector
rpm -e automic-connector-2.0.0.x86_64
rm -rf /var/log/connector-framework
rm -rf /var/log/automic-connector
rm -rf /opt/<Connector Install Dir>
Supported Automic Automation Objects
The Automic Automation integration into Automic Automation Intelligence supports the following objects:
-
Events (EVNT)
Event objects allow you to monitor certain conditions and, if they apply, to automatically trigger actions. These actions are usually the execution of other objects, as defined for the specific Event object.
-
C_PERIOD
Runtime objects that are executed at intervals that are shorter than one day. C_PERIOD stands for period container and refers to the cyclical executions of objects that have the execution type Execute Recurring.
-
File Transfers (JOBF)
File Transfer objects let you exchange any file from one system to another. The transfer can be structured, thus enabling the exchange of files with packed and binary fields in heterogeneous system environments.
-
Jobs (JOBS)
An Automic Automation Job executes commands on computers or in enterprise business solutions (SAP, PeopleSoft, Oracle Applications, etc.). These solutions differ from each other; therefore, specific Job templates are available for each of them. Jobs are always assigned to Agents and they always need a Login object that submits the necessary credentials to the target system (Agent).
-
Job Groups (JOBG)
A Job Group is a container for other objects. It helps you manage the execution of the individual objects it contains. Job Groups can be stand-alone objects that you execute manually or you can insert them in Schedules or Workflows.
-
Workflows (JOBP)
Workflows serve as containers for objects that must be executed in a specific sequence and with specific parameters. An object that is inserted in a Workflow is called task. A Workflow can also be embedded in another Workflow. By linking the tasks in a Workflow, you establish the sequence of the executions.
-
Schedules (JSCH)
Schedule objects allow you to design time and event-driven task management. They are frames where you collect tasks that you want to execute automatically at regular intervals. Schedule objects determine scheduling parameters, such as the periodicity with which the tasks are executed and the times at which they start. They also let you modify the properties of the tasks that they contain. Such changes apply to the tasks only when processed within that particular Schedule; the objects themselves are not affected.
-
Scripts (SCRI)
Script objects let you write and reuse scripts that provide internal processing instructions. The scripts in Script objects are executed in the Automation Engine itself, and not on target systems.
All objects that are related to an execution which should be monitored by AAI must be available in the system. Otherwise, the Connector cannot generate some events and it does not send them to AAI. Renaming or deleting objects can cause that the Connector cannot generate all events. If you need to rename an object, you can duplicate it and rename the copy. This ensures that the original object remains unchanged as part of past executions while allowing you to use the copy with a different name, as needed.
For more information, please refer to the Automic Automation documentation at https://docs.automic.com/.
You can use those Automic Automation objects to carry out the following actions in Automic Automation Intelligence:
- Create (SLA) for different jobstream setups (simple, complex and/or with external dependencies)
- Locate a possible bottleneck in a jobstream (critical path)
- Create dashboards
See also: