Upgrading AAI
This section describes the AAI upgrade procedure:
-
Check the compatibility matrix (compatibility matrix) to find the relevant information on supported versions and possible dependencies. For more information, see Compatibility Information.
-
When upgrading AAI and connectors, make sure you take down the relevant connectors, upgrade and start AAI, and then upgrade and start each connector.
-
Shut down the AAI server. The upgrade will not execute if the server is running.
-
If you have not done so yet, download the relevant AAI product or solution. For more information, see Downloads.
-
Extract the upgrade bundle into a temporary directory. Ensure the following directories and file are present:
-
install\build.xml
-
install\log\log4j.properties
-
install\properties
-
-
Execute the upgrade script. Select the directory for the AAI installation.
 Note:
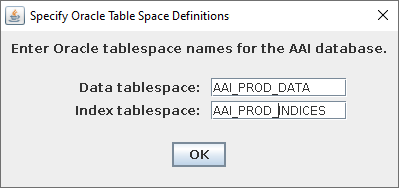
Note:For Oracle, you will need to specify the Oracle Table Space Definitions.
-
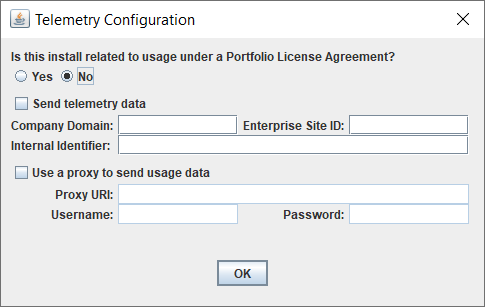
Specify Telemetry Configuration Options.

AAI uses telemetry to send product usage and system configuration information to Broadcom. Specify whether the upgrade is related to a new or additional planned usage under a Portfolio License Agreement (PLA) with Broadcom by selecting Yes or No.
-
Send telemetry data: Specifies whether you want to send the telemetry data to Broadcom or not.
-
Company Domain: Specifies the domain name of your company. It is the last part of your company's email address.
-
Enterprise Site ID: Specifies your company's unique login site ID that is listed on the Broadcom Support portal.
-
Internal Identifier: (Optional) Specifies your department's non-personally identifiable information (non-PII) identifier that you use for your company's tracking needs. Specify whether you want to use a proxy to send the telemetry data to Broadcom.
-
Proxy URI: Specifies the URI to access the proxy server.
-
Username: (Optional) Specifies the user name that is required for proxy authentication.
-
Password: (Optional) Specifies the AES encrypted password that is associated with the proxy URI user name.
Click OK to continue after completing your selections.
-
-
A dialog will be displayed if the AAI upgrade is successful. Click OK to continue.
The upgrade will perform the following:
-
Create a timestamped tarball from the existing AAI server installation in the directory install\backup
-
If needed, generate a SQL script for upgrading the database schema in the <Automation_Analytics_Intelligence>\scripts directory
-
Log the details in the install\l\og\upgrade.log
-
Store upgrade related properties in install\properties\upgrade.properties
-
-
A second dialog will be displayed if the AAI upgrade is successful. Click OK to continue.
-
Use an administration tool specific to your DBMS (a command line or GUI) to run the SQL upgrade script to update the AAI database schema.
Note:This step is not necessary if there are no changes to the database.
-
Restart AAI and confirm the server operates properly.
See also: