Creating your First CLI Action
This use case will help you learn how to create an Action which executes a command that outputs text on a Windows shell. You can use this tutorial also for creating an Action executed on Unix.
Watch the video:
Before you Start...
Make sure that the following conditions are met before you start creating your CLI Action:

|
One online Windows agent is available. |
|
|
The PCK.ITPA_SHARED pack is installed. |
To Create the Echo Hello World Action
- Navigate to the Process Assembly perspective.
- Select the Action Packs tab.
- Create a new Action Pack by clicking the Create Action Pack button in the sidebar.
- Name it Hello World.
- Click Create Action Pack to finish the creation process.
- Click the Add Action button in the toolbar to add an Action to the Action Pack. The Add Action dialog is displayed.
- The CLI type is selected by default. Leave it as is.
- Fill in the other fields as shown above.
Note: Categories are listed in the Explorer when editing workflows. They are represented as folders within the AE and can be changed later on.
- Click Next to confirm the creation of the Action.
- Re-validate you input and click Add.
- Either right-click the Action and select Edit or double-click it to switch to the object edit mode. A workflow containing two JOBS objects is displayed. Depending on the OS of the executing Agent (Windows or LINUX) one of them will be executed.
Note: The actual executed JOBS object (Windows/UNIX) is chosen by the OS of the executing agent during runtime. When you are creating this Action exclusively for one OS, simply leave the other part unchanged. For the purpose of this use case, we will create an Action to be executed on Windows.
- Double-click the JOBS@WINDOWS Action (the upper one).
- Click the Process tab in the sidebar to add the script for execution: echo "Hello World".
- Now you can execute the Action for the first time. To do so, go back to the JOBP and click the Execute button.
- An input request is triggered, which is indicated in the upper right corner of your screen (yellow number). Click it to open the request and provide an agent and a login object for the execution.
- Click Submit to confirm your input.
- Let's now inspect the result of the last execution. To do so, click the Last Monitor button in the toolbar and right-click the JOBS object that was executed.
- Select Open Report from the context menu. The Reports window is displayed.
- Now it is time to add some input data to this Action. To do so, switch back to the Process Assembly and navigate to Variables & Prompts > Prompt Sets.
- Here we can define some input variables (prompts). Right-click the Input prompt set and select Edit. Alternatively, select Edit in new window to edit the script and variables side-by-side.
- Add a new prompt by dragging and dropping it to the canvas.
- Enter VAR1 as a variable name using the following format &VAR1#.
- Click Save to confirm your changes. We will use this variable in our script.
- To add it to the script, go back to the script within the JOBS@WINDOWS Action.
- Add a script line which references the &VAR1# variable as follows:
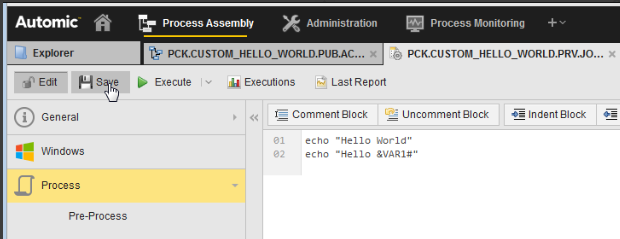
- Click Save to confirm your changes.
- To trigger the final test, go back to the JOBP (workflow) and click the Execute button.
- Another input request is triggered. Click on the yellow button to open it and provide an agent and a login object for the execution.
- Click Submit.
- Validate the result just as before. Open the Last Monitor and check the report.
Congratulations! You have just created your first CLI Action.
Additional Notes
- Two Prompt Sets are automatically assigned to every CLI Action.
- The first one (Input) is for your inputs and can be adapted to your needs.
- The other one (Overwrite Agent) is used to assign an agent for execution and should be kept as is.
- Both JOBS objects added by the Action Builder make use of the following include: PCK.ITPA_SHARED.PRV.INCLUDE.PREPARE_JOB, which is responsible for a proper execution. You can find it in the "Pre-Process" section the JOBS.
- Additional information about object types like JOBS and JOBP can be found here:Adding Objects.
- For more information about scripts, see Functional Logic with Scripts.
See also: