Creating your First Composite Action
Sometimes you may want to create Actions which make sense not only on their own, but also in combination with other Actions. This is where Composite Actions come into play. They avoid wiring work for every new instance of that combination. Let's see how easy it is to create Composite Actions...
Watch the video
Before you Start...
Make sure that the following conditions are met before you start creating your Composite Action:

|
One online Windows agent is available. |
|
|
You have created two Actions already. For the purpose of this use case, we'll use the Actions created in the Creating your First CLI Action and Creating your First REST Action topics. |
To Create the Echo Hello CDA Action
Note: Steps 1 to 5 describe how to create a new Action Pack. If you have already created one, skip to step 6.
- Navigate to the Process Assembly perspective.
- Select the Action Packs tab.
- Create a new Action Pack by clicking the Create Action Pack button in the sidebar.
- Name it Hello World.
- Click Create Action Pack to finish the creation process.
- Click the Add Action button in the toolbar to add an Action to the Action Pack . The Add Action dialog is displayed.
- Select the Composite type.
- Fill in the other fields as shown above.
Note: Categories are listed in the Explorer when editing workflows. They are represented as folders within the AE and can be changed later on.
- Click Next to confirm the creation of the Action Pack.
- Re-validate your input and click Add.
- Either right-click the Action and select Edit or double-click it to switch to the object edit mode.
- Drag the previously created actions from the sidebar and drop them into the workflow.
Note: You can use the Actions category browser in the right sidebar to have quick access to the respective objects.
- Connect the Actions as shown by hovering the mouse over the start or the end point of a task. Arrow symbols are displayed, from which you can start drawing the lines. Click and hold the arrow symbol and drag it to the task you want to link.
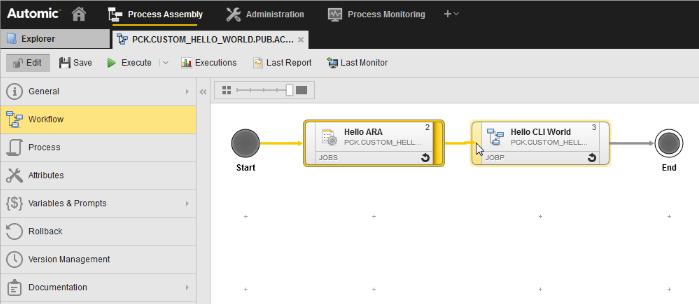
- Now that both Actions have been successfully connected, we'll wire the output values of the first Action into the prompts/input of the second Action, that is, we will concatenate both values together which are then to be echoed to the shell.
To do so:
- Select the second Action.
- Click Properties on top of the right sidebar.
- Select the Prompt Sets tab.
- Enter the variables from the first Action in the Input prompt set Text Field:
&Appname# Id:&id#.
- Save the workflow.
- Click Execute in the toolbar.
- An input request is triggered, which is indicated in the upper right corner of your screen (yellow number). Click it to open the request and provide an agent and a login object for the execution.
Note: We only need to provide an agent and login object for the second Action which is echoing to a Windows shell. There is no need to explicitly assign a REST agent since it will be automatically selected.
- Confirm your input by clicking Submit.
- Let's now inspect the result of the last execution. To do so, click the Last Monitor button in the toolbar and right-click the second JOBS object that was executed.
- Select Open Report from the context menu. The Reports window is displayed.
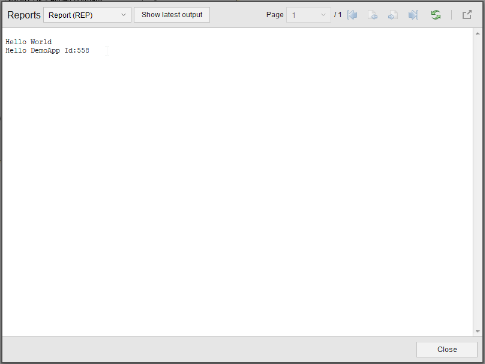
The second line that was printed to the shell contains the name and id of the first application that was returned by the REST call.
Congratulations! You have just created your first Composite Action.
Additional Notes
- Two Prompt Sets are automatically assigned to every Composite Action Pack.
- The first one (Input) is for your inputs and can be adapted to your needs.
- The other one (Overwrite Agent) is used to assign an agent for all OS specific sub-tasks.
- If one of your sub-actions needs explicit input which is not coming from a previous Action in the chain then you have to add this variable to the Input promptset of the Composite Action.
- Additional information about object types like JOBS and JOBP can be found here: Adding Objects.
- For more information about scripts, see Functional Logic with Scripts.
See also: