Working with Deployment Packages
As an Application Developer you create Deployment Packages to store a version of an Application.
Important! The actions that you can perform depend on your folder permissions. See: Assigning Release Automation Permissions.
This page includes the following:
The list of Packages gives you an overview of its properties, allows to edit them and to manage the Package state flow.
Package types are grouped into modules. The top navigation bar shows all modules. Within a module you can manage all packages with package types that belong to that module.
- Open the Release Automation perspective and click the Packages tab.
- Double-click a Package to open it.
System administrators can configure the Packages list to display:
- An advanced set of Package types (for example, in-house feature, upgrade package) of available types. They are available in Type.
- Specific properties per module.
From this list you can:
- Create a new Package.
- View and edit the details of a Package.
- Export the list to a .csv formatted file.
- Change the view to a custom view.
Additionally, you can access the list of Packages of an Application by expanding the Packages tab of an Application and selecting All Packages.
Tip: For more information about how search for entities and narrow down the results, see Advanced Search.
The Installations list helps you track the installation status of your Application by providing an overview of the Components installed on the Deployment Targets, the Artifacts deployed (if any), and other entities used for the deployment.
- Open the Release Automation perspective.
- Click the Packages tab.
- Right-click a Package and select Go to details > Installations.
The view presents the following columns:
- Environments: Environments on which the Package has been deployed.
- Component: Components deployed on the Deployment Targets.
- Deployed Artifact: name of the set of files defined by the Artifact Source. Only the last successfully deployed Artifact is shown.
- Deployment Target: endpoints to which the Components have been deployed.
- Profile: entity linking the Component to the Deployment Target.
- Deployed On: deployment date.
- Status: latest deployment status of the Application.
Notes:
You can change the installation status if:
- You have write permission on the Execution
- The Component deployment is in status Canceled, Failed, or Finished
- Refresh the view to show the new status
- After the data in the database has been updated, the installation time is set to the current time and history records are created for the Execution
You can define custom views for Packages as described in the Working with Custom Views section.
- Click Packages in the main navigation menu.
- Click Create in the toolbar.
- Fill out the Create Item dialog. Take the following into account:
- The Name of the Package must be unique within the Application and can only contain alphanumeric characters, blanks, ".", "-", "_", "@", "$", "#".
- The Type cannot be changed after creation.
- If the Package is of type "deployment" you must select an Application.
- Optionally, select a default Artifact that will be assigned to all Components.
- Click Create.
Notes:
- Upon creation of a deployment Package, all Components of the selected Application will be added as package content by default.
- Artifacts will be automatically associated to the newly created Package.
Editing the Properties of Packages
You can change the following properties:
-
General
Consider the following:
- Application: name of the application the package is assigned to
- Name: name of the package. You may change the name of the package if necessary. It can only contain alphanumeric characters, blanks, ".", "-", "_", "@", "$", "#".
- Type: type of the package.
Note: This property is read-only - if you want to change the type, create a new package with the required type.
- Patch Package: deployment package to be patched.
- Predecessor: the predecessor package of this package. You may define a new predecessor package if necessary.
Note: A package can have one predecessor package at most. If you change the predecessor package, the components already copied from the previous predecessor package will not be removed. Clicking on the link opens a dialog with the predecessor selection. When clicking the X-symbol, applications and components assigned so far remain unchanged.
- State: the current state for each package within the package life-cycle.
- Folder: folder on which the package is stored.
- Owner: organization or person who owns the package.
-
Description
Limited to 4000 characters.
-
Actions
Actions are located in the toolbar. They can be also triggered from the context menu displayed after right-clicking the entity. You can trigger the following actions (only available if you have the appropriate permissions):
- Fast State Change
- Delete. See Deleting Packages.
- Archive: archives the selected entity. If an entity is archived, Restore is available (see also: Archiving Entities)
-
Assign Artifact to all Components. See Working with Artifacts.
-
Errors and Warnings
Errors and warnings related to the current package. If none is available this section is hidden. See Errors and Warnings for all errors and warnings that may be displayed for the package.
-
Stateflow
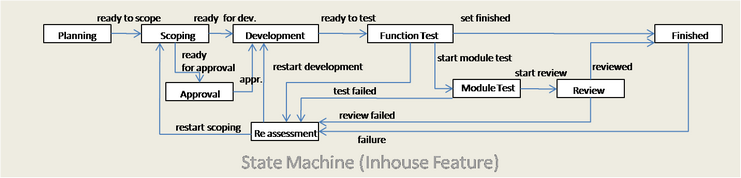
Each package has a type, such as inhouse feature, full package, patch package and so on which represents different kinds of packages. Each type may have its own life cycle, defined by a state machine. The state-machines are defined by an administrator. A state machine consists of states and transitions between states. The figure below shows an example of a state machine of a package type Inhouse Feature. When a new package of type Inhouse Feature is created, its life-cycle will start in the initial state of the state-machine (for example "Planning"), followed by the states scoping, development, and so on. For more information, see: Package Stateflow
-
Components
This section shows the Artifacts assigned to each Package Component. A maximum number of 5 Components is displayed
Click on Details to open the package Component view.
- Statistics & History
If the Package is of type Deployment, dynamic properties can be defined on it. For Delivery Packages this menu item is not shown. See Working with Dynamic Properties for details.
You can also search for dynamic properties using the Global Search.
Take the following into account when duplicating Packages:
- You can duplicate Deployment Packages from both the Package view and the Application Package list view.
- If stages are defined for the original Package the duplicate Package will be set to the initial state.
- All elements of the original Package will be copied to the new Package: Properties, Dynamic Properties, Assigned Components, Application, Predecessor.
- The status of the duplicate Package is the same as for newly created Packages.
To Duplicate Packages
- Click the Duplicate button in the toolbar.
- Optionally, enter a new name for the Package. It can only contain alphanumeric characters, blanks, ".", "-", "_", "@", "$", "#"".
- Select a destination folder.
- Assign an owner for the new Package.
Note: The owner of the original Package is selected by default.
- Select the Patches Package checkbox if the duplicate Package has to be installed on top of another Package. See Working with Patches for more information.
- Enter a name for the patch. For example, ARA-12.2-Build-1.
- Optionally, select an Artifact to be assigned by default to all Components in the Package.
After creation, you will be redirected to the properties page of the new Package.
-
Right-click the entity and select Delete.
Note: You may only delete the entity when you have the appropriate permission on the containing folder (see Security Concept in CDA) and all of the listed conditions are met.
Conditions to delete entities of type Package
- Has no executions
- Has no installation records
- Not referenced by a successor package
- No patch packages
- No other packages depends on it
- Has no installed package components
Important! The DB-Cleanup tool deletes Executions and Installation records, regardless of the installation status. To ensure that all Executions have been deleted, select the following parameters when running the tool:
- --olderThan 0
- --keepAtLeast 0
- --force True
Installation Records can be also deleted by executing a Workflow of type "Uninstall". It is not possible to delete single Installation records.
Assigning Artifacts to Package Components
- Open a Package and click the Components tab.
- Click the Select Artifact inline button on the right side of the page.
- Select the Artifact that you want to assign to the Package Component.
Important!
- Only Artifacts which have been already assigned to a Component are displayed.
- The latest Artifact assigned to a Component on which the user has the required permissions will be auto-assigned to a Package during creation.
- Click OK.
Naming Conventions
Deployment Packages are used to define which version of an Application is being deployed to an environment. The package name will depend on various organizational requirements. For Packages, there is not a unique way for naming conventions. Most important is that the package name has to be unique and meet your requirements for versioning, auditing and build standards.
When defining the naming conventions for packages, semantic versioning is a good starting point. Semantic Versioning is a standard that follows the format of x.y.z, where:
- x – stands for a major version
- y – stands for a minor version
- z – stands for a patch
In line with this the basic package would look like the following: Major.Minor.Patch.
A basic package would look like the following then:
- 1.3.10 – in this case it is the first major release, but third minor release and ten patches have been created for this major release.
Requirements may be different at your company. If this is the case, consider the following aspects to define naming conventions for your packages:
- Auditing – you may have specific requirements that need to be considered for auditing. It could be that the versioning/package has to contain a specific date format. Hence, the package should look like this:
- 1.3.10_20151231 - Major.Minor.Patch_YYYYMMDD
- 1.3.10_151231_1035 - Major.Minor.Patch_YYMMDD_HHMM
This could also be helpful for scenarios where multiple packages are created for the same Patch as the CDA Package has to be unique.
The date format is specified in such way because it allows for easier sorting.
- Continuous Integration/Build – You may also want to use the build number instead of the date, as this is unique too. This is more commonly used if the package is created from a build server. In this case, the package could look like the following:
- 1.3.10_151231_12- Major.Minor.Patch_BuildNumber
Some other aspects to consider when defining your package naming conventions are:
- Uniqueness – packages need to be unique.
- Deployment to Prod – in general all packages should be designed to be release candidates to the PROD environment.
- Other Applications – package names of different apps shall not conflict with each other.
- Continuous Integration and Continuous Delivery – packages need to fit into the CI and CD process.
- Artifact and Repositories – It should be easy to understand from the CDA Package what artifacts were used from repositories etc.
- Application name – Do not use the Application name for naming Packages.
The following table summarizes acceptable naming standards for this entity:
|
Package |
Description |
|---|---|
|
1.3.10 |
Basic Package Name – Major.Minor.Patch |
|
1.3.10_20151231 |
Package Name including the Date – Major.Minor.Patch_YYYYMMDD |
|
1.3.10_151231_1035 |
Package Name including the Date and Time– Major.Minor.Patch_YYMMDD_HHMM |
|
1.3.10_151231_12 |
Package Name including the Build Number – Major.Minor.Patch_BuildNumber |