Working with Custom Types
As an Application Developer you activate, create and edit Custom Types to define CDA Entities.
This page includes the following:
What are Properties?
Every entity has properties. However, the notion of property is particularly relevant for Components and Deployment Targets, because they carry technical references that must be interpreted on the system. Properties flow to Workflow actions using PromptSets, and from there they are passed to agents as parameters.
Types of Properties
- System properties: See CDA System Properties Reference
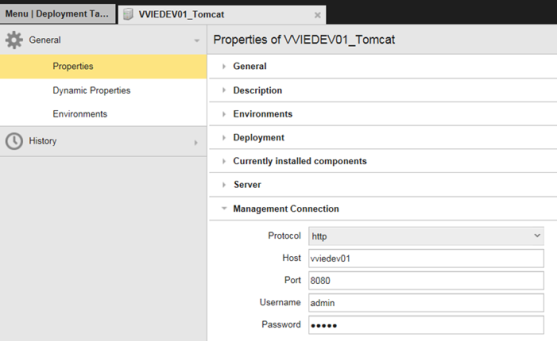
- Custom properties: Important properties that have dedicated fields in the entity user interface, like URL, user name, and password for Tomcat. These fields exist mainly because these values are not optional. The custom properties vary depending on the entity.
-
Dynamic properties (DPs):
View our short introductory video on Dynamic Properties:
Dynamic Properties store values which can be static, dynamic (expressions) or prompts. There are also many types of dynamic properties: text, numbers, lists, multiple choice, and so on (see Types of Dynamic Properties). The use of variables throughout the process means hard-coded references like host names and file paths can be avoided, making configurations more logical and reusable.
Dynamic properties are stored in folder-type structures called namespaces that loosely replicate UNIX file systems. For example, a dynamic property called /TOMCAT/URL means the property itself is called URL and it has been stored in a namespace with the name /TOMCAT.
Some of them are predefined but you can also define your own. For more information, see Creating Dynamic Properties.
Tip: Use uppercase to define your own dynamic properties to differentiate them from the standard ones.
Sequence of Events
- The Components pass the values to the action workflow (third-level workflow). Because an action deploys a component and nothing else, other entities never talk to the workflow directly. The Component, however, is able to source values from other entities (targets, applications, environments...). For example, if a weather application component is being deployed to a Tomcat Server with a given URL, you can source that URL from the deployment target in the dynamic properties of the component.
- In actions, PromptSet values flow from the components being deployed.
- The artifacts defining properties are passed to the agents as parameters.
For an artifact to be deployed to a system, you need an AE agent installed on that system. The agent performs the deployment work via system process submits called AE.
Understanding Custom Types and Properties
CDA has a flexible domain model that allows you to configure the entities according to your needs. You can create custom types for many entities (deployment packages, environments, components, applications, and so on) and define custom property groups and properties for each type. When you create an entity, you have to select the type. You can then work with the properties and templates that are attached to this type.
Note: You get more custom types with other packs.
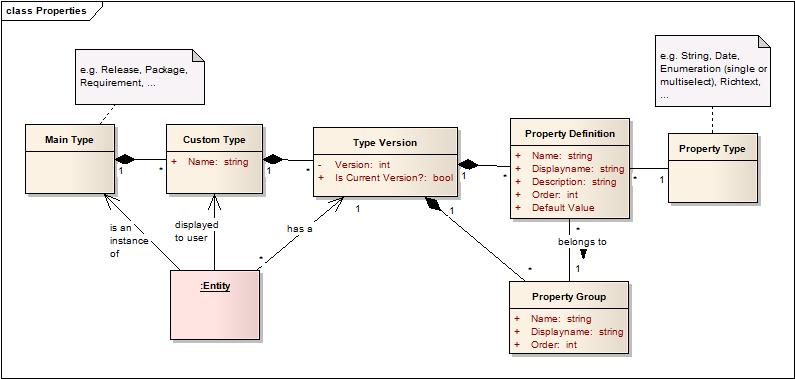
The following figure displays the concepts that are related to types and properties:
-
Entity
An entity such as Requirement 14, Package My Package, and so on.
-
Main Type
Each entity has a main type with a behavior and properties predefined which cannot be changed. Predefined main types are, for example, Package or Application.
-
Custom Type
For most main types, users have to define custom types which can contain more properties. For example, a user can define the types Bug and Feature as the custom types for the main type
Requirement. When creating a new requirement, a user would have to select either Bug or Feature. -
Type Version
For each custom type, there can be one or more type versions. The type version contains the definitions for all properties and property groups which an entity of that type version should have.
One type version is flagged as current version. When a user creates new entities, only the custom type must be selected manually; the type version is selected automatically based on this flag.
When creating a new type version, all property definitions and property groups are copied to the new version. This means that you can safely delete, add, or change property definitions and property groups, without affecting existing entities.
-
Property Group
A property group allows you to group related properties. Property groups become individual panels in the sidebar, when editing the entity.
-
Property Definition
The definition of a single property (for example, Error Message) with attributes such as a Name, Display Name, Description, and the order within the Property Group.
-
Property Type
Each property definition has a property type, which can be, for example,Text, Integer, Multi Choice List, Single Choice List, ... (see Property Groups and Properties for the list of available property types and their behavior).
Example
The following example shows the relationship between custom types and properties:
Example:
-
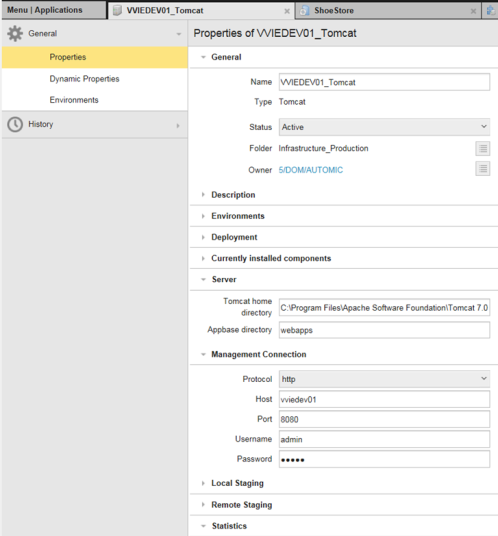
A Tomcat property stores the URL, which is made up of other properties, such as Protocol, Host, Port and so on. These values are stored in the Tomcat custom properties (you know that they are custom properties because there are fields). The URL is constructed from these properties.
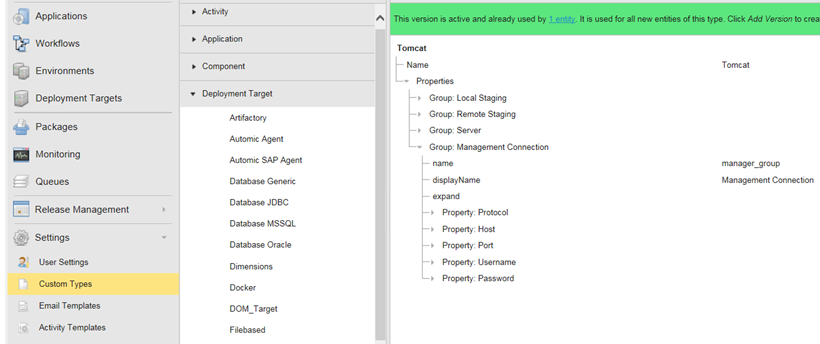
This is what is defined in the Custom Types of the Tomcat Deployment Target:
This is how this information looks like in the Properties view:
-
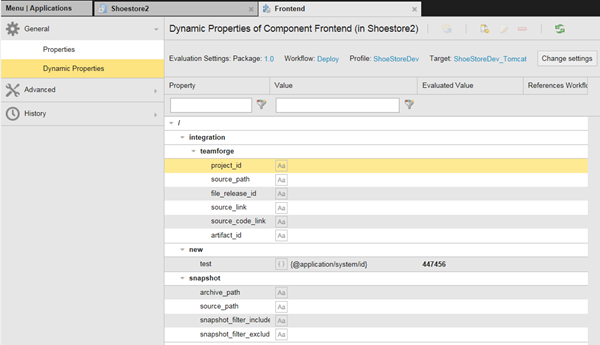
These values are passed to the dynamic properties of the web application Component:
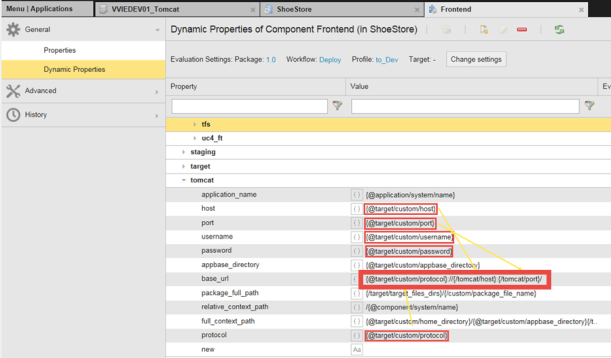
-
Then, the values are passed on to the action promptsets:

The promptsets have the same name as the dynamic property, but are preceded by an EXT: term.
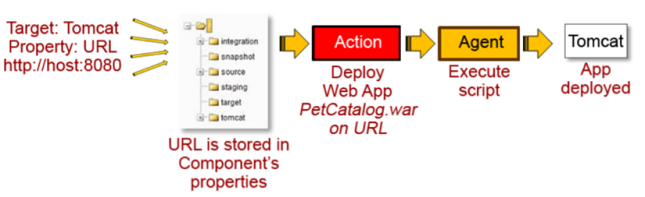
- When the Deploy Workflow action is executed, the URL is passed to the action and stored in the Promptset.
-
The action executes a task on the Agent - the URL is a parameter.
Custom types are displayed:
- In the Type Definition section of the Settings > Custom Types sub-menu (Release Automation perspective)
- In the Dynamic Properties section of an entity that has dynamic properties (/custom namespace)
The custom type definition consists of the following sections:
- Toolbar at the top of the content area
- Base and custom type selection on the left:
- Type editor on the right in the content area
Click the Add Filter button above the list to filter the custom type by one of its properties. The Component, Package and Workflow types can be also filtered by Application.
- Open the Release Automation perspective.
- Hover over one of the main types (for example, Application, Component...) and click the green cross displayed to the right. The Create Custom Type dialog is displayed.
- Do one of the following:
Select the Create from existing option and follow the steps below to create a custom type based on an existing one:
- Enter the name of the new custom type.
- Enter the version number.
- Select the type, custom type and version upon which you want to base the new custom type.
- Select the Import xml option, enter a version number and select the file containing the custom type definition you want to import.
Before you can use imported custom types, you must activate them.
Perform the following steps in CDA after installing a new pack:
- Log in as an Administrator and wait for 60 seconds.
Note: The Start page opens and a request shows up in the AWI Message area (top right corner), informing you that new custom types have been added.
-
Activate the new custom types manually and - if applicable - move the old instances forward.
- If your selected type version is in an editable state, you can edit Custom Types inline.
- If you want to make structural changes; that is, add or remove parameters, right-click the structure that you want to change. Then select the desired function from the context menu.
- If you want to change a value, simply click it to make it editable.
Note: Unsaved changes are indicated in the editor with a silver background and a small edit icon to the right.
Toolbar
The toolbar provides all functions to administrate a custom type:
-
Version
Used to switch between custom type versions and to access all administration functions.
The last version in use is selected by default. See Quick Actions.
Duplicate: Opens the dialog to duplicate the selected custom type version to a new custom type
Rename: Opens the dialog to rename the selected custom type
Export + [Version name]: Generates the type XML of the custom type and opens the corresponding download window. The name of the generated file name is a concatenation of the custom type name and the version. Example:
IIS 4.0.xmlDelete + [Version name]: Deletes the custom type version. Only enabled if the selected custom type version is not used by any entity. The whole custom type is deleted once the last version of it is deleted.
-
Add Version
- Opens the dialog to add a custom type version.
- Import XML enables the upload of an XML file (specified in File) for the new custom type version.
-
Collapse all
Collapses the whole custom type definition tree.
-
Expand all
Expands the next level of the custom type definition tree.
-
Save
Used to save the changes of the custom type in the database. The button is only enabled for custom type versions which are allowed to be edited.
Quick actions are shown below the toolbar and allow the user to immediately access the most likely function directly.
-
DRAFT
This version is not active yet. Click Activate to activate it so that it is used for all entities of this type.
-
IN USE
This version is not active anymore but still used by many entities. Click Upgrade to upgrade those entities to a new type version.
-
NOT USED
This version is not used anymore. Click Delete to delete it.
-
ACTIVE
This version is active and already used by many entities. It is also used for all new entities that are based on this type. Click Add Version to create a new version of this type.
Context Menu for Structural Changes
-
Add child
Opens a sub menu which shows all allowed child elements of the selected one. If you select a child element, this element is added on the last position. Disabled if the element does not allow child elements.
-
Add before
Opens a sub menu which shows all allowed elements on the same level as the selected one. If you select an element, this element is added on the same level but before the current one. Disabled if the element does not allow other elements on the same level.
-
Add after
Opens a sub menu which shows all allowed elements on the same level as the selected one. If you select an element, this element is added on the same level but after the current one. Disabled if the element does not allow other elements on the same level.
-
Delete [element name]
Deletes the selected element and all of its attributes/children. Disabled if the selected element is mandatory or if the selected item is an attribute. See also Rules for deleting elements.
-
Move up
Moves the selected element one position up considering the Rules for reordering elements. Only enabled if the selected element is not the first one.
-
Move down
Moves the selected element one position down considering the Rules for reordering elements. Only enabled if the selected element is not the last one.
- Select the type and click the Type Upgrade tab.
- Click the Upgrade button at the top.
- In the dialog, select the custom type, the type, and the base and target versions:
Custom Type
The custom type whose entities should be upgraded.
Type
The base type of the custom type.
From version
The type version from which the entities should be upgraded.
To version
Lists all non-draft type versions except the From version in descending order by their creation date.
- Select the new version and click Show Preview to perform a dry run. The result of the dry run is the Type Upgrade Preview, in which you see which entities could be safely converted to the new type.
- Select the entities you want to upgrade and click Upgrade.
- A detailed report about the upgrade results is displayed.
Notes:
- The custom type upgrade is stored in the log file.
- The sort order of the prompts is persisted. For more information, see Creating Dynamic Properties.
Best Practices for Custom Types
Deployment Package Custom Types
For deployment packages, new custom types are created as different properties are required based on the release version. Each individual deployment package may have a different package stateflow which would require more package types.
For example, in this case a bug and feature custom type was created. Both types require different properties.
- Bug – Name, title, description
- Feature – Name and approval date
Other common package custom types are: Major and Minor.
Note: default custom types may not meet the requirements in most scenarios or contain too many properties which are not used. If you use default custom types and update their properties, those properties should be set up for all applications.
It is also important to copy the deployment custom type (as this custom type allows a package to relate to an application) when creating application deployment package types.
Naming Conventions
Following examples can be used as standard naming conventions for package custom types:
- [<APPLICATION>]_<MAJOR>
- [<APPLICATION>]_<MINOR>
- [<APPLICATION>]_<HOTFIX>
- [<APPLICATION>]_<BUG>
- [<APPLICATION>]_<FEATURE>
Component and Deployment Target Custom Types
For an application that only deploys an Ear file, no new custom types might be required as the out-of-the-box deploy Ear file and start and stop server actions can be used. However, if this component also has to perform customized steps which require properties to be set up on the component, on the deployment target or both, individual custom types for components should be used.
Usually, the creation of custom types of components and deployment targets goes hand in hand, which means if a new component custom type is created, a new deployment target custom type should be also created.
Another use case that requires the creation of more custom types is when duplication of custom types is required.
For example, two Weblogic endpoints have been defined: Batch and Online. The Weblogic custom type has to be duplicated for both, because the target assignment on the profile is easier if two different custom types exist, as Weblogic_Online deployment target types are automatically assigned to Weblogic_Online component types. If only one Weblogic type existed, you would have to decide manually which deployment target has to be deployed against the component Weblogic_Online and Weblogic_Batch. Also, it makes it easier for the user to filter quickly on Custom Types.
In summary, creation of customized custom types highly depends on the use case. If a high number of customizations are required, customization of custom types should be considered. If out-of-the-box actions and properties are being used, it should be considered to use out-of-the-box custom types.
Naming Conventions
Following examples can be used as standard naming conventions for components and deployment targets custom types:
- <APPLICATION>_BACKEND
- <APPLICATION>_FRONTEND
- <APPLICATION>_MIDDLEWARE
Other Entities
No customization is required for other entities.