
|
Executing Executable Objects |

Executing Executable Objects |
Scheduling Recurring Tasks |

|
Various settings are provided that can be used to execute objects manually.
By using these settings, objects can be:
Highlight an object in the Explorer and open the context menu command "Execute". Three types of execution are available.
For each execution option, you can specify a particular Queue object in which the task should be activated. The object's settings are used if no particular Queue object has been specified.
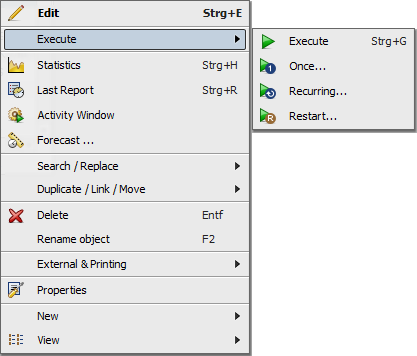
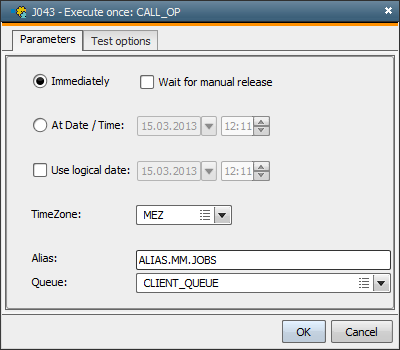
You can select an immediate execution or a start at a predetermined point in time. A logical date can be defined for both options. It is then used for calendar conditions.
The activation time is used as the logical date if you do not specify anything.
As opposed to recurring tasks, objects that are scheduled once show the start type <ONCE>.
The checkbox "Wait for manual release" refers to an immediate execution. Once selected, the task obtains the status "Waiting for manual release" in the Activity Window. Open the Manually release command in the Activity Window's context menu or the Workflow Monitor in order to process the object.
If you execute objects once, you can also specify an alias. This name is then used instead of the object's actual name in the Activity Window and in the statistics. For an alias, you can only use characters that are also allowed for object names. The maximum length is 200 characters. You cannot use predefined variables.
Using the option Manually release indicates that the script is immediately processed. Therefore, it is only useful for jobs because the generated JCL can be modified.
You can also select test options. They can be used to specify the way that processes are displayed in the activation report while the script is generated. The acquired diagnostic information shows whether a task has been correctly processed. You can compare scripting lines with the generated JCL, you can view variable and attribute values etc.
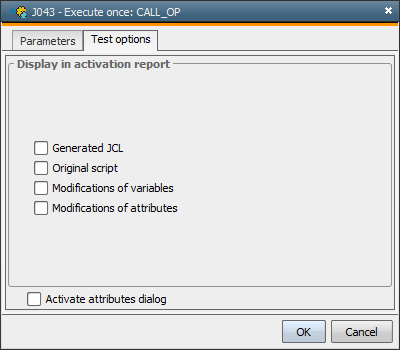
Click OK to activate the object and the corresponding protocol opens if at least one test option has been selected. The illustration below shows an activation report. The attribute dialog is also displayed if the corresponding option has been checked.
Test options cause the script to be processed. The "Generate at runtime" setting which is available in the object is irrelevant in this case.
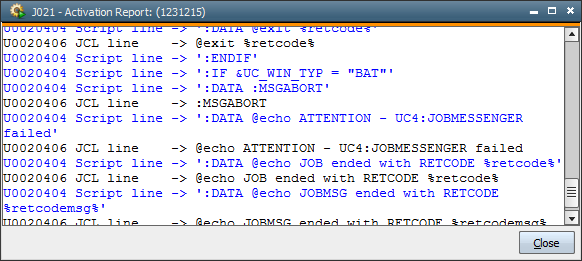
The activation report includes an object's script statements as well as the content of all involved Include objects (in jobs also the job includes such as Header and Trailer).
A query is displayed in order to verify whether the object should start after the script has been generated.
Schedule objects start tasks in a defined interval. The minimum period is one day. If objects should be processed in an interval that is shorter than a day, you can activate them by using the menu item "Recurring".
Various settings are provided that are shown in several tabs. The time zone is specified once and applies to all time specifications regardless of the tab. If no time zone has been specified, the client's time zone is used. UTC is used if no time zone has been specified at all.
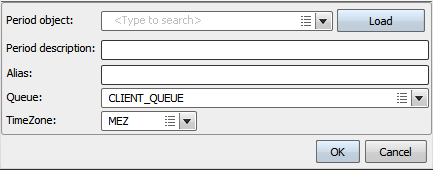
You can also assign an alias for tasks that start recurrently. The same limitations apply as for object names. You cannot use variables within an alias.
As of version 11.2 all tabs in the menu item "Recurring" have two additional fields, called "Period object" and "Period description".
You find them at the bottom of each "Recurring" tab (Frequency, Time frame, Days, Range), as shown below and they may be used to define a previously created Period object.
Period object - Start typing in the search box to find the name of a previously created object you want to use and load it by using the "Load"-button.
Period description (optional) - When you load the object, the title of the Period object's Header tab will be displayed here as a Period description.
Use the "Load"-button to load the values of the Period object. Only by clicking this button will the Period object's values be used for the executable object in question.
When you change the Period object in the respective field, the description field will be emptied automatically.
You may also add a description here manually. This description will be shown in the respective table columns of the Activity and Statistics windows of executable objects.
As soon as the Period object has been selected in the top field, the Period object's values will be loaded and shown in the respective "Recurring" tab above it (either Frequency, Time frame, Days or Range).
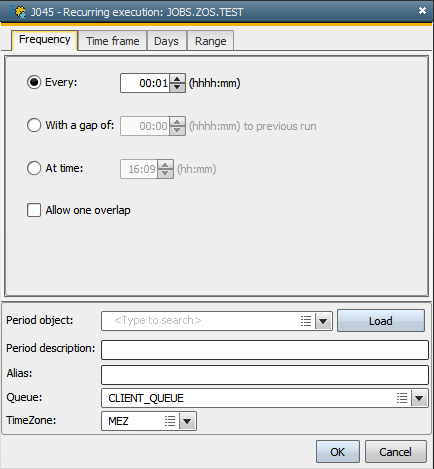
The Frequency tab can be used to select the interval in which the object should be processed.
For example: Every four hours
|
Field/Control |
Description |
|---|---|
|
Every |
Fixed interval in which the task is executed. The maximum value is 504 hours (21 days). For example: 0000:30 Executions take place in an interval of 30 minutes. |
|
With a gap of ... to previous run |
Time span between the executions. Task activation depends on how the last run ended. The last execution's end time plus the time span add up to the next execution's start time. The minimum value is one minute. The maximum value is 504 hours (21 days). For example: 00:15 The last execution ended at 14:00. Therefore, the next execution starts at 14:15. |
|
At time |
Time at which the task should be executed every day. For example: 20:00 The task is processed at 20:00 every day. |
|
Allow one overlap |
This setting can be used to permit one overlapping execution. If you use the settings "Every" and "At time", it can happen that although a task has not yet ended, the next execution should already start. By default, no overlapping is allowed because the number of parallel-running tasks would increase in the course of time if several consecutive executions last longer than the specified task. Therefore, the task starts at the next possible point in time. Tasks that are activated using other methods (for example, workflows) are not affected. This setting only affects executions that are started with this option activated. For example: A task starts every two hours. The next execution is scheduled for 10:30. The task that started at 08:30 is still active at this point in time. Example 1: Allow one overlap The task can start at 10:30 because one overlap is allowed. Example 2: No overlap The execution at 10:30 is skipped because overlaps are not allowed. The next task starts at 12:30 provided that the task that has started at 08:30 has already ended. |
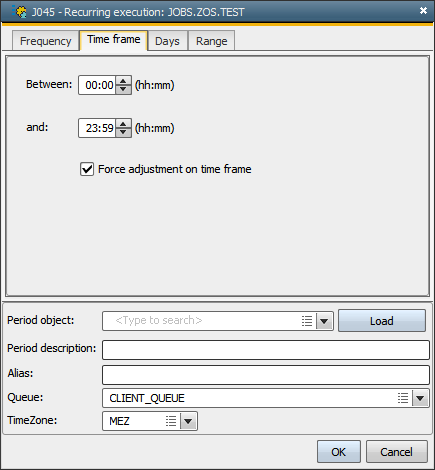
The Time-frame tab can be used to define a period in which the object should be executed.
This tab is hidden if the setting "At time" or an interval that exceeds 24 hours has been selected in the Frequency tab.
For example: Between 06:00 and 18:00
|
Field/Control |
Description |
|---|---|
|
Between ... and ... |
Start and end time during which the task should be executed. For example: Between 08:00 and 18:00 The task is executed during this period. For example: Between 00:00 and 23:59 The task starts throughout the day without any limitations. |
|
Force adjustment on time frame |
Execution depends on the time frame. The task's first execution and all resulting starts can be adjusted to the specified time frame. In doing so, the execution interval calculation is adjusted to the time frame's start time. This setting has the following effect if you execute tasks with a particular gap between the executions: The task starts at the beginning of the time frame even if the gap period has not expired. For example: A task should be executed in one-hour intervals in a time frame between 09:00 and 12:00. The task is scheduled for 09:20. Example 1: Without adjustment The task starts at 09:20, 10:20, and 11:20, and at 09:20, 10:20 and 11:20 on the following days. Example 2: With adjustment The task starts at 10:00, 11:00, and 12:00, and at 09:00, 10:00, 11:00 and 12:00 on the following days. For example: A time gap of 30 minutes should be scheduled for two task executions. The time frame starts at 01:00 and ends at 23:00. The task ends at 00:45. Example 1: With adjustment During the day, the task first starts at 01:00. Example 2: Without adjustment The task starts at 01:15 when the 30 minutes have expired. |
The Days tab can be used to select the days on which the object should be executed.
For example: Mondays through Fridays

|
Field/Control |
Description |
|---|---|
|
Weekdays |
Days on which executions are possible. |
|
Calendar |
The days on which executions are allowed are based on calendars and specified calendar keywords. Calendars and keywords specified here are not considered in the search-for-use function because they are part of an activity and not of an object. |
|
Execute if one condition matches |
The task is executed if the logical date corresponds to the specified calendar conditions. |
|
Execute if no condition matches |
The task is executed if the logical date does not correspond to the specified calendar conditions. |
|
Execute when all conditions match |
The task is executed if the logical date corresponds to all specified calendar conditions. |
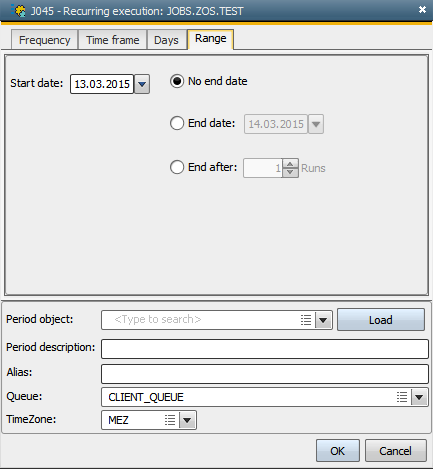
The date range in which the object should be executed can be specified in the Range tab.
For example: Execution starts on 13.03.2015, there is no end date.
|
Field/Control |
Description |
|---|---|
|
Start date |
Date on which the task should be executed for the first time. |
|
No end date |
The task is executed until it is manually ended. |
|
End date |
Date on which the task should be executed the last time. For example: 31.03.2009 The last time the task is executed is 31 March. |
|
End after |
Number of executions. Allowed values: "1" to "9999" |
Restarts can be used to start tasks again, thereby specifying a reference RunID and/or a restart point. The advantage of specifying a restart point is that it is not necessary to reprocess the whole script.
Tasks can be restarted from the Activity Window, Statistical Overview or monitors (Restart command).
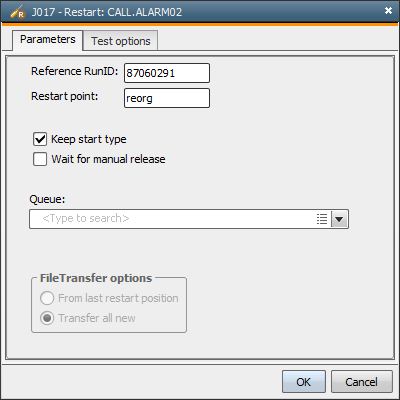
|
Field/Control |
Description |
|---|---|
|
Reference RunID |
RunID of the execution that should be repeated. Specify "0" if the restart should not refer to a particular execution. |
|
Restart point |
A restart point marks a point in the script where the restart should start. The whole script is processed if no restart point has been defined. Restart points are set using the script element :RESTART. |
|
Keep start type |
This setting has the effect that the restart runs in the group which has been specified in the object. The task is immediately processed if no group has been specified in the object. |
|
Wait for manual release |
The restart is not immediately processed if this option is checked. The task obtains the status "Waiting for manual release" in the Activity Window. Open the command "Manually release" in the Activity Window's context menu or the Workflow Monitor to process the object. Using the option Manually release has the effect that the script is immediately processed. Therefore, it is only useful for jobs because the generated JCL can be modified. |
|
Restart only aborted children |
This option is only displayed in tasks that have been started via an agent group in mode "All". Only tasks that have aborted are repeated if this option is activated. |
| FileTransfer options |
This option is only available for restarted file transfers. Note that the restart must be called using the object statistics. These options are grayed out if the FileTransfer object has been changed since the relevant execution has taken place.
|
The test options are the same as for single executions.
See also:
Schedule
Scheduling Recurring Tasks
Restarting Executable Objects