Session and User Settings
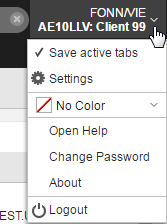
A context menu at the top right corner of the Automic Web Interface provides access to the session and user settings that allow to save the tabs that are currently open, define the time format you want to use, specify basic settings for the Script editor, specify the interval for refreshing data, change the session color, open the Online Help, modify your password, display the software version information and log out.
This topic provides information on the following:
- Accessing the Session and User Settings
- Saving the Active Tabs
-
Specifying Settings
- Session Color
Accessing the Session and User Settings
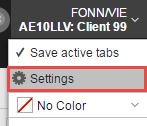
The session and user settings menu is available on the top right corner of the Automic Web Interface. Click the arrow to open it:
You probably visit the same perspectives, tables, lists once and again because they contain the records you work with. Saving the active tabs saves you time searching for and opening them everyday anew.
When you log out of the application, a dialog is displayed asking you whether you want to save the open tabs:
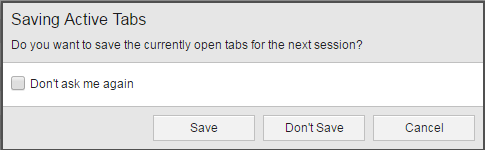
Clicking Save means that the next time you log in, the settings you last worked with are kept and displayed:
- Open pages
- Open perspectives
- Filter settings
- Lists
- Column orders
- Sort orders
- For split panes, such as the Properties of a Workflow, whether the split pane is open
You can also indicate the system that you want the active tabs to be saved always after logging out.
To Save the Active Tabs
- Open the login and session information menu on the upper right corner of the application.
-
Select Save active tab.
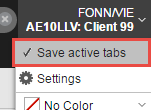
The tick to the left of Save active tab means that this function is activated.
You can define how times throughout the Automic Web Interface should be displayed. In addition, you can specify whether the times displayed on tables in the Process Assembly and Process Monitoring perspectives should include the seconds or not.
To Specify the Time Format
- Open the login and session information menu on the upper right corner of the application.
-
Select Settings.
-
The Settings dialog is displayed. The Time Format settings are on the General tab:
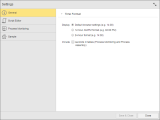
- In Display specify the time format to be used throughout the system:
- In Seconds in Tables specify whether the time indications should include seconds or not. This applies to all tables in the Process Assembly and in the Process Monitoring perspectives.
- Click Save and Close.

Specifying Script Editor Settings
The Script Editor tab allows you to specify basic settings for the Script Editor.
To Specify Script Editor Settings
- Open the login and session information menu on the upper right corner of the application.
-
Select Settings.
-
The Settings dialog is displayed. Open the Script Editor tab:

- Specify the font size to be used in your scripts.
- Activate Automation Engine Script: Begin new line with prefix of last line if you want the Script Editor to automatically add a : as prefix on the next line when pressing [Enter].
- Activate Automation Engine Script: Show parameter info in tooltip if you want to activate the syntax tooltip functionality in the Script Editor. See Syntax Tooltips.
- Click Save and Close.
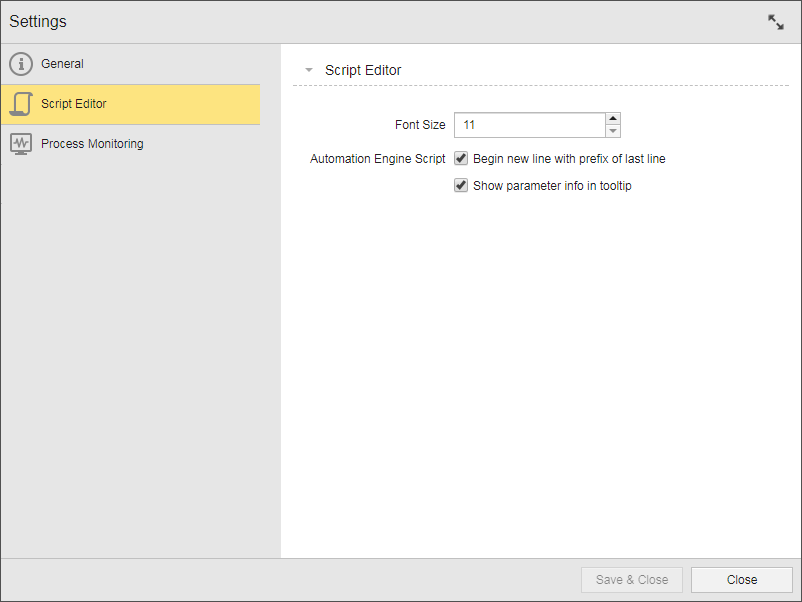
Please note that the Begin new line with prefix of last line and Show parameter info in tooltip options apply to Automation Engine scripting only. They have no effect whatsoever on scripts created as XML, JSON, etc.
Specifying the Refresh Interval in the Process Monitoring Perspective
The status of your tasks changes continuously. For this reason it is important that both the Workflow and Schedule Monitors and the list of Tasks are refreshed at appropriate intervals. A time indicator available on the toolbar
To Specify the Refresh Interval for the Workflow and Schedule Monitors
-
Open the login and session information menu on the upper right corner of the application and select Settings.

-
The Settings dialog is displayed.
Open the Process Monitoring pane, where you specify the refresh intervals for Monitor (this affects the Workflow and the Schedule Monitors) and the Tasks (this affects the list of Tasks).

-
In the Monitor section activate one of the following options :
Refresh interval Description Manual If you select this option, the contents of the Workflow and Schedule Monitors are not refreshed automatically. As a result, the Process Monitoring toolbar does not display the remaining time indicator but only the refresh button:

Default By the default, the refresh interval value is 60 seconds. However, you system administrator can specify a different value in your User definition. The following is possible:
-
Your User definition contains a value higher than 60 seconds.
The Default option displays the value set in your User definition.
-
Your Used definition contains a value lower than 60 seconds.
The Default option displayed here is not affected by the value in your User definition and displays Default (60 seconds).
You can enter a value between 10 and 86400 seconds.
The time indicator displays the remaining time until the next refresh. You can always refresh the views manually by clicking
 .
.User defined
Select this option and specify the interval.
By default, the value suggested here by default is the one that your system administrator has entered in your User definition. If you change it, the value in your User definition is also changed.
You can enter a value between 10 and 999 seconds. If the User definition has a value that is lower than 10, it is ignored.
The time indicator displays the remaining time until the next refresh. you can always refresh the views manually by clicking
. -
- Click Save and Close.

To Specify the Refresh Interval for the List of Tasks
-
Open the login and session information menu on the upper right corner of the application and select Settings.
-
The Settings dialog is displayed.
Open the Process Monitoring pane, where you specify the refresh intervals for Monitor (this affects the Workflow and the Schedule Monitors) and the Tasks (this affects the list of Tasks).
-
In the Tasks section activate one of the following options :
Refresh interval Description Manual If you select this option, the contents of the task list is not refreshed automatically. As a result, the Process Monitoring toolbar does not display the remaining time indicator but only the refresh button:
Default By the default, the refresh interval value is 60 seconds. However, you system administrator can specify a different value in your User definition. The following is possible:
-
Your User definition contains a value higher than 60 seconds.
The Default option displays the value set in your User definition.
-
Your Used definition contains a value lower than 60 seconds.
The Default option displayed here is not affected by the value in your User definition and displays Default (60 seconds).
You can enter a value between 10 and 86400 seconds.
The time indicator displays the remaining time until the next refresh. You can always refresh the views manually by clicking
.User defined
Select this option and specify the interval.
By default, the value suggested here by default is the one that your system administrator has entered in your User definition. If you change it, the value in your User definition is also changed.
You can enter a value between 10 and 999 seconds. If the User definition has a value that is lower than 10, it is ignored.
The time indicator displays the remaining time until the next refresh. you can always refresh the views manually by clicking
. -
- Click Save and Close.
For a detailed description of how the value specified in your User definition and your input here interact, please see Refreshing the List of Tasks.
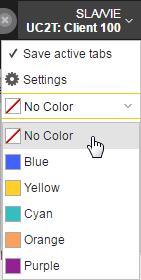
When logging into the application, you can choose a session color that appears as a horizontal bar across the top of the page.
When you have multiple sessions open, using a session color helps you keep track of where you are. You can also change the session color from the open session.
To Specify the Session Color
- Open the login and session information menu on the upper right corner of the application.
-
By default, No Color is selected.
Click the arrow to open a dropdown list displaying the colors you can choose: