Working with the AutoForecast
This topic describes the functions that are available for autoforecast objects.
This page includes the following:
Accessing the List of AutoForecasts
In the Process Monitoring perspective, open the Forecasts tab and select AutoForecasts.
AutoForecast Cache
Before working with the autoforecast, it is important to check the status of its cache. this is displayed below the page caption:
-
No Forecast data available
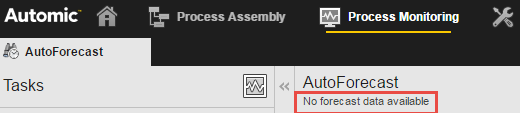
This means that you have to recalculate the forecast cache before using the feature.
-
Forecast data calculated from xx to yy

This means that the forecast cache was calculated on xx and is ready to use. Nevertheless you should verify that no important schedule changes happened since then, as they would not be reflected in the AutoForecast.
Calculating and Recalculating the AutoForecast Cache
By (re)calculating the forecast cache you can update or create the prediction data used by the autoforecast. Use this feature if the data is either outdated or non-existent.
Use this feature with caution because forecast recalculation can consume a lot of time and system resources.
To Calculate and Recalculate the AutoForecast Cache
-
Open the Process Monitoring perspective and select Forecasts > AutoForecast page on the left navigation pane.
-
Click the Recalculate button on the toolbar. This creates forecast records for the number of days that the system administrator has defined in the UC_CLIENT_SETTINGS variable.
-
If you have many scheduled objects, this process can consume many resources. This is why a dialog box is displayed prompting you to confirm that you want to continue. Click Recalculate.
-
The system notifies you when your forecast cache calculation has started and finished.
You can then refresh the AutoForecast page to see the scheduled tasks or check the message console for errors in the forecast calculation. For more information, see Working with Forecasts and Messages.
Important! You have to stay logged in during forecast calculation to receive all notifications or error messages.
Tip: If you have many scheduled objects, recalculate the forecast cache during off-peak times using a scheduled script which invokes the AUTOFORECAST() function. Reducing the AUTO_FORECAST_DAYS value can also speed up the creation of your autoforecast cache.
Showing and Filtering the AutoForecast
Use the Filter button on the toolbar filter the data and get a tailored forecast for the Agents, tasks or time frames you are interested in.
Checking the Details of a Task
Use the Details panel to learn more about each forecasted task, for example the estimated start and end times or its status. The information displayed varies depending on type and status of the task.
Refreshing the Forecast List
As everywhere else in the system, the refresh button allows you update the contents of the lists. This is particularly important on the AutoForecast list after (re)calculating. When a calculation finishes, the list is not updated automatically. You must refresh it manually.
See also: