In a company with two departments, SALES and DEVELOPMENT, each user should have a pre-configured My Catalog in which only the folders and objects are available for which the user has the necessary rights. In this Use Case, the system administrator creates and configures the User Groups that serve as basis for the User Catalogs, grants them the appropriate Automation Engine authorizations and assigns them the users. As a result, when a user logs in to the system, his/her My Catalog displays only the folders and objects he/she is entitled to work with.
This page includes the following:
What Will You Learn?
How to create User Groups and assign or deny them authorizations to access and/or work with folders and objects.
How to create a structure of folders and objects per User Group that serves as basis for the User Catalog. This determines what users will be able to see and do with those folders and objects.
How to assign authorizations at User Group level so that users belonging to it can work with specific folders and objects.
How to create Users and assign them to User Groups.
How the User Group configuration determines the folders and objects that its Users can see in their User Catalogs.
What Does this Use Case Cover?
The flexibility of the User and Authorization Management system of the Automation Engine caters for many ways of configuring User Catalogs. In this Use Case, we will
-
Create a User Group called AWI.USER.CATALOG.
This User group serves three purposes:
-
Provide the basis in terms of authorizations and rights upon which you will then build up.
All users in the company, whether they belong to SALES or to DEVELOPMENT, will be assigned to this group. It will provide users with Read access rights to all folders and objects assigned to it. Afterward, you will restrict these rights at User Group level denying them rights to specific folders.
- Grant users the right to access My Catalog, thus guaranteeing that they can open it.
-
Provide a structure of folders and objects that depicts how the SALES and DEVELOPMENT departments work.
User Groups are the basis of User Catalogs. As soon as you create a User Group in the Administration perspective, it is also available on the User Catalog list in the Process Assembly perspective. In the Process Assembly perspective you can then add the folders and objects to the User Catalog that users in the corresponding User Group will be able to access in their My Catalogs.
-
- Create a SALES User Group with specific rights to certain folders and objects.
- Create a DEVELOPMENT User group with specific rights to certain folders and objects.
- Assign users to those User groups
Important! The combination of the authorizations and privileges defined at User group level and the folders and objects added to it on the User Catalog list determines what a particular user will be able to see and do with those objects.
Prerequisites
You have administrator rights on the client on which you are going to define the User Groups and Users.
Use Case Actors
Overview
The following list provides an overview of the steps you must carry out:
- Create and configure the AWI.SERVICE.CATALOG User Group.
- Add folders to the User Group
- Add objects to the folders.
- Create and configure the DEVELOPMENT User Group.
- Create and configure the SALES User Group..
- Add the Users to the User Groups
Procedure
-
Create and configure the AWI.SERVICE.CATALOG User Group
You do this in the Administration perspective.
- Log in to the Automation Engine client with your administrator credentials.
- Open the Administration perspective.
- On the Administration pane on the left hand side, click User Management to expand it and select User Groups.
- Right-click anywhere on the list to select Add User Group.
- On the Add User Group dialog enter AWI.USER.CATALOG and click OK.
- On the Automation Engine > Authorizations page you specify the folders and object types to which users belonging to this group will have access.
Grant users that belong to this group Read access rights to all folders and objects they should have access to. Later you will restrict these rights at User Group level denying them rights to specific folders.
- In the Grp. column select 1 from the dropdown list.
- In the Type column select FOLD from the dropdown list.
- In the Name column enter *.
- Activate the R-Read checkbox.
As a result, users assigned to this group will be able to open the folders and the objects that you will later add to it.
For technical reasons, it is necessary to grant AWI.USER.CATALOG Read rights to the User Group object type. To do so:
- Click Add Row on the toolbar.
- In the Grp. column select 1 from the dropdown list.
- In the Type column select USRG from the dropdown list.
- In the Name column enter *.
- Activate the R-Read checkbox.
-
You do this in the Process Assembly perspective.
As soon as you create a User Group in the Administration perspective, it is also available on the User Catalog list in the Process Assembly perspective, where you can add the folders and objects that the users in the corresponding User Group will have access to.
In this Use Case, we will create two folders: SALES and DEVELOPMENT. We will add to them the objects that the members of those departments should have access to respectively.
- Switch to the Process Assembly perspective.
- Expand the User Catalog list on the Explorer.
- Either click the Add Folder on the toolbar or right-click anywhere on the list and select Add Folder.
- In the Add Folder dialog enter DEVELOPMENT in the Name field. Optionally, enter a Title (this is a short description of the folder). In Folder you can see the path of the folder you are about to create; leave it as it is.
- Repeat these steps to create the SALES folder.
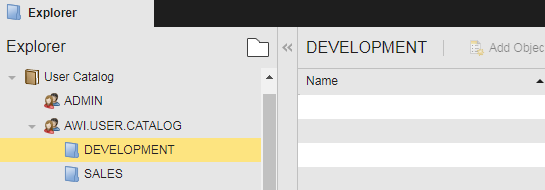
Both folders are now available in User Catalog > AWI.USER.CATALOG. This is how it looks like:
-
The DEVELOPMENT folder should contain the objects that the users in the DEVELOPMENT User group should have access to. The SALES folder should contain the objects that the users in the SALES User group should have access to.
The DEVELOPMENT folder will have two Workflows:
- #1DWH.UPDATE_DATAWAREHOUSE
- JOBP.AGENT.ONBOARDING.
The SALES folder will also contain two Workflows:
- #2DWH.SEND_REPORTS_TO_MANAGEMENT
- #CUSTOMER.ONBOARDING.
Add the objects as follows:
- Enter #1DWH.UPDATE_DATAWAREHOUSE in the Global Search field at the upper right corner of the screen and press Enter.
-
A popup window opens up displaying the results of the search:
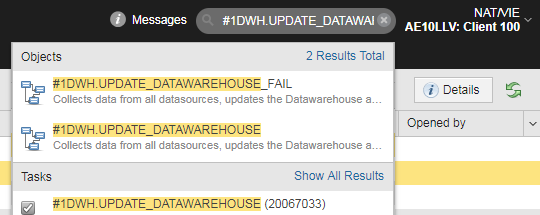
- Right-click #1DWH.UPDATE_DATAWAREHOUSE and select Add to User Catalog from the context menu.
-
In the Add to User Catalog dialog select the DEVELOPMENT folder already available in AWI.USER.CATALOG and click OK:

- Do the same with JOBP.AGENT.ONBOARDING (for DEVELOPMENT) as well as with # 2DWH.SEND_REPORTS_TO_MANAGEMENT and CUSTOMER.ONBOARDING (for SALES).
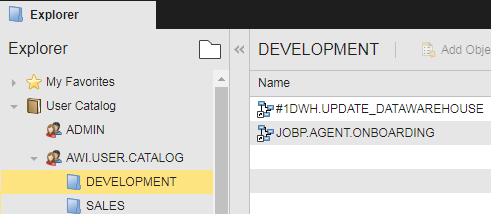
The Workflows are now available as links in User Catalog > AWI.USER.CATALOG > DEVELOPMENT/SALES. This is how it looks like:
-
Create and configure the DEVELOPMENT User Group
You do this in the Administration perspective.
Configure the Group Authorizations
- Click User Management to expand it and select User Groups.
- Right-click anywhere on the list to select Add User Group or click the Add User Group button on the toolbar.
- On the Add User Group dialog enter DEVELOPMENT and click OK.
-
On the Automation Engine > Authorizations page, specify the folders and object types to which users belonging to this group will have access.
Later we will assign all users to the AWI.USER.CATALOG User Group; this will grant them authorizations to access all folders and objects we added to them. For this reason, you need to restrict now the rights of DEVELOPMENT users.
- In the Grp. column select NOT from the dropdown list.
- In the Type column select FOLD from the dropdown list.
-
In the Name column enter *SALES* and activate the R - Read checkbox.
As a result, users assigned to this group will not be able to see either the SALES folder or the objects within it.
- Click Add Row on the toolbar.
- In the Grp. column select 1 from the dropdown list.
- In the Type column select JOBP from the dropdown list.
- In the Name column enter *#1DWH.UPDATE_DATAWAREHOUSE*.
-
Activate the R - Read, X-Execute, S - Executions and P - Open Report checkboxes. This is how it looks like:
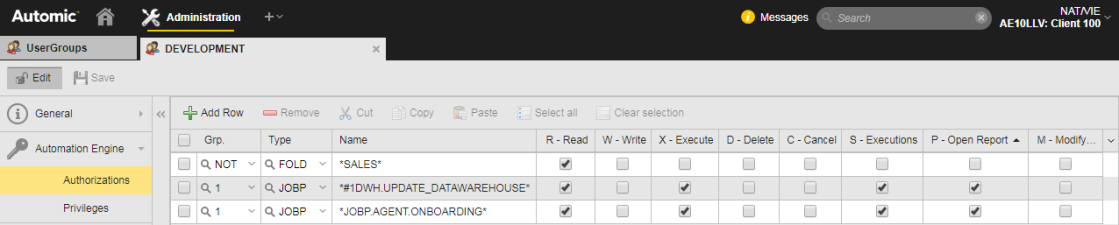
As a result, users assigned to this group will be able to open, execute, see the executions (historical data) and the reports of this object. This is an example of the rights you can grant users. Depending on the policy at your company you may want to activate other checkboxes.
- Repeat these steps for the JOBP.AGENT.ONBOARDING workflow.
Configure the group Privileges
-
Switch to the Privileges page and activate the following checkboxes:
-
Access to My Catalog
This allows users to open their catalogs.
-
Access to Process Monitoring
This allows users to open the Process Monitoring perspective to follow up the executions of the objects they are entitled to work with.
-
Access to Dashboards
This allows users to open the Dashboard perspective and create their customized views.
-
-
Save your changes
As a result, users in this User Group will be able to open and execute both workflows and to access their reports.
-
Create and configure the SALES User Group.
Configure the Group Authorizations
- In the Grp. column select NOT from the dropdown list.
- In the Type column select FOLD from the dropdown list.
-
In the Name column enter *DEVELOPMENT*.
As a result, users assigned to this group will not be able to see either the DEVELOPMENT folder or the objects within it.
- Click Add Row on the toolbar.
- In the Grp. column select 1 from the dropdown list.
- In the Type column select JOBP from the dropdown list.
- In the Name column enter *# 2DWH.SEND_REPORTS_TO_MANAGEMENT*.
-
Activate the R - Read, X-Execute, S - Executions and P - Open Report checkboxes.
As a result, users assigned to this group will be able to open, execute, see the executions (historical data) and the reports of this object. This is an example of the rights you can grant users. Depending on the policy at your company you may want to activate other checkboxes
- Repeat these steps for the CUSTOMER.ONBOARDING WORKFLOW.
Configure the Group Privileges
-
Switch to the Privileges page and activate the following checkboxes:
-
Access to My Catalog
This allows users to open their catalogs.
-
Access to Process Monitoring
This allows users to open the Process Monitoring perspective to follow up the executions of the objects they are entitled to work with.
-
Access to Dashboards.
This allows users to open the Dashboard perspective and create their customized views.
-
- Save your changes.
As a result, users in this User Group will be able to open and execute both workflows and to access their reports.
-
Add the Users to the User Groups
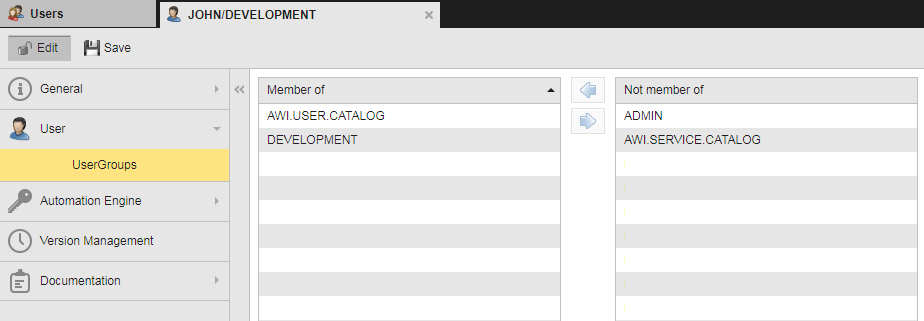
- Open the Users list and search for JOHN (our DEVELOPMENT user).
- Right-click and select Open.
- Expand the User list on the left pane and select UserGroups. This is where you assign this User to one or more User Groups.
-
Press and hold the Shift key on your keyboard and select AWI.USER.CATALOG and DEVELOPMENT on the Not Member of list and click the left arrow to insert them on the Member of list. This is how it looks like:
- Go back to the Users list and search for SMIT (our SALES user) open its object definition on the User Groups sub page as well.
- Press and hold the Shift key on your keyboard and select AWI.USER.CATALOG and SALES on the Not Member of list and click the left arrow to insert them on the Member of list.
- Save your changes.
Both users are now members of the AWI.USER.CATALOG group. This gives them the rights and privileges you defined there. Each is member of an additional User Group, where those rights are restricted to the folders, objects and privileges that correspond to their roles.
-
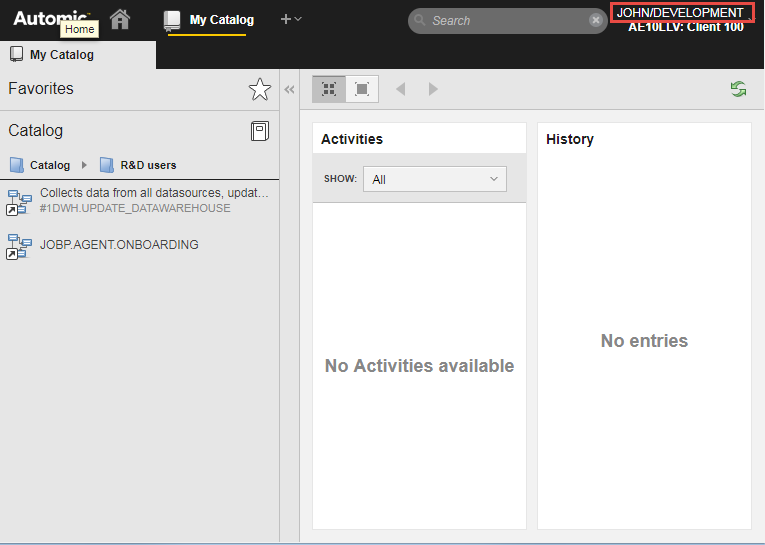
Log in to the system using the credentials defined for JOHN and open the My Catalog perspective. Only the two DEVELOPMENT Workflows are available:
-
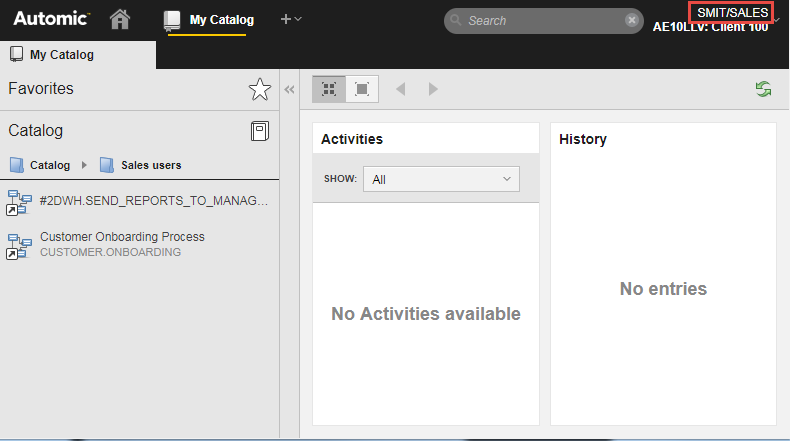
Log in to the system using the credentials defined for SMIT and open the My Catalog perspective. Only the two SALES Workflows are available:
Useful Links
This use case contains references to a number of functions that you might want to know a bit more about.