Working with Release Plans
As a Release Manager, you can design Release Plans, Phases and Tasks to schedule the activities that need to be performed to successfully deploy a new version of an Application and its related Components.
This topic provides information on the following:
- About Release Planner
- About Release Plans
- Viewing Release Plans
- Creating Release Plans
- Changing Properties of Release Plans
- Using Variables in Release Plans
- Starting Release Plans
- Pausing/Restarting a Release Plan
- Stopping Release Plans
- Resetting Release Plans
- Exporting/Importing Release Plans
- Duplicating Release Plans
- Archiving a Release Plan
- Deleting Release Plans
Release Planner is a cross-team orchestration capability that executes deployments or Release Plans.
Watch the video:
The AutomicRelease Planner feature will help you streamline your end-to-end release deployment activities, task definition and coordination of the required resources.
Furthermore, ARP helps you monitor the deployment progress with real-time information on status of each Task, completion time, and drill-down capabilities to the Task Workflows.
What activities can be performed with Release Planner?
Examples of manual activities are:
- Preparation (collect artifacts from various sources) or validation steps (analyze test reports)
- Third-party activities (e.g. some activity that is done by an outsourced team)
- Approvals
Examples of automated activities are:
- Running a deployment
- Provisioning an Environment
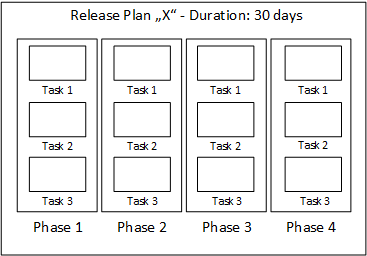
A Release Plan is a collection of Tasks that are grouped in Phases. Each Phase can have an unlimited number of Tasks. The execution of a Release Plan starts with the first Task in the first Phase and ends with the execution of the last Task in the last Phase. After all Tasks are executed the Release Plan is successfully completed. If one Task fails (= ends with status "error") the execution of the Release Plan is automatically paused.
Releases are managed and displayed within the Releases section of the Release Planner perspective. The following views are available.
- Status View (default)
- List View
- Calendar View
Additionally, the Release Board shows a graphic representation of the components that make up each release (Tasks and Phases).
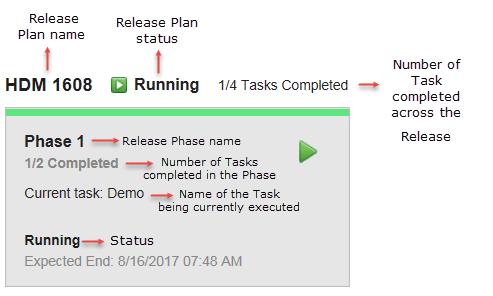
The Status View is the default view of the Release Planner. It allows you to monitor the progress of multiple Release Plans in parallel.
You can filter the release plans shown by status (to be selected from the Show dropdown list in the toolbar. Default: all) and sort them by name, scheduled start date or planned end date (Sort dropdown list. Default: planned start date).
Release Plans with status "draft" are not selectable/displayed in the Status View.
The following information is shown:
- Name of the Release Plan.
- Name of the Phase(s).
- Name of the Task being executed.
- Phase status. The active phase is highlighted.
- Expected end date and time (for Tasks with status "Not started yet - Draft", "Running", "Pausing" & "Canceled").
- Actual end date and time (for Tasks with status "Success - Completed")
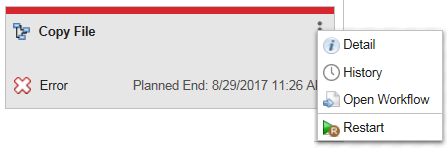
Running and failed AE and ARA tasks include a link to see the workflow execution in the Process Monitoring perspective. To open it, right-click the Task and select Open Workflow.
Status Colors
You can easily recognize the status of each Task by the color stripe on the top:
- Blue: Draft, Waiting.
- Green: Running, Finished.
- Yellow: Running late.
- Red: Error
- Grey: Completed, Skipped, Disabled.
The List View list shows all Release Plans the user has read access to ordered by planned start date.
When you select a Release Plan in the list, you can trigger the most common actions in the toolbar (see Changing Properties of Release Plans). To access all functionality for a release, double-click one row or right-click one release and select go to details.
The calendar view shows an interactive overview of all Release Plans the user has read access to on a monthly or weekly basis.
You can filter the Release Plans by status or ownership (to be selected from the Show dropdown list in the toolbar) and switch between a monthly or weekly view, depending on the level of detail you want to delve into (Next dropdown list).
Click on Next or Prev to scroll by month or week, depending on the view you are in.
Release Plans are displayed as bars. The fill colour depends on the status of the Release Plan:
- Blue = draft
- Red = canceled
- Green = running, finished OK
- Yellow = paused, pausing
- Grey = completed
If the number of Release Plans exceeds the space available in the cell, some items may be wrapped. To see the full list, click on the + symbol displayed at the bottom of the cell.
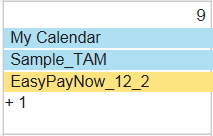
Hover over a Release Plan to show the planned & actual start date/time. Click a Release Plan to see more detailed information in the Release Board.
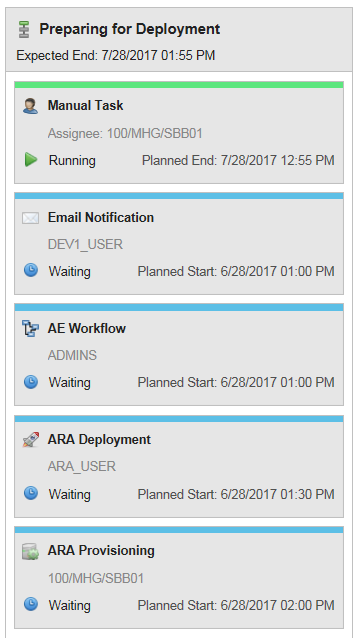
The Release Board view is a graphic representation of the Tasks and Phases that make up the Release Plan.
To View the Release Board
- Open the Release Planner perspective.
- Double-click a release to open it.
- Click the Release Board tab.
The Phases and Tasks defined for the release are shown. The elements of the release can be rearranged, edited or deleted provided the user has sufficient rights for it.
Task types can be identified by the icon displayed to the left of the Task name:
Running and failed AE and ARA tasks include a link to see the workflow execution in the Process Monitoring perspective. To open it, right-click the Task and select Open Workflow.
The following information is shown:
- Name of the Release Phase.
- Name of the Release Task
- Task status: the active Task is highlighted.
- Planned end date and time (for Tasks with status "Not started yet - Draft", "Running", "Pausing" & "Canceled").
- Duration/Delay (for Tasks with status "Success - Completed")
If the task execution took longer than expected, the late task icon (
 ) is displayed next to the extra time.
Status Colors
You can easily recognize the status of each Task by the color stripe on the top:
- Blue: Draft, Waiting.
- Green: Running, Finished.
- Yellow: Running late.
- Red: Error
- Grey: Completed, Skipped, Disabled.
Release board summary bar
The release board summary bar shows basic information of the Release Plan at a glance: start time, planned duration (expected duration of the Release Plan execution), calculated duration (sum of the execution times of the tasks), number of tasks completed and status.

The information displayed is read-only.
- Open the Release Planner perspective.
- Select any of the release views: Status View,List View, Calendar View.
- Click the Create button in the toolbar. The New Release Plan dialog is displayed.
- Enter a unique name for the new Release Plan.
- Optionally, enter a description to better identify the release.
- Select the folder where you want to store the Release Plan.
- Select the owner of the Release Plan.
- Select or enter a start date and time to trigger the release.
-
Optionally, select or enter an end date and time.
The value must be in the following format: M/d/yyyy HH:mm.
- If start and end dates have been entered, the duration in days is automatically calculated.
- Click Create to complete the first stage of the creation process. The Release Board view is displayed.
New releases will automatically get the status Draft.
- Optionally, select the Notification tab to define when to notify users about changes in the Release Plan. When the owner is a user group, all members will be notified. Select one or more of the following checkboxes and add the user(s)/user group(s) you want to be notified:
- Notify on Start: a message will be sent when the Release Plan is started.
- Notify on Error: a message will be sent when the Release Plan fails.
- Notify when Finished: a message will be sent when the Release Plan finished successfully.
- Notify when Delayed: a message will be sent when the Release Plan did not start in the specified time.
Message notifications are sent to the Notification bar. To know more see: Notification Object (CALL).
The value must be in the following format: M/d/yyyy HH:mm.
See also: Using Variables in Release Plans
Congratulations! You have just defined the container of the Release Plan and its basic details. Let's now plan the phases of the Release Plan and the tasks to be executed in each phase.
Release Plans can be edited by one user at a time. If the Release Plan is being edited by another user, you can only open it in read-only mode. However, it is possible to claim edit-rights to take control over the Release Plan.
Once the Release Plan has started, the owner can only modify some basic details. Name, owner, start/end-date and duration are non-editable fields.
What to do next:
Changing Properties of Release Plans
The properties of a Release Plan can be edited from the General view of the Release Board. You can change the following properties:
- Name: must be unique.
- Description: limited to 2000 characters.
- Owner: the current user is selected by default.
- Folder: folder where the Release Plan is stored.
- Start Date: date and time when the Release Plan is to be triggered.
- End Date: end date and time (optional).
- Duration: planned duration of the Release Plan.
Using Variables in Release Plans
ARP supports the use of variables for Release Plans.
Variables can be referenced in the input of Release Phases and Release Tasks and help you save time and ensure consistency.
To Define Variables
- Open the Release Plan.
- Select the Variables tab.
- Click Add Row.
- Enter a name for the variable.
Alphanumeric characters are allowed. Variable names cannot start with a number.
-
Define the value. Values can be a single string or a string concatenation. For example:
Name Value Evaluation package_name pck-{build_number}.{build_version} pck_55.v12 recipient_title Sir/Madam Sir/Madam build_number 55 55 build_version V12 V12 Variables used in expressions are evaluated at runtime when a Task is started.
Variables can be modified via REST API.
- Open the Release Planner perspective.
- Do one of the following:
- Select the Release Plan from the List View/ Calendar View and click the Start icon in the toolbar.
- Double-click the release to access the Release Board view and click the Start icon in the toolbar.
The planned start date/time of a Release Plan in status "Draft" can be brought forward (to the current point in time) or delayed as needed. To do so:
- If the Release Plan start date/time lies in the future: start the Release Plan and click Start to confirm the current time as new start date/time
- If the Release Plan start date/time lies in the past: start the Release Plan, select the Update the planned start date option and enter a new start date/time.
The statuses of all Phases and Tasks are reset to the default value when the plan is started. Note that single tasks or phases activated upfront for testing purposes could have changed their status.
Pausing/Restarting a Release Plan
- Open the Release Planner perspective.
- Select the Release Plan you want to pause/restart from the List View/ Calendar View.
- Click the Pause icon in the toolbar.
- In the dialog, specify the reason why the execution of the Release Plan should be paused.
- Click Pause Run.
- Make your changes (e.g. create a new manual task).
- Cancel, resume or reset the Release Plan.
If you pause a Release Plan when the last Task of a Phase is running and the Task ends successfully, the status of the Phase will change to "paused", even though all Tasks of the Phase are in status "completed OK".
Only release plans in execution mode (running or paused) can be stopped.
-
Go to one of the two starting points to stop executions:
- Click the Stop button in the toolbar. The Stop Release Plan dialog is displayed.
- Enter a reason for cancellation.
-
Click Stop Run.
Stopping the Release Plan means the currently executing Task(s) will be:
- aborted (manual Tasks)
- completed with status "OK" or "failed" (all other types of Tasks)
A Release Plan with status "canceled" cannot be resumed (only reset).
Only release plans with status "stopped" can be reset.
-
Go to one of the two starting points to reset executions:
- Click the Reset button in the toolbar. The Reset Release Plan dialog is displayed.
- Click Reset to confirm.
This action will clear the status of all already finished tasks.
Exporting/Importing Release Plans
The definition of a Release Plan can be exported into a single file and re-imported into the same or a different ARA client at a later point in time.
The import/export function can be used to transport/copy Release Plans between different ARA-clients, save Release Plans for later use, create an (external) Release Plan library, transport/copy Release Plans between different versions of ARA, etc...
You can export Release Plans in any state (draft, running, error...). The execution process of a Release Plan with status "running" won't be affected.
To Export a Release Plan
- Open the Release Planner perspective.
- Navigate to the List View.
- Select the Release Plan you want to export.
- Click the Export button in the toolbar.
- Specify a filename and location for the exported file.
Passwords are not exported.
Release Plans are exported in .json format.
To Import a Release Plan
- Open the Release Planner perspective.
- Navigate to the List View.
- Click the Import button in the toolbar or right-click. The Import a Release Plan dialog is displayed.
- Browse to the location where the Release Plan is stored and click
 to import the file.
 - Enter the name, owner, folder and planned start of the Release Plan.
All the elements of an imported Release Plan will be reset (draft mode).
As the file to be imported does not contain any passwords, several tasks (e.g. ARA-Deployment, AE-Workflow and. protected prompt-set fields) may need user input before the plan can be successfully executed.
- Open the Release Planner perspective.
- Navigate to List View/ Calendar View.
- Select a Release Plan.
- Click the Duplicate button in the toolbar. The Duplicate Release Plan dialog is displayed.
- Optionally, enter a new name for the Release Plan. (The default name consists of the original Release Plan name followed by "_COPY"). The Release Plan name must be unique.
- Optionally, enter a different owner/folder/start date.
If a new start date/time is entered, the date/time defined for Tasks/Phases will be updated accordingly.
- Click Duplicate.
User passwords will be deleted unless the user duplicating the Release Plan has administrator rights or is the same user whose credentials are used to execute the workflow (see: Creating Release Tasks).
The status of the duplicated Release Plan, Phases and Tasks is automatically set back to draft.
Note that if you duplicate an archived Release Plan, the archive flag will be removed from the new entity.
Outdated Release Plans can be archived to reduce the number of listed Release Plans and improve system usability.
Only Release Plans with status "Draft", "Completed OK" or "Canceled" can be archived.
To Archive a Release Plan
- Open the Release Planner perspective.
- From the List View/ Calendar View, select the Release Plan you want to archive.
- Click the Archive button in the toolbar.
If an archived plan is started, it will be automatically restored.
See Archiving Entities to know more.
- Select the Release Plan you want to delete from the List View/ Calendar View.
Conditions to delete entities of type Release Plan:
- The Release Plan has never been executed.
Topics:
- Working with Release Phases
- Working with Release Tasks