Defining Queue Objects
The steps for defining a Queue object (QUEUE) are the same as for any other Automic object. This section describes the settings that are specific to only Queue objects. For general information about their purpose see Queue Object (QUEUE).
A Queue object definition is made up of the following pages:
- Standard pages that are always available, no matter what type of object you are defining:
- The object-specific page described here.
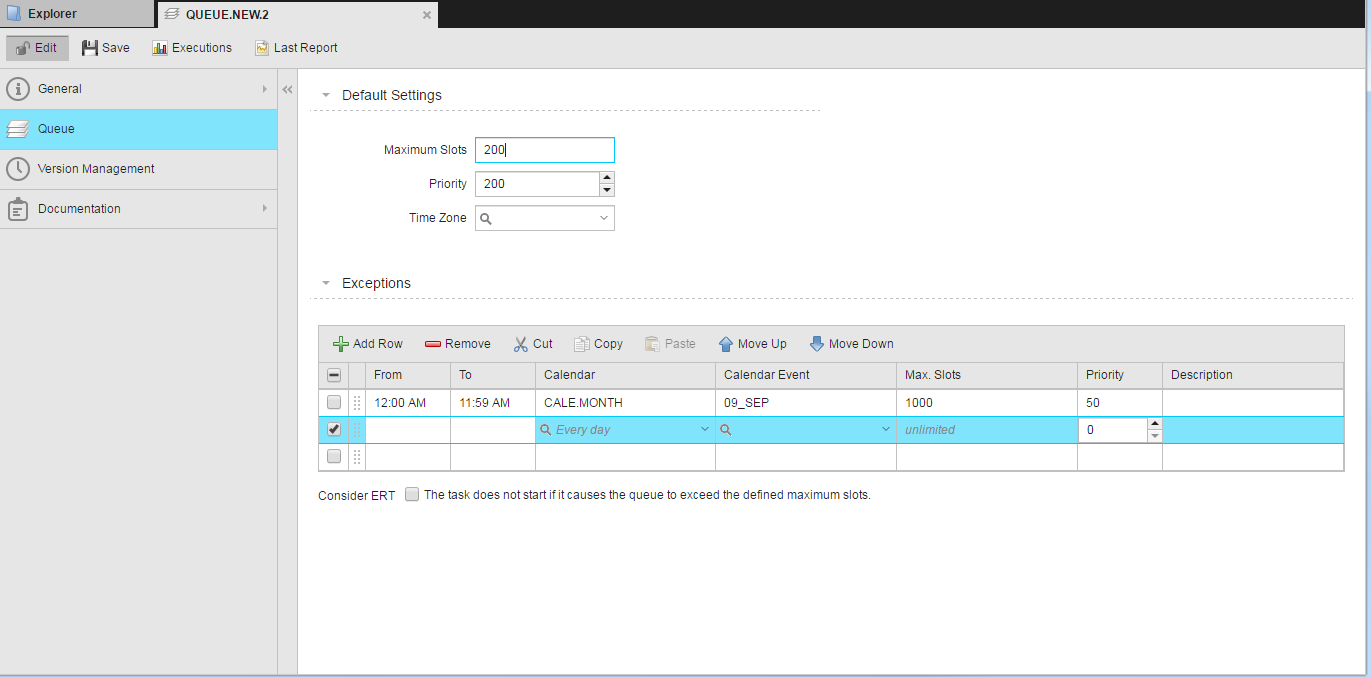
To Define a Queue
-
In the Default Settings section you specify the standard behavior of the Queue:
Field Description Maximum Slots Maximum number of tasks that can run in parallel in this Queue. The default value is unlimited.
You can enter a value between 1 and 100000 here.
When an object starts, the Queue slot is reserved before any other object are checked, such as Sync objects, available resources, maximum number of parallel tasks allowed for a particular objects, agent, etc.
Entering 0 is not allowed here. It can only set via the Queue modification.
Priority Objects are processed based on their priority. Here you specify the priority you assign to this object.
- Allowed values: 0- 255
- Default value: 200
Take into account that the settings in the Exception section might affect the priority of a task and overrule this definition.
The priority defined in the Queue object is checked before the priority define in the task. If two tasks have the same Queue priority, the priority specified in the task will be used.
Time Zone You can assign a Time Zone Object (TZ) to this Queue, which will affect the time calculation. -
In the Exceptions section you can specify periods of time in which the default Queue settings do not apply. You can also define specific parameters for those periods.
- In From/To you specify the period in hours and minutes you do not want the default settings to apply.
- Optionally, select a Calendar to determine the days on which the default settings will not apply.
- Again optionally, select the Calendar Event (if any available) that further restricts the days on which the default settings will not apply.
-
Enter now the settings that should apply instead of the default ones, namely the maximum slots and priority.
You can also add a Description that helps users recognize this description later on. You can enter up to 255 characters.
The order of the exceptions in the table matters! The list is processed from top to bottom, that is, the first applicable exception is selected. You can arrange their order using the arrow up/down buttons.
This is how you work with the table:
To edit a row you must first click its checkbox to activate it. You have then the following options:
Option Description

Inserts a new row at the bottom of the table

Deletes the row 
Removes the entry from the list and pastes it to the clipboard. Click Paste to add it to the bottom of the table. 
Duplicates the entry. Click Paste to add it to the bottom of the table. 
Moves the selected row in the table one position up. 
Moves the selected row in the table one position down. 
Activates all rows in the table. -
To have the system to take the estimated runtime into account for all active tasks in the queue when an object starts, click the Consider ERT checkbox.
This checkbox is only available when a value is entered for in the Maximum Slots field in the queue's Default Settings section and one or more exceptions are added.
Automation Engine recommends activating this checkbox.
Please refer to Considering ERT in Queue Objects for a detailed description and examples of this function.
- Save your changes.
See also: