Working with the Workflow Editor
The Workflow page provides tools to build relationships between tasks and define the logic of workflows. This topic describes the elements of the workflow editor.
This topic provides information on the following:
- Overview
- Workflow Toolbar
- Objects Pane
- Working with the Editor
- Inserting and Deleting Tasks
- Task Boxes
- Task Tooltips
- Connecting and Disconnecting Tasks
- Connecting Distant Tasks in Large Workflows
- Rearranging Tasks
- Copying, Pasting and Replacing Tasks
- Inserting Rows/Columns
- Removing Rows/Columns
- Panning
- Inserting a Workflow in a Workflow
- Mini Map
See also Name, Title and Alias.
Usually, a Workflow has a START and an END node and, between these nodes, any number of executable objects that are linked to each other via connector lines. You can arrange the tasks to be executed simultaneously or sequentially, however, their order in the Workflow is not the only parameter that determines when they will be executed. You can define many additional parameters and properties for each task which influence their execution.
Have a look at Workflow Logic, where you can find a description of the validation checks that take place during the execution of a Workflow; the graphic at the bottom of the topic will help you understand how and when the properties defined for each task affect the order and outcome of the task executions.
Please note that IF workflows are the only ones that do not have a START and END objects.
The marked areas in the illustration below are some of the main elements that you will use when working with the Workflow editor. Click on them to open a description of their functions:
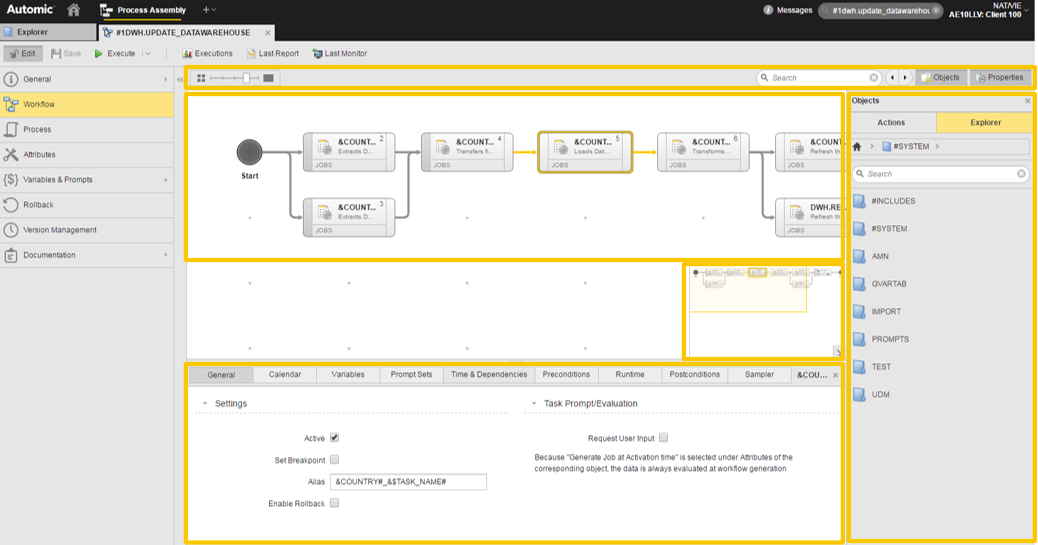 This illustration shows a system in which the Plugin Manager has also been installed. This is why the Objects pane contains an additional Actions tab.

It contains the functions you need to drag and drop tasks into the editor, search for tasks and change the view of the editor.
| Field/Element/Function | Description |
|---|---|
| Level of detail |
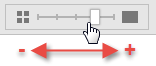
This adjusts the magnification and the level of detail of the view. Zoom in and out of the workflow map by clicking and dragging the slider.
You can also zoom in and out with the mouse wheel. |
| Search |
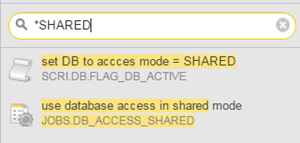
Quick search for objects in the workflow you are defining.
You can enter one of the following here:
If the entered string is available in more than one task, use the left/right arrows to the right of the search field to scroll through them. You can use the following wildcard characters in your search:
|
| Objects |
Click this button to display/hide the Objects Pane on the right hand side of the editor, where you can select objects, drag and drop them into the right place in the workflow editor. |
| Properties |
Select a task and click this button to display/hide the Properties pane on the lower half of the editor, where you modify the settings of the workflow tasks. You can define specific options for each task in a workflow. They apply when the task is executed within the workflow; these settings are not saved with the object itself. Select a task and click the Properties button to display the properties pane on the lower half of the editor. Click the links below for a detailed description on the available options:
Note that the properties are available not only for the tasks in a Workflow but also for the START and END nodes. If you are creating ForEach or IF Workflows you may want to read information on their specifics. Click the links below for details:
|

This pane lists all the executable objects available in the client you are logged into and that can be included in a workflow. You can search for them a follows:
| Element | Description |
|---|---|
| Folder menu bar |
|
| Quick search field |
Enter a search string here to quickly find tasks in the hit list. You can use wildcard characters, * as placeholder for any number of characters and and ? as placeholder for exactly one character. |

If you are working with packs and actions this pane contains an additional tab called Actions from which you can select the predefined tasks you want to include in the workflow. To know more see Working with Actions.
The editor is the space that provides you all the functions you need to build workflows. You insert the tasks here, connect them, modify the task properties, etc.
To Insert Tasks
There are two ways to insert tasks in the Workflow:
Via the Objects Pane
- Click
 on the toolbar to open the Objects pane.
 -
Search for the object you want to insert. You have two possibilities:
-
Using the folder menu bar
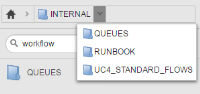
Click the arrow next to the home icon to open a dropdown list that replicates your folder structure in the Process Assembly perspective.
Select a folder; if it has subfolders, a new dropdown list displays them. The objects contained in the subfolder are displayed in the hit list below.
-
Using the quick search field
Enter a search string here to quickly find tasks in the hit list. You can use wildcard characters, * as placeholder for any number of characters and and ? as placeholder for exactly one character.
-
-
Select the object and drag and drop it anywhere on the editor.
Once on the editor, the objects turn into tasks boxes that you can link to each other.
Either way, you can also select multiple objects and drag and drop them in bulk onto the editor
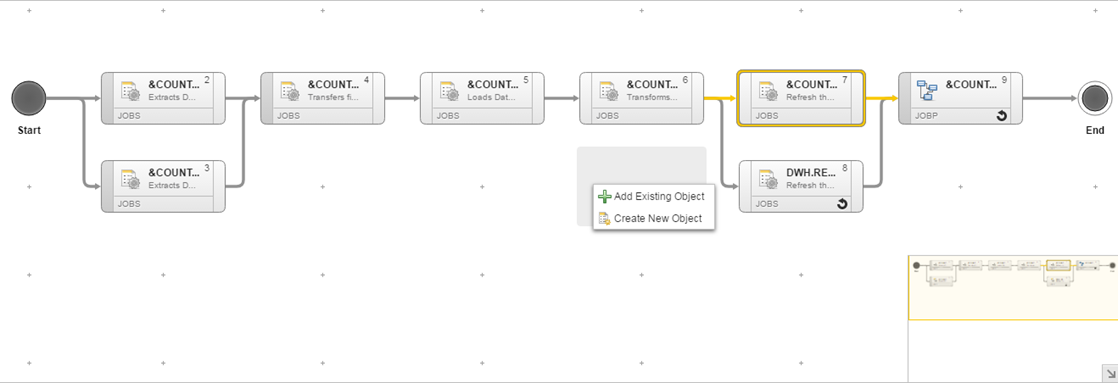
Right-clicking on the Editor
-
Right-click on any empty space on the editor.
The following context menu is displayed:

-
Select Add Existing Object:
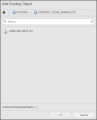
- Click the arrow next to the home icon to open a dropdown list that replicates your folder structure in the Process Assembly perspective.
- Select a folder; if it has subfolders, a new dropdown list displays them.
-
The objects contained in the subfolder are displayed in the hit list below.
Select the one or more objects.
-
Click the Insert as External Dependency checkbox if you want the task to be included as an external task.
For details on the implications of external dependencies in workflows click here.
- Click OK.


After inserting tasks, you must arrange and connect them.
In large Workflows with many tasks, you may need to add rows or columns between already existing tasks to be able to add a new one. For this purpose, see Inserting Rows/Columns.
To Remove Tasks
There are two ways to remove a task from the workflow:
- Select a task and hit the DEL button on your keyboard.
- Right-click the task and select Delete from the context menu.
When the tasks that should be deleted are linked to other tasks, the connecting lines will also be removed.
The objects are only removed from the workflow but not from the client.
The START and END object are always available and cannot be deleted.
Once on the editor, the tasks turn into boxes that you can link to each other. Selected tasks are encircled by a thick line and display start and end arrows; these are the connector points from/to which you can link.
Basic information on the task is displayed on the box:

|
Task box element |
Example |
Meaning |
|---|---|---|
|
1 |
|
Object icon, which is different for each type |
| 2 |

|
Depending on what you have specified in the object definition this can be:
|
| 3 |

|
Either the name or the title of the object. See below for details. |
| 4 |

|
Order of the task in the workflow sequence. |
| 5 |

|
Short name of the object type. |
| 6 |

|
Whether rollback has been enabled for this task or not. |

Hover the mouse pointer over a task to display its tooltip. It provides more detailed information, for example:
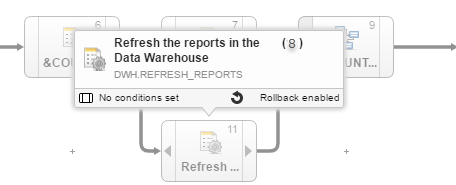
In addition to the information available in the task box, the tooltip indicates whether conditions have been defined for the task and whether rollback has been enabled or not.
Connecting and Disconnecting Tasks
Tasks are linked via connector lines. They establish the dependencies between tasks.
You define the order in which tasks are processed within workflows by linking them. You use the line connectors for this.
- Hover the mouse over the start or the end point of a task.
Arrow symbols are displayed, from which you can start drawing the lines.
- Click and hold the arrow symbol and drag it to the task you want to link.
- Release the mouse button. The two tasks are now linked to each other.
You can only link from a node's ending (to the right of the box) to a task's beginning (to the left of the box) or vice versa. You cannot link a task to itself.
There are two types of special workflows that work slightly different in this respect because their tasks are linked automatically.:
- FOREACH workflows; they represent loops
For details on these workflows see ForEach Tab.
- IF workflows; they represent IF statements
For details on these workflows see Conditions Tab.
As soon as the relationship is established, a number of functions are available that help you fine tune the dependencies between tasks. For example, you can set a condition for the execution of a downstream task depending on the status of the upstream one. See Preconditions, Postconditions, Conditions and Time & Dependencies.
You can delete connector lines (and thus unlink tasks) as follows:
- Select the line and hit the delete button on your keyboard, or
- Select and right-click the line to select Delete from the context menu.
Connecting Distant Tasks in Large Workflows
In case of large Workflows, if you want to connect tasks that are far away from each other, it can be difficult to find the correct target task. Since the size of the task boxes is automatically reduced to display as much as possible of the Workflow structure, you may not have enough information at a glance to be able to establish the connections. On the other hand, the target task may be outside the visible part of the Workflow.
When a Workflow expands beyond its visible part, the context menu that is displayed when right-clicking a task contains an additional option, namely Connect, that helps you find and connect distant tasks. This function is available both for the Workflow editor and for the Workflow monitor.

To Connect Distant Tasks
-
Right-click a task in the Workflow and select Connect Task from the context menu.
- The connect toolbar is displayed at the top of the editor.
-
From Start Task select the task from which you want to start connecting.
This pre populates the field with the selected task; if necessary you can change it by selecting a different task from the dropdown list. Alternatively, start typing the task name, alias or its sequence number within the workflow; the find as you type function automatically restricts the content of the list to those tasks that match your entry.
The focus of the editor/monitor changes to the selected task. This allows you to check that it is actually the task you want to link from. Hover your mouse over the task box to have the tooltip displayed. If you need more information, right-click it and select Properties.
- Select a task or start typing the task name, alias or its sequence number in the End Task dropdown list. Again, the focus of the editor/monitor changes to the selected task.
-
Click the Connect button on the toolbar.
The connecting line is displayed now.
- The Save button is now enabled. Click it to confirm the connection.
- Click Cancel to hide the toolbar.
If you click Cancel before saving, the tasks are not connected and the toolbar is hidden.
Please take the following restrictions into account:
-
External dependencies are not available for selection in either of the dropdown lists.
External dependencies are tasks that are not inserted in the Workflow but that affect its execution, see External Workflow Dependencies)
-
The task you select in the Start Task dropdown list is not available for selection in the End Task one.
This prevents linking a task to itself, which would be an invalid connection.
- The Start node is not available for selection in the End Task list; likewise, the End node is not available for selection in the Start Task list.
- The Connect button is disabled if one of the dropdown lists in empty or if your selection is an invalid combination of tasks.
- In case of sub Workflows (Workflows that are embedded in a parent Workflow), only the tasks that belong to the sub Workflow are available from the dropdown lists.
You can move linked and/or unlinked tasks to another empty position in the workflow using the drag and drop function.
This has no effect on the synchronization whatsoever. It is simply for design purposes; it helps you visualize the workflow logic.
To Rearrange Tasks
- Click on an empty spot in the tasks area.
- Hold down the mouse button.
- Drag and drop it to another spot on the editor.
Copying, Pasting and Replacing Tasks
Once you have created a task with all its properties, you can reuse it in the same workflow or in a different one without having to define it anew. You can copy and paste it or you can replace an existing task with the copied one. All the properties of the copied task are cloned in the pasted/replaced task with only two exceptions, the PromptSets and the Variables. All connections and dependencies remain as well.
The system performs validation checks in the background; if you are trying to copy an invalid object, a message is displayed indicating it so. To be able to continue you must first correct the errors.
There are some exceptions to this function. It is not possible to copy/paste/replace tasks for IF and ForEach workflows as well as for the START and END nodes.
ForEach and IF Workflows are not modifiable at runtime. This is the reason why the  button is always disabled on their monitors.
- Select the task you want to copy.
-
Right-click and select Copy
The task and all its properties, dependencies and connections are copied to the clipboard.
-
If you want to paste it in the same workflow, right-click and select Paste.
If you want to paste it in a different workflow, open it, right-click and select Paste.
- Save your changes
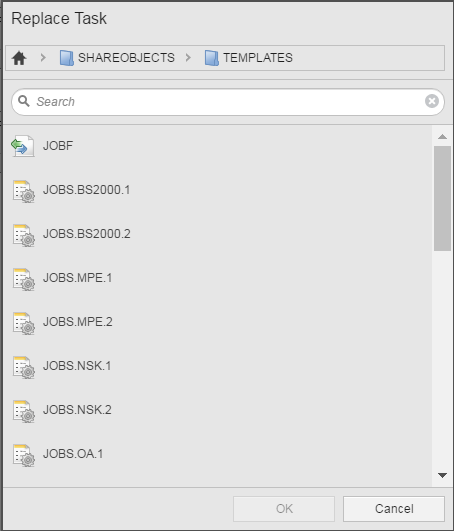
- Select the task you want to replace and right-click to select Replace.
-
The Replace Task dialog is displayed:

-
Search for the task using one of the following options:
-
The folder menu bar
- Click the arrow next to the home icon to open a dropdown list that replicates your folder structure in the Process Assembly perspective.
- Select a folder; if it has subfolders, a new dropdown list displays them.
- The objects contained in the subfolder are displayed in the hit list below.
- The quick search

Enter a string in this field; you can use wildcard characters, * as placeholder for any number of characters and ? as placeholder for exactly one character. The string is searched for in:
- Object names
- Titles
- Agents
- Runtime
- IF and FOREACH condition texts
Special Case: External Dependencies
You can specify external dependencies when designing a Workflow. They are objects that will not be processed with the workflow but that affect its processing, for example because dependencies have been defined that determine that the external task must have a specific status for the workflow to continue processing.
When you replace an object that has been inserted as external dependency, the new task inherits this definition and is automatically inserted as external dependency as well.
For details see External Workflow Dependencies.
-
In large workflows with many tasks, you may need to add columns or rows between already existing tasks to be able to add new ones.
To Insert a Row/Column
- Right-click either a task or any empty space on the editor and select Rows/Columns from the context-menu.
- Select Insert Row Above/Insert Column Left.
- Existing columns/rows and their contents shift
You can only remove columns or rows if they do not contain any tasks.
Right-click the row you want to remove; if it is empty, the Remove Row option is available. The same applies if you want to remove columns.
You can move the editor in two dimensions, which is useful if you have large, complex workflows. There are two ways to pan:
- Click anywhere on the editor and drag the view.
- Press space and the arrows on your keyboard to move up/down/right/left to move the view.
Inserting a Workflow in a Workflow
From the editor you can create a workflow from scratch that is embedded in the existing one.
To Insert a Workflow within a Workflow
-
Right-click on any empty space on the editor.
The following context menu is displayed:
- Select Create new object
-
The Add Object dialog is displayed

- Select the Workflow Type.
- Enter a Title that helps you identify the workflow later on.
-
Click the Name button to make this field editable and enter the name of the new workflow.
- Optionally, click the Folder button to make this field editable and specify a different path. By default, the paths of the parent workflow is displayed.
-
Click OK.
- Save your changes.

Large workflows spread over the visible part of the Workflow editor. A mini map at the bottom right corner of the editor helps you orientating within them.
The mini map serves as indicator of where the current screen lies within the Workflow. It provides a minimized view of the entire Workflow and highlights the section that is currently visible.
If you click anywhere on the editor/monitor to drag the view and, therefore, you change the focus in the workflow, the mini map changes its position simultaneously. Conversely, if you click and drag the mini map, the editor/monitor changes its focus accordingly.
Furthermore, if you select a task in the workflow, the task is also selected in the mini map.
The mini map is visible by default when you open a Workflow, either in the Workflow Editor (Process Assembly perspective) or in the Workflow Monitor (Process Monitoring perspective), no matter if it is in edit mode or not. You can toggle it off by clicking the  button. You can have it displayed again by clicking the
  button.