Activating Schedule Objects
After you have created a Schedule object, you must activate it manually. From then on, the tasks included in it are processed according to the settings you have defined. This topic describes the Schedule execution logic and what happens to its tasks when they are executed. It also indicates what are the processing options for each state.
This page includes the following:
To activate a Schedule object, after defining it you must execute it manually for the first time. Its status is Active from that moment on. Its tasks are executed automatically according to the start and start offset times and in combination with the period duration and turnaround time.
To Activate the Schedule
You have the following options:
- On the Explorer list, right-click the Schedule and select Execute > Execute. Alternatively click the Execute button on the toolbar.
- On the Schedule object definition pages, click the Execute button on the toolbar.
After you have activated the Schedule, you can follow the execution of its tasks in the Schedule monitor. For more information, see Monitoring Schedules.
You can also see the Schedule and its tasks on the Tasks list in the Process Monitoring perspective. For more information, see The Task List.
What Happens when the Tasks Are Activated?
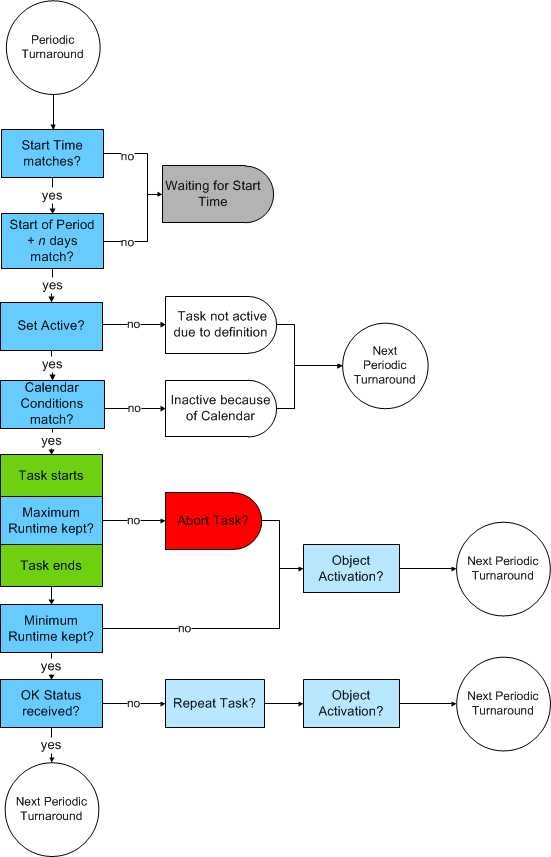
When the start time of a task arrives, the Schedule object performs several checks. These checks determine when it should be executed and whether follow-up objects must be executed depending on its end status. This list describes the possible scenarios:
-
Are there dependencies between the Schedule period and the task start time?
-
Yes
-
Scenario 1: The task start time is before the Schedule period turnaround time.
Task status: ENDED_TIMEOUT - Start time exceeded
The task is not started. The system tries to start it again when the current period turnaround has elapsed and the new period starts.
-
Scenario 2: The task start time is later than the schedule period turnaround time.
Task status: WAITING - Waiting for start time
The task is not started. It is executed when its start time arrives.
-
-
No
Task status: WAITING - Waiting for start time
Next checks are performed.
-
-
Are there calendar conditions to be considered?
-
Yes
Calendar settings are applied and, if necessary, the task is not executed.
-
No
Task status: WAITING - Waiting for start time
Next checks are performed.
-
-
Are Sync objects assigned to the Schedule?
-
Yes
The conditions are evaluated and, if necessary, the task is not executed.
-
No
The task is executed.
-
-
Are follow-up tasks assigned to the task?
-
Yes
-
Scenario 1: Follow-up tasks are started and processing ends. The task has the OK status as specified in the task properties.
-
Scenario 2: The task does not have the OK status that is specified in its properties.
The system reacts automatically and either starts the task again or executes a different one, according to its property definitions.
-
-
No
The process starts again with the next period turnaround.
-
The following graphic depicts how the system checks scheduled tasks:
Special Case: A Task Is Still Running After the Period Turnaround
Schedules trigger the execution of tasks once a day according to the conditions that you have defined. With each period turnaround, the Schedule starts anew and both the Schedule and its tasks get a new RunID.
You have probably defined the task start times in a way that they do not collide with period turnarounds. However, if that happens, this is how the tasks and the Schedule behave:
- The task continues its execution. The instance of the Schedule that started the task has no longer control over it.
- The instance of the Schedule that started the task ends as usual. The tasks in the Schedule start again with the next period turnaround.
- If you set the flat list view in the list of Tasks in the Process Monitoring perspective, you can only see the task that is still executing. The reason is that the Schedule task (and therefore its children) is no longer available in the Tasks list.
- You can still access the Schedule that started the task. For this purpose, right-click it and select Activator Executions.
-
With a period turnaround, a new Schedule monitor instance is created. The monitor of the previous instance is frozen. If a task is still Active, its status is not be updated once it ends.
See also: