Generating at Activation or at Runtime
Executable objects go through four execution stages, the second one being the generation stage. During this stage, various steps happen in a specific sequence that prepare the task for the execution. One of those steps is the generation of the script (if available).
When you configure an object, you must decide the exact moment during the generation stage in which the script will be generated. You do this on the Attributes page by setting the following parameter:
-
Generate Task at: Activation time
The script is generated at the beginning of the generation stage
-
Generate Task at: Runtime
The script is generated later in the generation stage
It is important to understand the sequence in which the generation steps happen, and the impact of this setting particularly if you use script elements to enhance the logic of your Jobs.
This graphic illustrates the order in which the most important generation steps occur and the difference that this setting makes:
- Activation
- Generation
- Processing
- Completion
During these stages, different things happen in a specific, fix sequence: RunIDs are assigned, then Agents are assigned, then PromptSets are called, then variables are resolved, and so on. As a developer and object designer, to ensure that you configure your executable objects correctly, you must be aware of what happens during each stage.
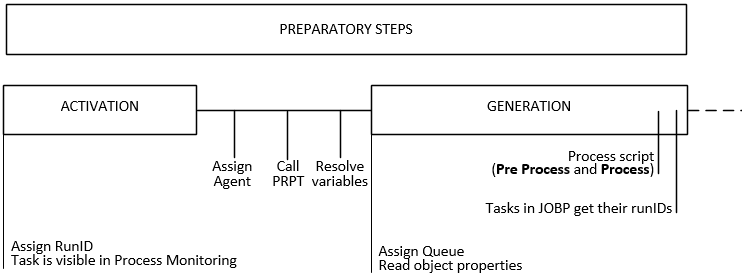
The first two stages of object execution are Activation and Generation. These stages prepare the object for execution. During the activation stage, not many things happen; the task gets its runID and it is visible in the Process Monitoring perspective. Immediately after the activation and before the generation stage some optional steps take place. When the generation stage ends, all preparatory steps are also done and the task starts running on the destination computer.
This list explains the order in which the various processing steps take place during the activation and the generation stages:
- Activation starts.
- The object gets a runID.
- The task is available and visible in the Process Monitoring perspective.
- The activation stage ends.
-
If the object runs in an Agent Group, the Agent is assigned.
Exception: If you assign the Agent using the :PUT_ATT statement in a script, the Agent is allocated/overwritten later during generation, when the script is processed.
- PromptSets are called.
- Variables are resolved.
- Generation starts.
- The Queue is assigned.
- Object properties are read.
-
The scripts on the Pre Process and Process pages are processed.
Note: :READ statements are processed now.
- If the object is a Workflow, all its tasks are also activated and they get their runIDs.
- The generation stage ends.
This graphic illustrates the order of the most important processing steps during activation and generation:
When you configure an executable object, you define when the object should be generated on its Attributes page. The options are Generate Task at: Activation Time (immediately after the activation stage ends) or Generate Task at: Runtime (immediately before processing starts).
In stand alone objects, that is, objects that are executed NOT within a parent object, such as a Workflow or a Schedule, this setting does not make much of a different. However, this setting can make a big difference for tasks in Workflows.
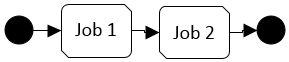
To explain the difference between both options, we will use a Workflow with two Jobs. The Workflow looks like this:
Generate at Activation Time
If you select this option, each Job object is generated earlier in the Workflow execution process, immediately after its activation phase has ended.
This graphic illustrates what happens:
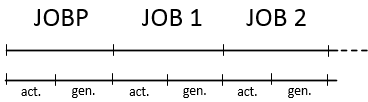
This list describes what happens:
- The Workflow is activated.
- The Workflow is generated.
- The first Job is activated.
- The first Job is generated.
- The second Job is activated.
- The second Job is generated.
- The Workflow is processed.
- The first Job is processed.
- The first Job is completed.
- The second Job is processed.
- The second Job is completed
- The Workflow is completed.
When Should You Select this Option?
You have a very long Workflow that requires a long time for the preparation steps (activation and generation) and you need it to start at a specific time (you have defined a start time). and If you want a Workflow to start at a specific time. Select this option and define a start time, for example, 30 minutes before the actual time you want the Workflow to start. This leaves 30 minutes for the preparatory steps.
Generate at Runtime
This is the option that you will probably want to apply in most cases. When you select Generate Task at: Runtime, the object is generated later in the execution process, immediately before the processing stage starts.
This graphic illustrates what happens:

This list describes what happens:
- The Workflow is activated.
- Job 1 is activated.
- Job 2 is activated.
- The Workflow is generated.
- The Workflow is processed.
- Job 1 is generated.
- Job 1 is processed
- Job 1 is completed
- Job 2 is generated.
- Job 2 is processed
- Job 2 is completed.
- The Workflow is completed.
In case of Workflows with many tasks, there can be an important time difference between the Workflow activation and the generation of its last task, for example.
When Should You Select this Option?
Since tasks are generated at a later stage in the process, all the data that the script in a task might need is already available.
Example: A task in a Workflow can be generated only if some files are available in your system. Those files are the result of a previous task in the Workflow (a File Transfer). With the Generate Task at: Runtime option you can be sure that the files are already available when the task needs them.
See also: