Node Details
This section describes the node characteristics, but depending on the selected node (Management server, Dollar Universe...), the sections and actions may differ.
Certain fields are not modifiable depending on the action selected. Do not forget to click Save to save your Node definition.
General
-
Type
Click the arrow  and select the type from the list:
-
Dollar Universe: To access Dollar Universe Application Server V5. A Dollar Universe V6 Node cannot be manually added but must be declared during installation.
-
External Management Server: Select this type of UVMS to declare an existing UVMS in order to, for example, manage administration, exchange packages… Communication is not possible between DUAS V6 nodes and different UVMS.
After the user registers the external UVMS node definition, a window is displayed in order to enter the administrator and password of the external UVMS. The connection to the new UVMS is tested immediately.
-
Subordinate Management Server: Select this type of UVMS to declare an existing UVMS and its associated DUAS V6 nodes. The action of declaring a subordinate UVMS, defines the UVMS on which UVC is connected as master UVMS.
After the user registers the node definition, a window is displayed in order to enter the administrator and password of the subordinate. The connection to the new UVMS is immediately tested.
It is possible to define only one level of master UVMS / subordinate UVMS. All attempts to declare a subordinate UVMS on a subordinate UVMS will fail.
Once the subordinate UVMS is linked to the master UVMS, the local subordinate UVMS security is overwritten by the master UVMS. Refer to the Univiewer Administration Guide, in the Advanced Architecture section for more details.
-
Reporter: To declare a Reporter Server.
-
Publisher: To declare a Publisher Server.
-
UniJob: Display mode only. A UniJob Node cannot be manually added but must be declared during installation.
-
SAP Manager: To access the SAP Manager Node (DUAS V5).
-
EJB Manager: To access the Java / EJB Manager Node (DUAS V5).
-
Oracle Applications Manager: To access the Oracle Applications Manager Node (DUAS V5).
-
Company
This field is only displayed if you have selected a Dollar Universe Node type or a Manager. Enter the Dollar Universe Company name (6 uppercase characters exactly) for that Node. If you want to monitor more than one Company on the same Node, you must declare the same Node for each Company.
-
Label
Enter the Node description.
-
Area
Only available for Managers.
-
Node
Enter either the UniJob Node name or the DUAS Node name depending on the type.
-
Host name
Enter the physical Node name.
The host name of a Dollar Universe v6 node can not be changed via UVC. The command unims -update must be used. It is described in the Dollar Universe Installation Guide.
-
SSL
Only for External or Subordinate Management Server node types, check this box if the communication between master UVMS and external / subordinate UVMS uses SSL. In this case, specify the port number used by SSL in the section “Network Configuration”.
-
Sharing nodes
Only for a subordinate Management Server node type, check the box to share the Dollar Universe V6 nodes linked to the subordinate with the other subordinate UVMS. Dollar Universe V5 and Managers V5 nodes are shared with the master UVMS only. UniJob, Reporter and Publisher nodes are not shared. Refer to the Univiewer Administration Guide, in the Advanced Architecture section for more details.
The following information is only displayed if the document is opened in Display mode.
-
Status
Node status, shows the information in the Status column of the node list.
-
Information
Displays the version of Dollar Universe installed on this node. This can be supplemented by an information message, for example to indicate that the license will expire soon.
Network Configuration
This list displays the TCP port numbers used by the Node in question to communicate with the UVMS or with a Dollar Universe console.
Port definitions should always be adjusted and loaded on the UniJob Node before any changes are made to the UVMS, otherwise communications will be impossible. UniJob port numbers can be displayed via the Node Settings - UVMS - Network Parameters option. However a direct connection to the UniJob Node will be required to adjust the contents of the values.xml file where the port number sequences are stored.
Great care should be taken when updating these values.
-
Dollar Universe v5 Node: five port numbers are displayed for each Area:
- IO: IO server
- BVS: Business Views server
- CDJ: Display server
- DQM: Batch queue manager
- CMD: Command server (not used since DUAS v5.1)
The IO and CDJ server port numbers are mandatory.
Make sure the port values correspond exactly to those declared in the system’s TCP/IP services file. In the majority of cases the CMD server will not be used, consequently no default value is proposed. The port number should be entered only for Dollar Universe Application Servers where the CMD server is effectively used.
-
Dollar Universe V6 Node: the following port numbers are available for each Area:
- IO: I/O server
- BVS: Business Views server
- CDJ: Display server
- DQM: Batch Queue Manager
- EEP: External Event Processor
- GSI: Generic Server for Integration (currently used by Manager for SQL server)
- SAP: Manager for SAP Solutions
- OAPP: Manager for Oracle Applications
- JEE: Manager for Java/EJB
-
Manager: a single port is available, corresponding to the Manager’s main server.
-
UniJob Node: three port numbers are displayed:
- IO: IO server
- CDJ: Display server
- CAL: Calculator
If default values were used during the UniJob installation, "not available" is displayed. This is normal.
To modify a value:
- Click on the Update button.
- Double click on the value to change.
- Enter the new value.
- Type Enter.
For a Dollar Universe V5 node, to update all the defined ports or to add new areas:
- Click Quick port definition.
- Enter the lower value of the port definition. This value must be smaller than 65520.
- Click OK. This procedure automatically calculates all the Dollar Universe ports numbers from the value provided (VAL). Ports of all Areas are recalculated, not only the selected line. The rule of the following table is applied:
|
Area
|
IO
|
BVS
|
CDJ
|
DQM
|
CMD / EEP
|
GSI
|
|
A
|
VAL+3
|
VAL+8
|
VAL+14
|
|
|
|
|
I
|
VAL+2
|
VAL+7
|
VAL+13
|
|
|
|
|
S
|
VAL+1
|
VAL+6
|
VAL+12
|
|
|
|
|
X
|
VAL
|
VAL+5
|
VAL+11
|
VAL+15
|
VAL+4
|
VAL+17
|
Note that, by default, CMD port values are left empty unless a value had previously been set, in which case the value would be =VAL+4 for A, I, S and X.
Save the values.
Service Configuration
For a given Dollar Universe V6 Node, a number of services are displayed: One for each Area and one per Manager. For each service, the matching status is displayed.
- Activated: The service is enabled. It can be deactivate: It would then no longer be available to the user.
- Available: The service is installed, but not started. It can be activated: It will then be available to the user.
- Not installed: The service was not installed (applies to Managers only). It cannot be enabled.
Depending on the selected node and its status, the following actions can be used Company areas can not be activated / deactivated via UVC. The command unims -update must be used. It is described in the Dollar Universe Installation Guide):
-
Activate
Select a service with status Available and click Activate to enable it.
-
Deactivate
Select a service with status Activated and click Deactivate to make it Available.
-
Server Engine List
Select a service with status Activated for an Area (Application, Integration, Simulation or Production) to show the Engines and their status for an Area. The Production Area shows all Engines.
-
Manager Settings
Select a Manager with status Activated to show the settings for that manager.
Tags
This list displays the tags attached to the selected Node.
-
Add Tags
You can set an existing tag or add a new tag to the selected node.
-
Existing Tag: Click the arrow to select a tag already in the list. This list contains all Tags used for the Nodes in this UVMS.
-
New Tag: Enter a new tag name. This name is a free string that can contain any characters except: white spaces, commas or semi-colons, quotes, percentage signs.
-
Remove Tags
Select a tag and click Remove. A confirmation is required. The tag is removed from this node but is still available for the other nodes.
Address
This section can only be modified on the connected UVMS. It contains the list of machine addresses declared in the cluster. The addresses can be either IP or hostname type.
The list is updated automatically by the installation or the uninstallation of a secondary node in a failover architecture but the user can also modify it manually. If the user manages database replication (external), he can also declare a failover UVMS by adding its hostname or IP address in this section.
To add a new address click on Add. To modify an existing address, select the address in the list and click on Update. In the displayed window:
The order of the list determines the order based on which of the machines will be contacted by the client application if there is no response from the connected UVMS. Place the main UVMS machine at the top of the list; use the menus Move up and Move down to modify the order of the list.
Delete the machines UVMS is no longer installed on in fail-over mode. This lessens the reconnection time of the client application. The UVC reconnection time is modifiable with the node setting UVMS_UVC_RECONNECTION_TIMER.
Save the node modifications.
Only one declared UVMS can be started at any time.
SSL
Refer to Univiewer Administration Guide for more details on SSL usage.
-
SSL Status
Shows whether SSL is enabled. Enabling SSL on a Node is done in Node Settings > UVMS - Optional Services.
-
Validity Date
If SSL is enabled, shows the certificate’s validity date.
-
Certificate Authority Details
Click to display the certificate’s details.
Authentication Key Management
This section applies to a Dollar Universe V6 node.
Authentication keys are part of the triggers mechanism and allow for external systems to authenticate the current user to Dollar Universe in order to submit events. The keys are generated by Dollar Universe and expire if they are not used for a specified period of time (24 hours by default). This value can be modified in the Dollar Universe node setting O_AUTH_CACHE_SESSIONID_TIMEOUT. When a user submits an http request using a key for user authentication, a trace is added to the Dollar Universe log file to indicate how many users are currently logged in.
-
Invalidate all authentication keys
This action is available in the API Authentication Key Management section. It invalidates the authentication keys for users on external systems. After this action is selected, if an event is submitted to Dollar Universe from an external system, the user will receive an error message. The event will never reach Dollar Universe.
The user will need to replace the authentication key with a newly generated one and resubmit the event.
The triggers mechanism is detailed in the Dollar Universe Reference Guide.
Synchronization - Full Synchronization
This action applies to a Dollar Universe V6 node.
A Dollar Universe V6 node can be synchronized with UVMS automatically or manually, a subordinate UVMS node can be synchronized with a master UVMS automatically or manually:
-
Automatic: In a classic architecture, UVMS updates the Dollar Universe V6 node data incrementally. In a UVMS master / UVMS subordinates architecture, the master UVMS updates the UVMS subordinate data incrementally.
-
Manual: The user can request synchronization through Univiewer Console by selecting either the Synchronization or Full Synchronization buttons:
If the selected node is a DUAS V6 node, UVC sends a request to DUAS, and DUAS sends a synchronization request to UVMS.
If the selected node is a subordinate UVMS node, UVC sends a request to the master UVMS, so that it performs synchronization on the selected subordinate UVMS.
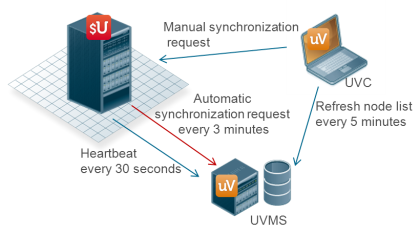
Figure 7: Synchronization Workflow between DUAS and UVMS
At each heartbeat, UVMS verifies if a node (DUAS or subordinate UVMS) needs a synchronization based on the cycles defined in the node settings (automatic synchronization) or on manual requests. The synchronizations are performed in sequence; a manual synchronization request is therefore not taken into account immediately but will be processed as soon as possible.
The synchronization process that takes place between Dollar Universe and UVMS or between subordinate UVMS and master UVMS allows for updating of the following data: Node list, security settings, alerting rules and UVMS nodes list.
The Synchronization or Full Synchronization buttons are accessible from the node list, in display mode only.
-
To synchronize a Dollar Universe V6 node, select it in the node list and click Display.
-
To synchronize a subordinate UVMS node (in a master UVMS / subordinate UVMS architecture), connect UVC on master UVMS, select the subordinate UVMS from the node list and then click on Display.
The response to a synchronization query contains all data that has been modified, created or deleted that applies to the node.
-
Synchronization
UVC sends a request to DUAS or to the master UVMS to trigger a standard synchronization query. A standard query requests only node data that was modified, created or deleted after the most recent synchronization.
-
Full synchronization
UVC sends a request to DUAS or to the master UVMS to trigger a full synchronization query. A full query requests all node data to be synchronized. This type of query request takes a longer period of time to complete than a standard synchronization request.
A full synchronization is requested if the user activates an area in a Dollar Universe node with the command unims –update.
Once the synchronization request has been sent, a pop-up window appears to notify the user their request has been sent.
If advanced architecture is implemented (master UVMS/ subordinate UVMS), when a new DUAS V6 node is installed, it is automatically created in the list of subordinate nodes. This new node also appears in the node list of the master UVMS after the next synchronization. The master UVMS then synchronizes the required security to this DUAS V6 node. A latency period can occur between the V6 node declaration and the first user connection.
If UVMS is installed with the machine’s short name or if the connection between Dollar Universe V6 and UVMS uses the IP address only, connection issues may occur during the first synchronization between UVMS and Dollar Universe V6 (after Dollar Universe V6 installation). In which case the administrator must specify the UVMS IP address in etc/hosts and restart UVMS.
Only IP v4 is currently supported