Creating Dashboards and Adding Widgets
This topic describes how to create and configure a Dashboard and insert Widgets.
You first create a Dashboard and then add the Widgets you need. You can configure the necessary settings right at the beginning or change them later on.
There are different types of Widgets; some of their properties are common to all, but others are type-specific.
To Create a Dashboard
- Click the
 button to open the Home Dashboards view if you are not already there.
 -
Click the
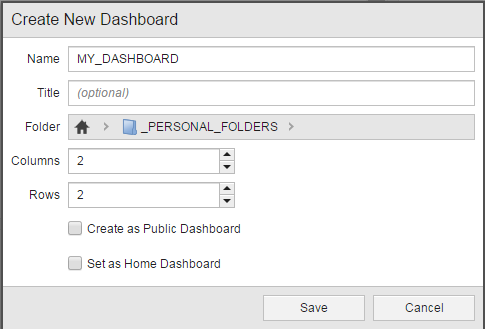
 button. The Create New Dashboard dialog is displayed:
Define the following:
Field Description Name
The internal name of the Dashboard. This must be unique in your client.
Folder
The folder to which the Dashboard will be internally assigned. You organization's default location for Dashboards will be suggested.
Columns*
The number of columns for the dashboard grid.
This will be the maximum number of widgets that you can include in one row.
Rows*
The number of rows for the Dashboard grid.
Create as Public Dashboard *
Activate this if you want this Dashboard to be available to all users. The Dashboard will be added to the list of Public Dashboards in the navigation pane.
Leave it deactivated if you want it to be a private Dashboard for your use only. The Dashboard will be added to the list of My Dashboards in the navigation pane.
Set as Home Dashboard *
Activate this if you want to use this Dashboard as your Home Dashboard. This applies only to your setup. If this is a public Dashboard, then other users will be able to use it but it will not be their home Dashboard.
* You can change these specifications at any time later, unless a public Dashboard is made private by another user.
The main page is divided in as many calls as you have just specified (columns/rows). Mouse over it; the cells are displayed in a darker shade of gray and provide a link to the Add Widget dialog.
To Add Widgets to the Dashboard
- Start adding widgets to your Dashboard clicking the Add Widget button either on the toolbar or on the Widget cell.
-
The Add Widget dialog is displayed. For example:
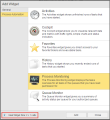
The left pane provides the list of widget categories you have access to. Select a category to display the available Widgets and click on the one you need to insert it.
Notice the information on the bottom left corner of this dialog. It suggests the optimum size of the Widget. In the screenshot above, the Process Monitoring widget is selected; this is quite a complex table with multiple columns containing important information, so the suggested size is 2 cells in a row.
- Select the Widget you want to add to the Dashboard.
- Click Add.

Depending on the type of Widget that you are adding, you may have to configure it from scratch or change the standard configuration.
See also: