Working with Dashboards
The Navigation pane displays the list of existing dashboards and provides basic functions to work with them.
This topic provides information on the following:
- Opening Dashboards
- Setting the Home Dashboard
- Making Dashboards Private/Public
- Duplicating Dashboards
- Deleting Dashboards
- Sharing the Content of a Dashboard
Opening Dashboards/Opening Dashboards in a New Tab
- Right-click a Dashboard in the Navigation pane to open the context menu.
- Select one of the following:
- Open
Open in new tab. This opens the selected dashboard in a separate browser window.
- Right-click a Dashboard in the Navigator pane to open the context menu.
-
Select Set as Home Dashboard.
This makes the selected Dashboard to your Home Dashboard, which you can open by clicking the
 button on the menu bar.
Moving to My Dashboards/Moving to Public Dashboards
When you first create a Dashboard, you specify whether it should be private or public. You can change this definition later as follows:
To Make a Public Dashboard Private
- Right-click a Dashboard in the Public Dashboards tab to open the context menu.
-
Select Move to My Dashboards.
The Dashboards is now available in the My Dashboards tab and only you can see and work with it.
To Make a Private Dashboard Public
- Right-click a Dashboard in the My Dashboards tab to open the context menu.
-
Select Move to Public Dashboards.
The Dashboard is now available in the Public Dashboards tab. All users can see and work with it.
You can easily make a copy of the current Dashboard to use it as a base for a new one with different settings and Widgets.
To Duplicate a Dashboard
- Right-click a Dashboard in the Navigator pane to open the context menu.
- Select Duplicate.
-
The Duplicate dialog is displayed:
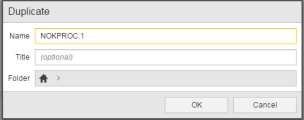
-
The system suggests the name of the original dashboard adding it a number. Change it if necessary.
If you do not specify a title, the name will be displayed on the navigation pane.
- Optionally, in Title enter an alternative name for the dashboard. If you do so, the title and not the name is displayed on the navigation pane.
- Select the Folder where you want to store the dashboard.
- Click OK.
This permanently deletes the dashboard. If this is a public dashboard, it will be removed from everyone's list.
To Delete a Dashboard
- Right-click a dashboard in the Navigation pane to open the context menu.
- Select Delete.
Sharing the Content of a Dashboard
It is possible to share the content of a widget . Since this function does not require login, it can be used to share it with people without access to the Automic Web Interface.
To Share the Content of a Dashboard
-
Click the Share button in the toolbar. The Share "dashboard name" dialog is displayed:
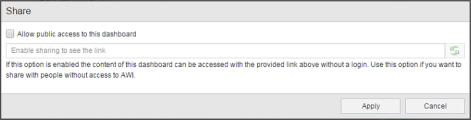
- Select the Allow public access to this dashboard checkbox. A link to the current dashboard is created, which can be manually added to any form of written communication e.g.: email, documents, SharePoint, wiki, etc...
- Click Apply to save your changes.

You can disable a link (you may want to do this if, for example, if you sent a link to the wrong recipient) and create a new one by clicking  .
.
If you update a widget in a dashboard after sharing the link, its content will not be available for public access.
Selecting the Data Source of a Dashboard
This allows you to reload the data used in all Widgets in the current Dashboard.
To Select the Data Source of a Dashboard
-
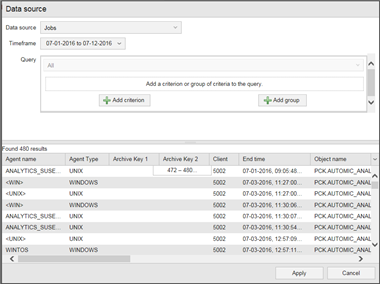
Click the Data source button in the toolbar. The Data source dialog is displayed:
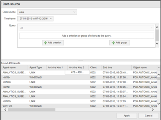
-
From the Data source dropdown list select the type of data you want to load: Jobs, Workflows, Application Deployments, Service Fulfillments and Release Planner Tasks.
Workflows and Application Deployments will be only available if the ARA plugin is installed.
- Select the Timeframe. You can select a time range, a certain number of days or a period of time (day, week, month, year).
-
Optionally, add a criterion or a group of criteria to the query in order to filter down the data to be loaded.
You can filter by attribute, logical operators or by a numeric value.
If no criterion is selected, all existing values in the selected time frame will be loaded.
- Click Apply to reload the data source according to the options selected.
See also: