Working with Actions
As an Application Developer, you use the Action Builder plug-in to create new Actions (sets of objects) for common operations to be used in Workflows.
Watch this introductory video to get a quick overview of the Action Builder:
Important! The actions that you can perform depend on your folder permissions. See: Assigning Release Automation Permissions.
This page includes the following:
About Actions & Action Packs
What are Actions?
Actions are pre-defined tasks for executing single operations as part of the Workflow. They simplify constructing Workflows by providing reusable, ready-to-use and tested building blocks for frequently needed operations.
Actions cover different areas of critical data center operations and help you to automate simple and complex tasks, such as checking file system operations or permission on Windows, UNIX and Linux or creating web-sites, web applications and application pools for various platforms like IIS, JBoss, Tomcat or Websphere.
Because Actions are parametrized with prompts for input values, they can be applied in a variety of workflows.
Structure of Actions
An Action consists of all of the following:
- A workflow
- At least one prompt-set for input parameters
- A set of sub-tasks for the actual execution
Furthermore, most Actions specify a rollback task that will be executed if the workflow containing the Action fails.
Note: Actions are stored in the Automation Engine. Although they could be built in the Automation Engine directly, you would need to create many objects manually. The Action Builder provides means to create a skeleton for new Actions in a comfortable, integrated user interface.
Action Folder Structure
Within the Action Pack SOURCE folder, a folder for the Action is created and beneath that several sub-folders containing objects referenced by the Action:
-
<ACTION_NAME>
The main workflow object for the Action. Its name will be the name of the Action.
-
INTERNAL
Folder containing internal objects used by the Action.
-
INCLUDES
Contains objects used by the Action workflow, backup or rollback workflow.
-
JOBS
Contains job objects. For CLI Actions 2 JOBS objects are created – 1 Windows job and 1 Unix job. For REST and Composite Actions, no job objects are created.
PCK.PACKNAME.PRV.JOB.actionname@agenttypeWhere agenttype is WINDOWS | UNIX | GENERIC | RA
-
PROMPTSETS
Promptset objects used by the Action workflow.
-
ROLLBACK
Workflows used to provide custom backup and rollback.
-
VARIABLES
Variable objects used by the Action, typically lookup values for prompt set radio, checkbox and combobox items.
What are Action Packs?
Action Packs are outbound integrations with third-party products such as Amazon S3, Docker and Tomcat for automation purposes. They group actions that are related to each other (for example, Windows File System Actions)
For example, the Tomcat Action Pack (which is available at https://marketplace.automic.com/) lets you automate application deployments to a Tomcat application server. The Tomcat Action Pack contains the following actions:
- Create/Drop Datasource
- Start/Stop/Resume Server
- Create Snapshot
- Start/Stop Application
- Deploy/Undeploy Application
- List Applications
- List JNDI Resources
Creating CLI Actions
Watch the video:
Important! The following components have to be installed on the client before creating CLI Actions:
- PCK.ITPA_SHARED
To Create CLI Actions
- Navigate to the Process Assembly perspective and click the Packs tab.
- Click the Pack where you want to create the Action or create a new one. (For more information see the Creating Packs section).
- Click Add Action. The Add Action window is displayed.
- Select the CLI Action type (Command Line).
- Enter a Title for the Action. The Name for the Action is suggested automatically.
- Enter a new Category for the Action or select an existing one from the drop-down list. Categories are used to group and easily find the Actions and are displayed on the Actions tab.
- Click Next to confirm the creation of the Action.
- Re-validate your input and click Add to create the Action.
Notes:
- You can view all objects of the Action by right-clicking it and selecting Jump to source.
- It is good practice to provide information to others in the Documentation tab of the Action workflow to help identify your content.
- Learn more on how to configure a CLI Action by reading the following use case: Creating your First CLI Action
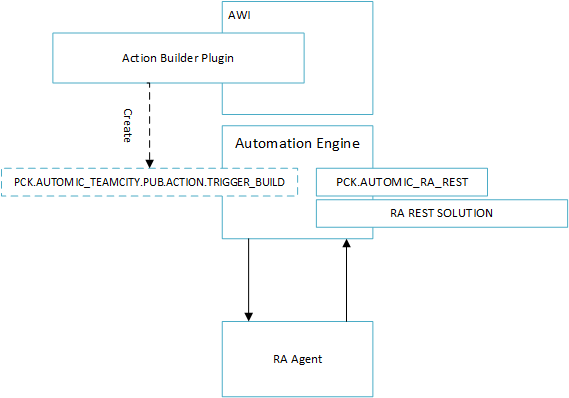
Creating REST Actions
REST Actions can be created, for example, to trigger a TeamCity build via CDA REST API. For more information about the CDA REST API see CDA REST API - General Info.
Watch the video:
Important! The following components have to be installed on the client before creating REST Actions:
- PCK.AUTOMIC_RA_REST
- RA-Solution WEBSERVICEREST
- PCK.ITPA_SHARED
Note: These components are available from https://marketplace.automic.com/.
To Create REST Actions
- Navigate to the Process Assembly perspective and click the Packs tab.
- Click the Action Pack where you want to create the Action or create a new one. (For more information see the Creating Packs section)
- Click Add Action. The Add Action window is displayed.
- Select the REST Action type (REST).
- Enter a Title for the Action. The Name for the Action is suggested automatically.
- Enter a new Category for the Action or select an existing one from the drop-down list. Categories are used to group and easily find the Actions and are displayed on the Actions tab.
- Click Next. The Add Action dialog is displayed.
- Select the Authentication type for the endpoint. None is selected by default.
Note: The following authentication methods are available: None, Basic, Digest, NTLM, Oauth 1.0a, Oauth 2.0, AWS Signed URL.
- Click Add to create the Action.
Notes:
- You can view all objects of the Action by right-clicking it and selecting Jump to source.
- It is good practice to provide information to others in the Documentation tab of the Action workflow to help identifying your content.
- Learn more on how to configure a REST Action by reading the following use case: Creating your First REST Action
Creating Composite Actions
Sometimes you may want to create Actions which make sense not only on their own, but also in combination with other Actions. This is where Composite Actions come into play. They avoid wiring work for every new instance of that combination.
Watch the video:
To Create Composite Actions
- Navigate to the Process Assembly perspective and click the Packs tab.
- Click the Pack where you want to create the Action or create a new one. (For more information see the Creating Packs section).
- Click Add Action. The Add Action window is displayed.
- Select the Composite Action type.
- Enter a Title for the Action. The Name for the Action is suggested automatically.
- Enter a new Category for the Action or select an existing one from the drop-down list. Categories are used to group and easily find the Actions and are displayed on the Actions tab.
- Click Next to confirm the creation of the Action.
- Re-validate your input and click Add to create the Action.
Notes:
- You can view all objects of the Action by right-clicking it and selecting Jump to source.
- It is good practice to provide information to others in the Documentation tab of the Action workflow to help identifying your content.
- Learn more on how to configure a composite Action by reading the following use case: Creating your First Composite Action.
Cloning Actions
The cloning functionality of the Action Builder allows you to save time when creating Actions which are similar to existing ones.
Note: Cloning an Action results in all objects that directly belong to it (Includes, PromptSets, Workflows) to be copied. Cloned Actions can be used independently.
To Clone Actions
- Go to the Process Assembly perspective, click the Action Packs accordion tab in the sidebar.
- Select an Action Pack. The list of available Actions is displayed.
- Right-click an Action to select Clone. The Clone Action dialog is displayed.
- Select the Pack where you want to save the cloned Action.
- Optionally, change the title for the cloned Action.
- Click Clone. The cloned Action is displayed in the list.
Important! Actions can only be cloned provided the SEARCH_SCRIPT_FOR_USAGE setting in the UC_CLIENT_SETTINGS Vara is set to Y.
- Go to the Process Assembly perspective and click an Action Pack.
- Select an Action and click Delete.
Using In-line Documentation for Actions
- Go to the Process Assembly perspective and click an Action Pack.
- Double-click an Action.
- Open the Documentation tab.
Troubleshooting
| Error | Solution |
|---|---|
|
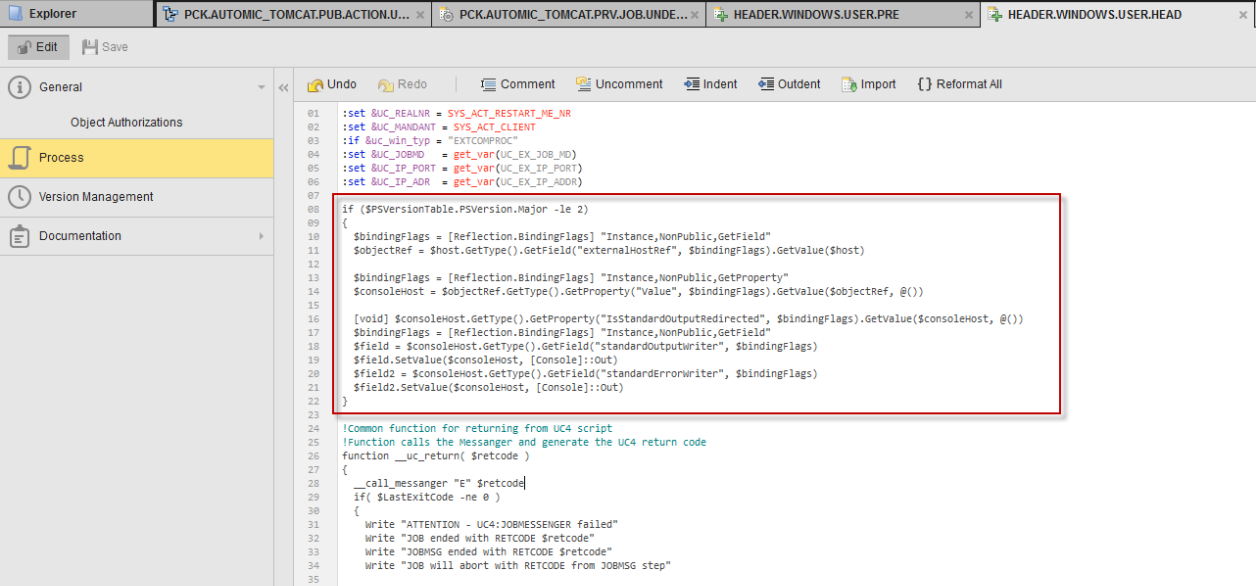
An error message is displayed when running a Runbook Action with Powershell v >=3.0. For example: __uc_return : The term '__uc_return' is not recognized as the name of a cmdlet, function, script file, or operab path is correct and try again. At C:\temp\test.ps1:75 char:3 + __uc_return( 9999 ) + ~~~~~~~~~~~ + CategoryInfo : ObjectNotFound: (__uc_return:String) [], CommandNotFoundException + FullyQualifiedErrorId : CommandNotFoundException |
Add the following if script (in bold) to the HEADER.WINDOWS.USER.HEAD object to ensure that your actions can execute with all versions of PowerShell: if ($PSVersionTable.PSVersion.Major -le 2) { $bindingFlags = [Reflection.BindingFlags] "Instance,NonPublic,GetField" $objectRef = $host.GetType().GetField("externalHostRef", $bindingFlags).GetValue($host) $bindingFlags = [Reflection.BindingFlags] "Instance,NonPublic,GetProperty" $consoleHost = $objectRef.GetType().GetProperty("Value", $bindingFlags).GetValue($objectRef, @()) [void] $consoleHost.GetType().GetProperty("IsStandardOutputRedirected", $bindingFlags).GetValue($consoleHost, @()) $bindingFlags = [Reflection.BindingFlags] "Instance,NonPublic,GetField" $field = $consoleHost.GetType().GetField("standardOutputWriter", $bindingFlags) $field.SetValue($consoleHost, [Console]::Out) $field2 = $consoleHost.GetType().GetField("standardErrorWriter", $bindingFlags) $field2.SetValue($consoleHost, [Console]::Out) }
|
See also:
- Action Best Practices
- CA Automic Community: Running batch commands
- CA Automic Community: About exporting single Actions
- CA Automic Community: Finding/listing Automic Actions used by an Application