Working with Queues
As a Application Developer, you can create Queues to group Workflow Executions that need to run repeatedly and in a specific order within a planned timeframe.
Important! The actions that you can perform depend on your folder permissions. See: Assigning Release Automation Permissions.
This page includes the following:
Queues are containers for workflow executions. Queues are intended to run repeatedly within a planned timeframe. The assigned workflow executions are grouped together and processed one after another when the current queue run starts.
Workflow executions within a queue typically have similar purposes or reasons. As an example, a queue named "daily deployments" is used to schedule deployments to a certain environment to be executed within a daily maintenance slot. When the queue run starts, all workflow executions assigned to it are processed one after another.
Some typical scenarios where Queues can be used are:
Fully automated, recurring deployments
Example: the deployment of daily builds to the development system. In this scenario a queue is created for a daily run over night, for instance at 02:00h. The build server is configured to generate a new build, for instance at 01:00h. Additionally the build server is configured to create an execution for it via the deployment service and link it to a queue.
Semi-automated, recurring deployments
Example: weekly deployments to the test system. In this example, deployments to the test system are performed once per week at a certain time. For these deployment cycles a queue is created with a corresponding schedule. Once the packages are ready, an execution is created for them and linked to the queue with which they will be deployed automatically.
Manual execution of a collection of deployments
Example: a set of executions is created but their start time is not yet defined. In this case, the executions are collected in a queue run which is manually started once the time has been fixed.
Prerequisites for Using Queues
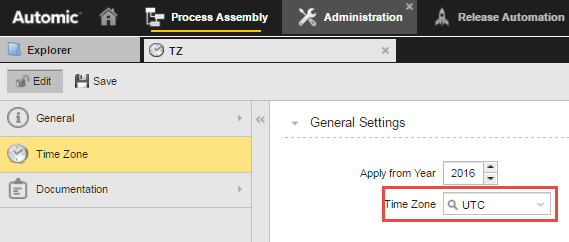
Important! In order for queues to run, the TZ.UTC TimeZone object configured by default in the integration.config file (config <add key="AutomationEngine.UTCTimezoneName" value="TZ.UTC"/>) must exist on the AE client. The Time Zone selected in the General Settings section must be UTC.
Queues are managed within the Queuesmain section of the Release Automation perspective.
From the Queues view you can:
- See a list of Queues you have read access to.
- Edit the properties of a Queue from the sidebar.
- Trigger the most common Actions from the Toolbar.
- Click the left icon or hover over the Queue name on the column header to access its full functionality.
Tip: For more information about how search for entities and narrow down the results, see Advanced Search.
- Select the Queues tab in the Navigator pane. The Queues list is displayed.
- Click the Create button in the toolbar. The Create Queue dialog is displayed.
- Enter a name for the Queue.
- Assign the folder to store the Queue.
- Enter the owner of the Queue. The current user is selected by default.
- Click Create.
Note: By default the queue state is set to inactive for the newly created queue.
Queue Runs are intended to start automatically or manually on an individual, automated start time. You can create the following Queue Runs:
-
Recurring queue runs
This type is typically used for maintenance windows, which are frequently executed automatically in a certain interval, for example, weekly hotfix deployments.
-
Manual queue runs
This type can be used to simply collect workflow executions and execute them all together but in a certain order.
-
Individually scheduled queue runs
This type focuses on queue runs that are not frequently executed and are scheduled a long time in advance, for example, a release cutover weekend.
Automatic Start
The scheduled workflow executions will start when all of the following conditions are fulfilled:
- The specified start date on which the first run should start is reached.
- The weekday and the start time (recurrence and start time setting in Schedule Panel) of the queue run is reached.
- All approvals are done.
- Manual confirmation (if specified) is done.
When all conditions are met, the processing of the queue run starts automatically.
To Start the Current Queue Run Manually
- From the Monitoring list select the queue run.
- To initiate the run you have two options:
- Right-click the queue run to open the context menu and select Run.
- Click on the Run button in the toolbar.
- Click Yes in the Run dialog to confirm the action.
To Start a Queue Run Individually
- Go to the Queues list.
- Select a queue.
- In the Schedule pane of the sidebar enable Activate automatic start.
- Select the Schedule queue runs individually option.
- Click Save.
Note: You can also plan individual queue runs from the Deployment Calendar.
Processing Queue Runs
When a queue Run is started, its state changes to "Processing". In fact, one of the two states are presented to the user: Waiting or Execution Processing.
-
Execution Processing State
In this state the scheduled executions are processed. You can supervise and control Workflow Executions using the Workflow Monitor.
-
Waiting State
A Queue Run in this state waits while the next execution to be processed is waiting for approval, manual confirmation or both.
After the waiting timeout has been reached (default: 1 hour) the processing of the queue run is canceled and all remaining executions change their state to "failed".
Activating/Deactivating Queues
Every queue can be activated or deactivated.
Active State
This is the most the common state. In this state the queue is active, executions can be scheduled in it and you can start the queue run.
Inactive State
The queue is stored but either not yet finished in its configuration, deactivated because of manual interaction or deactivated automatically because of its last run.
Note: No new executions can be added to a queue in inactive state.
Change State
Activate or deactivate queues as follows:
- Right-click the queue in the queue list and select Activate or Deactivate in the context menu
- Click the Activate or Deactivate button in the Actions section
Depending on the state of the queue, the action buttons Activate or Deactivateare displayed.
Editing the Properties of a Queue
To change the properties of a Queue you can use one of the following:
- The Queue Sidebar next to the Queue list.
- The Properties section of a Queue.
You can change the following Queue properties:
-
Basic attributes of the Queue. You can edit the following properties:
- Name
- Folder
- Owner
- Default duration: the duration picker can be used to set hours and minutes. The maximum duration is 24 hours.
-
The description is limited to 4000 characters.
-
Within this section you can configure the following settings:
- Activate automatic start: activates/deactivates the radio button group for the definition of the queue run scheduling type. If not set, the queue runs have to be started manually.
If the "Activate automatic start" setting is checked:
- Schedule queue runs individually: activates/deactivates queue runs with an individual schedule. This option is selected by default when the "Activate automatic start" option is checked.
- Schedule recurring queue runs: activates/deactivates queue runs with a recurring schedule. If selected, the input elements for the recurrence options are shown, otherwise they are hidden.
- Start time: start time of each queue run. Mandatory if the "Schedule recurring queue runs" option is selected.
- Recurrence pattern: recurrence of the queue run. At least one checkbox must be selected. Mandatory if the "Schedule recurring queue runs" option is selected.
- Start date: date on which the first run should start. Default: Current date. Mandatory if the "Schedule recurring queue runs" option is selected.
If the "Schedule recurring queue runs" setting is checked:
- No end date: this option sets the queue to run in an endless loop (selected by default).
- End after: this option sets the queue to automatically end after some runs. If selected, the "Occurrences" text box has to be populated too.
- Occurrences: The "Occurrences" value must be greater than the number of queue runs executed since the last time the queue was activated.
- End by: the queue automatically ends at the specified date. If set, the datepicker "end date" has to be set too.
- End date: defines the end date of the queue. Default: Start date + 1 month. Only enabled if the corresponding option is selected.
After changing values, click the Save button to save the changes or click Cancel.
-
Current Run / Next Queue Runs/ Past Queue Runs
- Current Run: executions scheduled for the current run (the one that will be executed on the next start event).
- Next Queue Run: executions scheduled for the run after the current run.
- Past Queue Runs: already finished executions.
-
Actions are located in the toolbar. They can be also triggered from the context menu displayed after right-clicking the entity. You can trigger the following actions (depending on your permissions):
- Depending on the state of the queue, the action buttons Activate or Deactivate are displayed: to activate or deactivate a queue
- Delete: deletes a queue
- Archive: archives the selected entity. If an entity is archived, Restore is available (see also: Archiving Entities)
Assigning Workflow Executions to a Queue
When you schedule a workflow execution to a queue, the execution is added to the current run by default. Only if the current run of the queue has already been started (states: processing, pausing after current, paused) the execution is added to the next run.
The are two ways to assign a workflow execution:
From a Workflow:
- Start in the Workflow List or from a detail view.
- Click the Execute button. The Schedule Workflow Execution dialog opens.
- In the starts section select the In queue... radio button.
- Click Execute.
As a result, you have assigned the workflow execution to the current run of the selected queue.
Note: If a queue has already been selected the selection of the deployment profile does only show those deployment profiles having the selected queue assigned.
If a deployment profile has been selected the select box of the queue does only show queues that are assigned to the selected profile.
From a Queue:
- From the Queue List select a queue.
- Click on Go to details > Runs.
- Click the Create button to open the Select Workflow dialog (see screenshot below).
- Select the workflow to be executed and click the Select button.
Now the selected workflow is assigned to the current or later run of the selected queue.
Note: The queue has to be activated before assigning workflows.
Right-click the entity and select Delete.
Note: You may only delete the entity when you have the appropriate permission on the containing folder (see Security Concept in CDA) and all of the listed conditions are met.
Conditions to delete entities of type Queue
- Is not running
- Has no executions
- Not used in execution template
See also:
- Monitoring Executions and Queue Runs
- CA Automic Community: How to use a queue to customize an execution.